Ice dying is one of the most straightforward fabric dyeing techniques, and one of the easiest to try at home. It is also one of the most exciting techniques to try, as you never know the exact result you will achieve until the process is complete.

The process I used to create the ice-dyed fabrics shown in this post is based on the ice-dying instructions from Dharma Trading Company. I strongly recommend referring to these instructions for your ice-dyeing projects.
Gather Ice Dying Supplies
Most of the supplies you need are readily available at grocery stores and big-box stores. The two specialty items, Soda Ash and Fiber Reactive Dye, are available in art supply stores such as Blicks and can be easily ordered online from places like Pro Chem and Dye or Dharma Trading. Here is what you need:
- Soda Ash to make the dye permanently stick to the fabric
- Fiber Reactive Dye for color
- Cotton Fabric works with fiber-reactive dyes (If you want to dye other fibers, such as silk, wool, or nylon, you will need to use dyes and chemicals intended for those fibers.)
- Bucket to mix soda ash solution
- Bin to catch the dye run-off.
- A grate that lies on top of the bin to keep the fabric elevated. Cooling racks are great for this
- Ice of any type, but you will need a few pounds for each piece of fabric
- Plastic spoons for dye
- Plastic bags to put fabric in while it cures. Grocery bags or trash bags work well for this purpose.
- Gloves to keep you from changing colors. Medical/food gloves, as well as dishwashing gloves, are all suitable for this technique.
- Mask to prevent breathing in dye particles
Important: Any item used for fabric dying is no longer suitable for use with food!
Prewash Your Fabric or Other Dyables
Ensure you use cotton fabric for this dyeing project. Plant-based fibers, such as cotton, require different dyes, chemicals, and processing methods than animal-based fibers, like wool or silk, or synthetic fibers like nylon or acetate. (And polyester isn’t anything most home dyers have any desire to deal with.)
Fabrics come to you with various chemicals and finishes, and it is crucial to wash these out to allow the dye to properly penetrate the fibers and achieve the best possible color.
Ideally, you will use a dyer’s detergent, if available, but your regular detergent will also work. Whatever you do, just don’t use fabric softener! We are trying to eliminate added chemicals, not reintroduce them.
I just run my fabric through a standard cycle in the washing machine, and it is ready to go. You don’t even need to dry the fabrics, because our next step is to get them wet again.
Soak Materials in Soda Ash
Now that we are using chemicals, you will want to wear gloves from now on.
All dye processes require a mordant, which causes the dye’s pigment to adhere to the fabric in the long term. For ice dying, soda ash serves this purpose.
In a bucket or large tub, mix your soda ash with warm water. I’ve read instructions with varying proportions, but I typically use one cup of soda ash to one gallon of water. Stir the mixture until the soda ash completely dissolves.
Soak your fabric or other cotton dyables in the soda ash mixture for at least 20 minutes.
Set Up Your Dying Bin
While your fabric is soaking, you can set up the bin you will use for dying. Shallow dish bins or storage bins work well for this process, but any container that can catch the liquid dye runoff and support the grate is suitable.
Place your grate over the top of the bin, and you are ready to dye.
Alternatively, you can purchase a cooling rack with legs that stand a few inches off the ground and place the grate inside a larger container. This is the cleanest way to do this process, but I’m typically outside in an area where some dye spillage doesn’t matter. Always choose the method that works best for you and your space.
Choosing the Ice for Ice Dying
Different ice can yield different dying results. I typically buy a large bag of ice from a grocery store or convenience store, but you can experiment with ice made at home or obtained from another source. You can even use snow in the wintertime!
The type of water used to make your ice can affect the ice-dyeing results. How your city treats its water and where it is sourced can make a significant difference. If you, like me, have well water, the minerals in it can also impact the results.
Even the shape of your ice can alter the results since the way it melts can cause the dye to move differently. I like the effects I get from store-bought bags of ice, but I’ve heard crushed ice is particularly fun to work with, so I hope to try that someday.
Selecting Dyes
In traditional dying processes, you carefully dissolve the dyes in water before adding the fabric to ensure even color distribution. Ice dying breaks all of these rules because one of the goals is to have the dye pigments break apart to create unique designs.
There are dozens of dye colors to choose from, and my two favorite sources are Pro Chem and Dye, as well as Dharma Trading. As ice-dyeing has become more popular, both companies have added charts to their websites showing how different dyes react to the ice-dyeing process.
These charts are very helpful, but it is also fun to experiment. I have found that dyes using pure color, particularly in the primary colors, break apart less than colors that may be expected to have a mixture of pigments. Muted colors as well as black and grey dyes tend to break apart into several, often unexpected, colors.
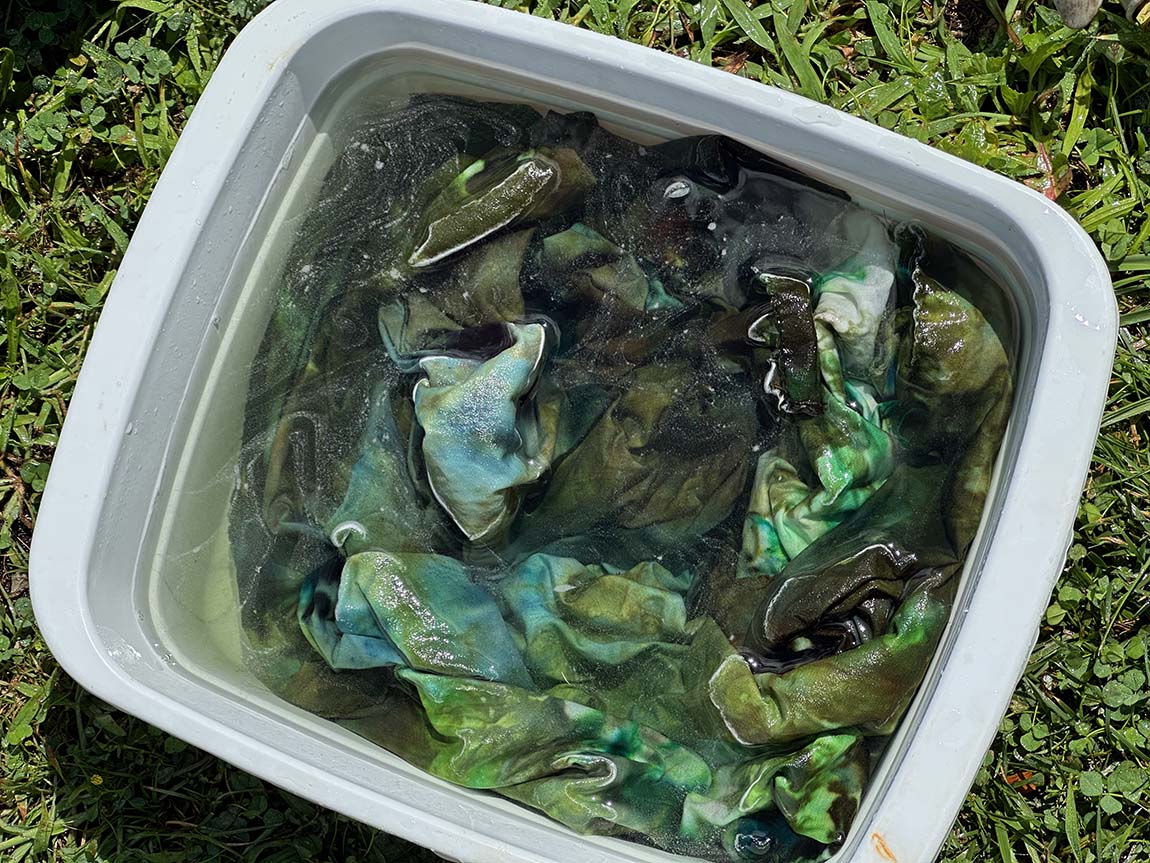
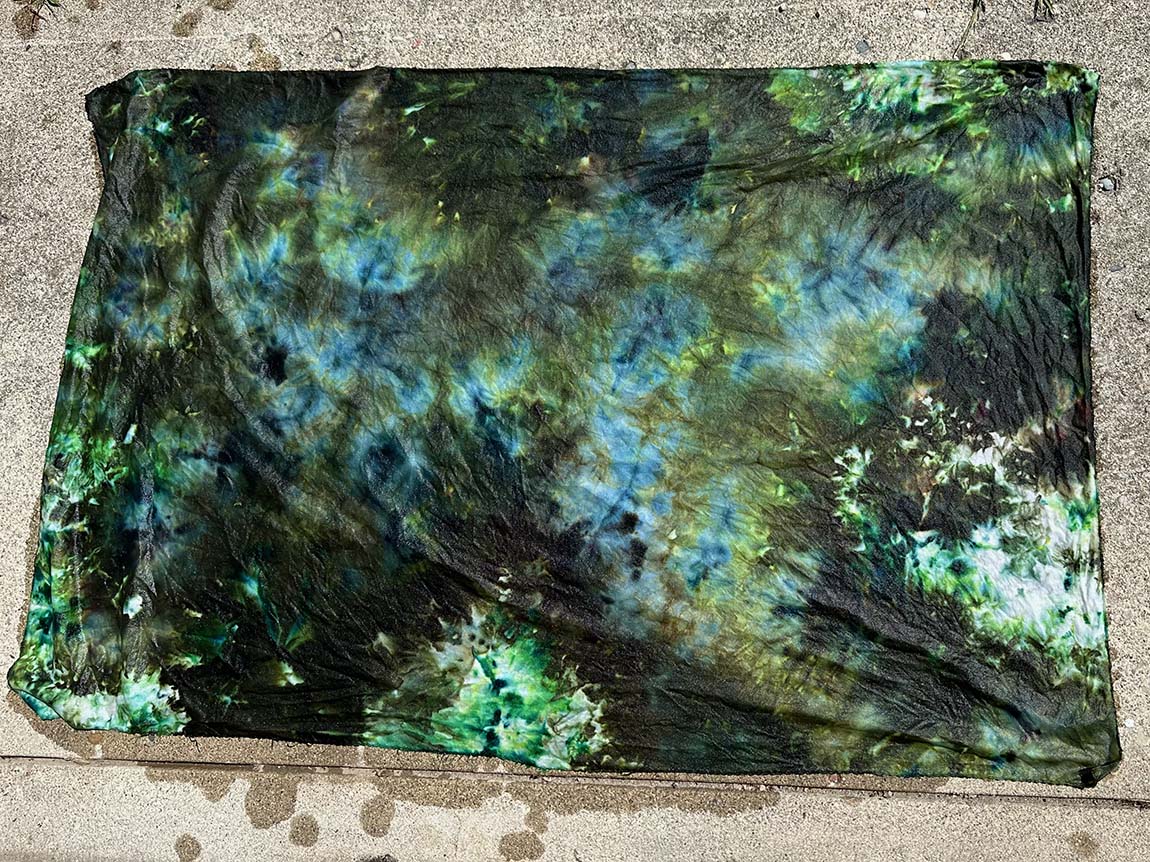
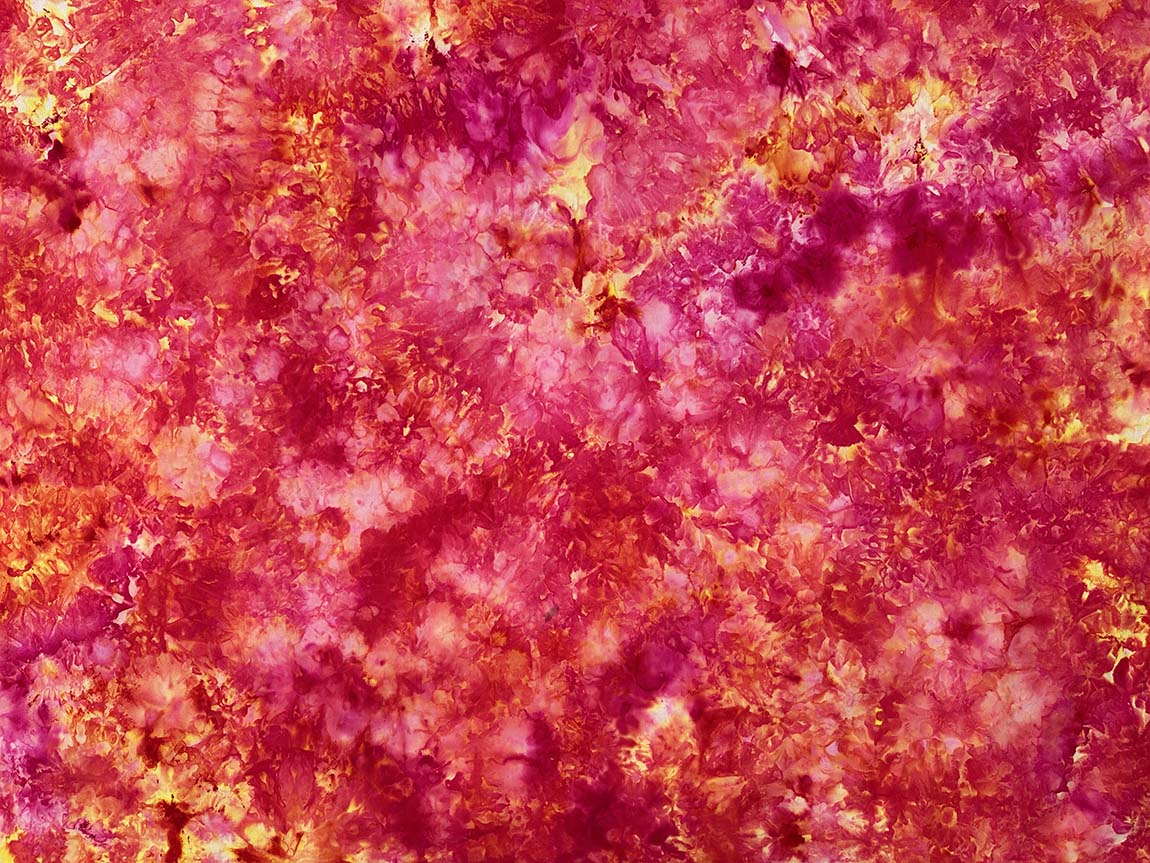
I typically select two dyes to use on each piece of fabric. For this round of dying, I did three pieces of fabric using:
- Salmon Mousse and Fuchsia
- Olive and Brightest Green
- Nickel and Lilac
Fabric Placement
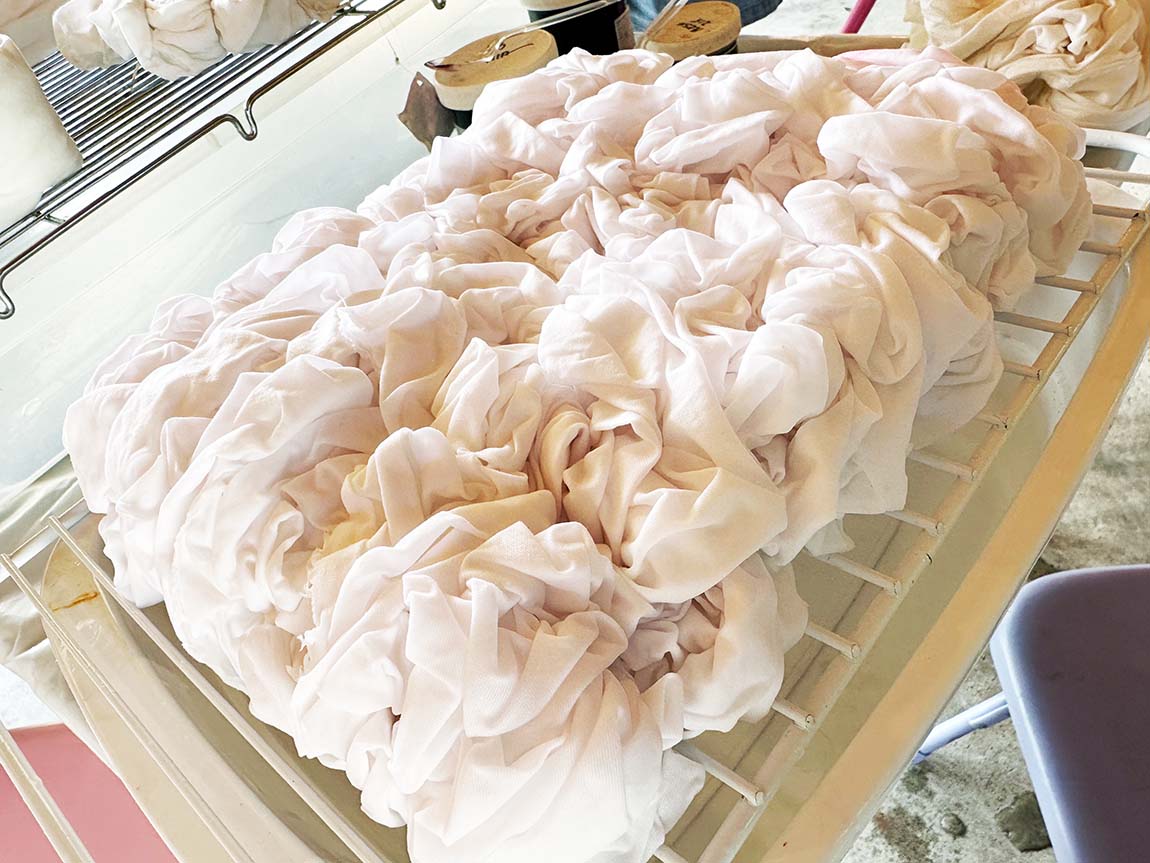
Once your fabric has soaked in the soda ash solution for at least 20 minutes, remove each piece and squeeze out the excess solution. You want your fabric wet, but not dripping, for the next step of the process.
The position of your fabric on the grate will partially determine how the designs are created. You don’t have a great deal of control over ice-dying results, but fabric placement does matter. Ensure you are working with one layer of fabric at a time, and scrunch the fabric evenly on the grate. The fabric can be up to a couple of inches thick. I have found that a grate over a dishpan easily holds 1-3 yards of fabric, but you can also use smaller pieces.
Note: If you want to have more control over the ice-dying motifs, you can do directed tucks, folds, and rolls that you would frequently find in tie-dying.
Adding the Ice and Dye
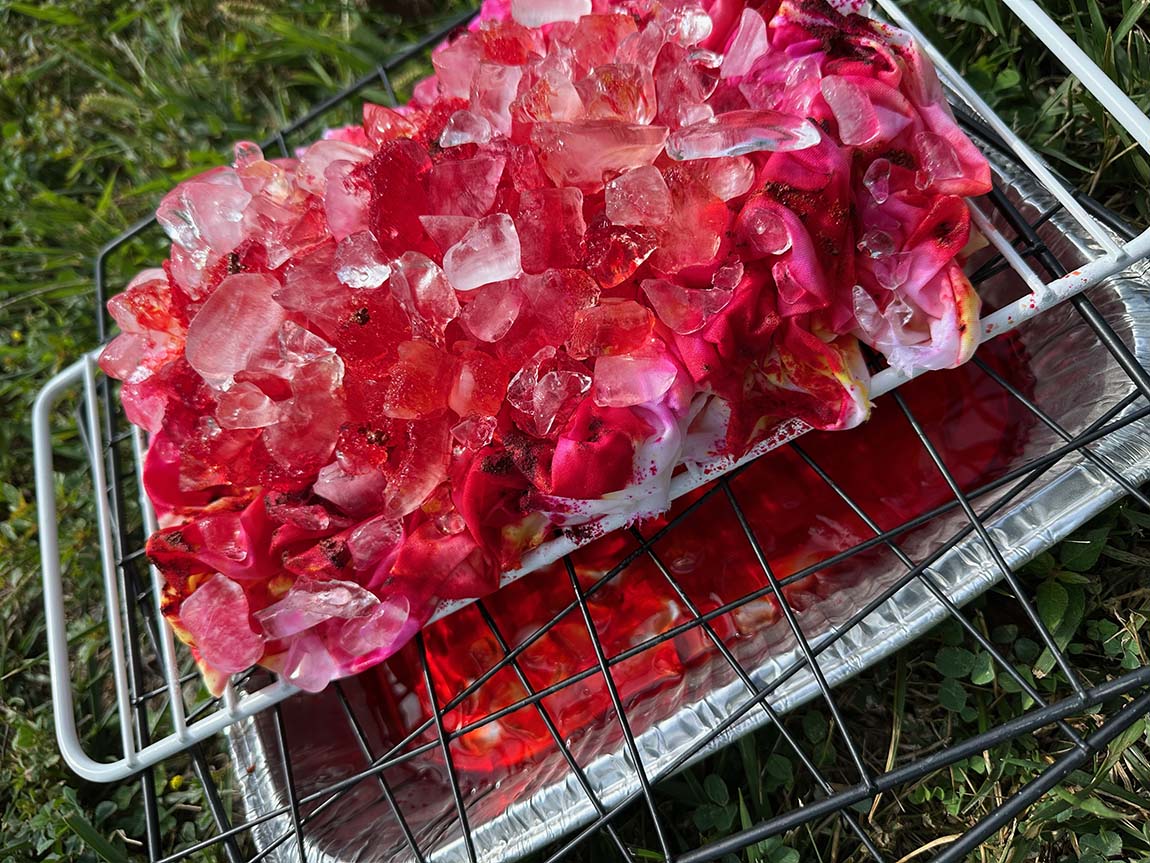
Once your fabric is positioned, pile ice on top of it, and don’t be afraid to use a lot! I like at least a couple of inches of ice on top of most of the fabric. Try to cover most of the sides too, but don’t worry about some exposed fabric here and there- a bit of white can add a lot to the overall design.
Note: A friend mentioned using strips of cardboard around the edges of her ice-dying to help hold the ice in place, which may be helpful, especially on more open grates.
Before using dye, make sure you are wearing a mask. Pigments are pretty, but you definitely don’t want them in your lungs.
A little dye goes a long way. I dip the tip of a plastic disposable spoon into the dye container to get about a quarter teaspoon of dye at a time and sprinkle it across the top of the ice. If a little dye lands on exposed fabric around the edges, that is fine- it all contributes to the final design. I distribute my dye in areas around the ice surface and then fill in with my second color. Don’t feel like you need to completely cover the ice with dye. The more times you do this technique, the more you will discover about the dye amounts you tend to prefer.
Wait
There are two parts to the waiting process: watching the ice melt and allowing the finished piece to cure.
Once your dye is on top of the ice, you wait for everything to melt. I sometimes add a bit more ice about halfway through the melting process if I notice some small clumps of dye-goo forming that look like they may need a little more liquid to help them dissolve. A few cubes will usually suffice, and this step is completely optional, a matter of personal preference.
If your fabric appears to be drying out before the ice is completely melted, you can cover your bins with pieces of plastic dropcloth to retain the moisture.
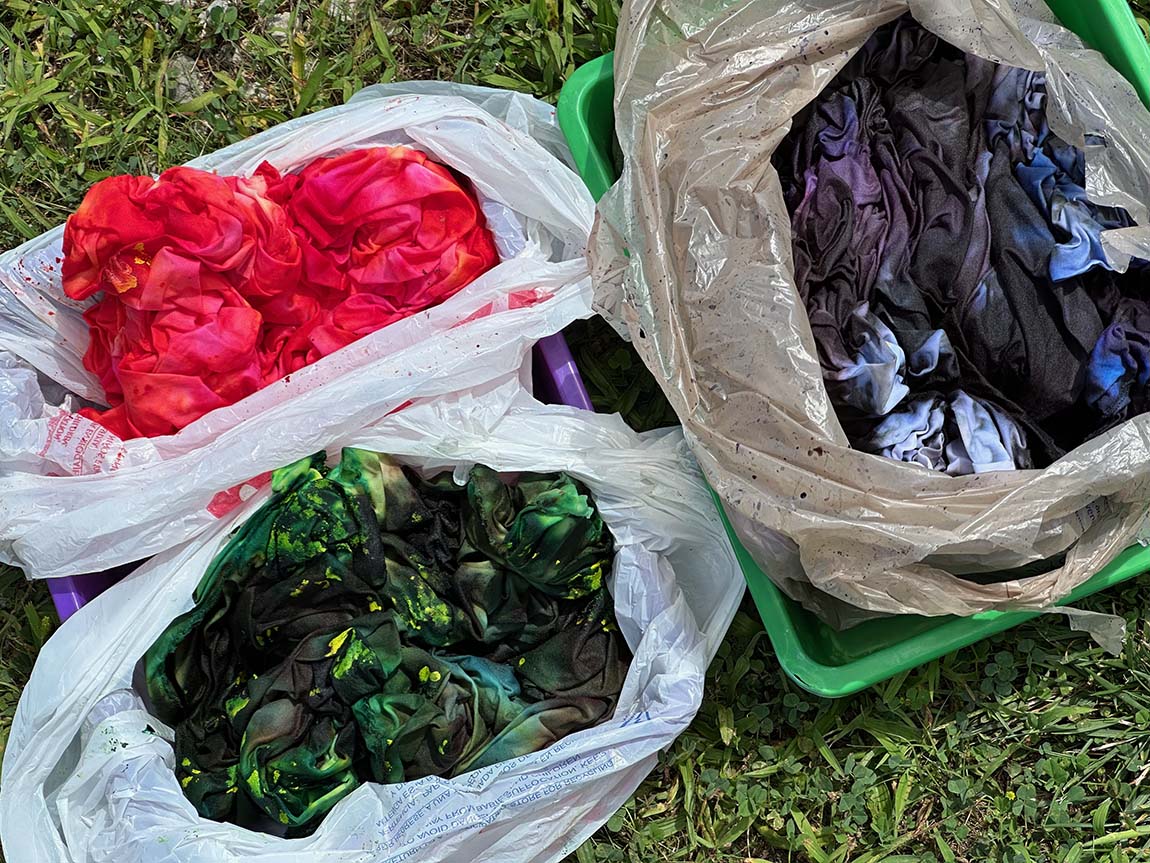
Once everything is melted, transfer your fabric into plastic bags to cure for at least 24 hours. Keep the fabric scrunched up in its original position as much as possible during this transfer to keep the designs created during the ice-dyeing process. (Resist the temptation to spread out the fabric at this stage!)
Rinse Your Ice Dying
The most hands-on part of ice dying is rinsing the fabric at the end of the process. Once your fabric has cured for at least 24 hours, remove it from the plastic bag and rinse thoroughly in a tub or bucket with cold water.
Rinsing outdoors with a garden hose equipped with a strong spray is the easiest way to remove most of the dye quickly, but you can also accomplish this step in a sink. It will take several rinses to get the water to run clear. At this point, I let the fabric soak in cold water for a few minutes. If the water still has visible dye, I repeat the process until it is mostly clear after a 5-10 minute soak.
Now you are ready to move to hot water. Hot water releases even more dye, but the fabric will release less dye than it did in the initial rinsing process. Rinse and soak as long as it takes to get clear water.
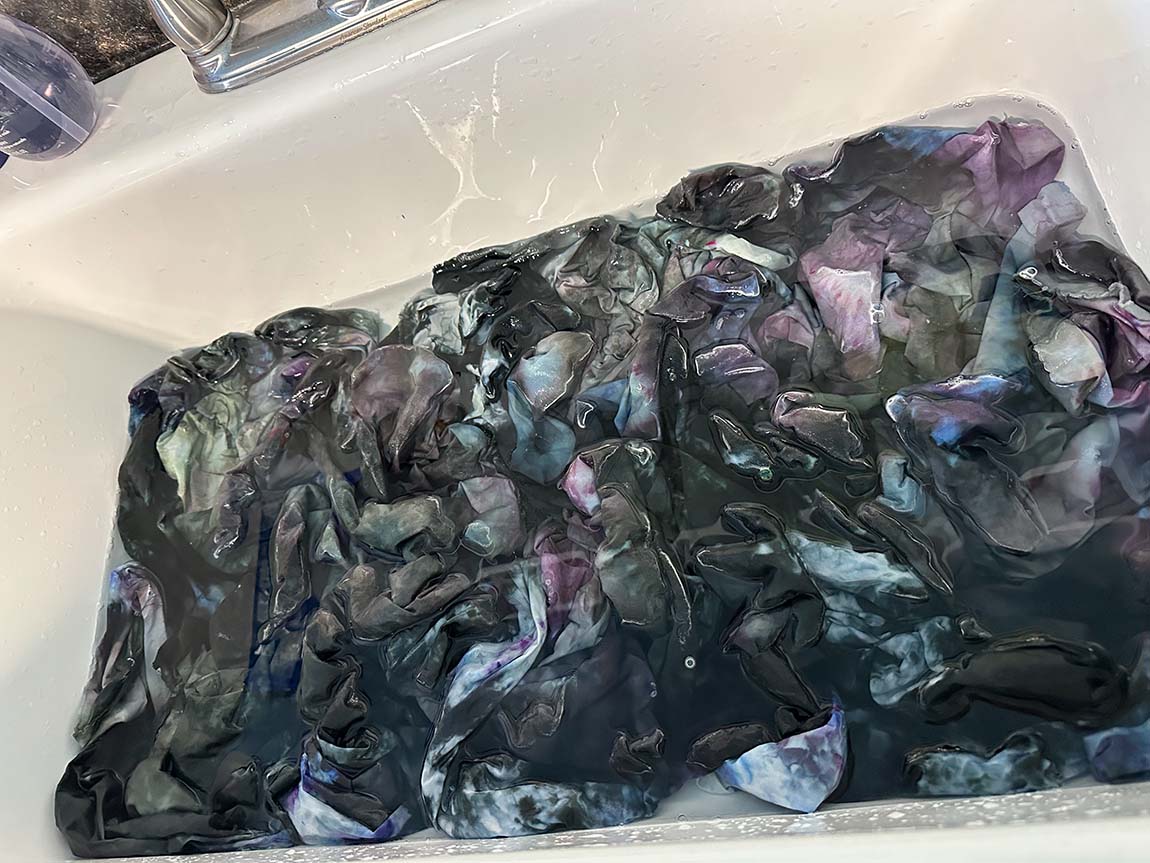
Sometimes, the different water temperatures will release different pigments. For instance, the piece of fabric I dyed with nickel and lilac released mostly red color towards the end of the cold water rinse, but mostly grey when hot water was introduced.
Wash your fabric with a dyer’s detergent and dry to complete the fabric.
Ice Dying Results
I always like ice dying that has lots of color splits, and all three of these pieces achieved that goal.
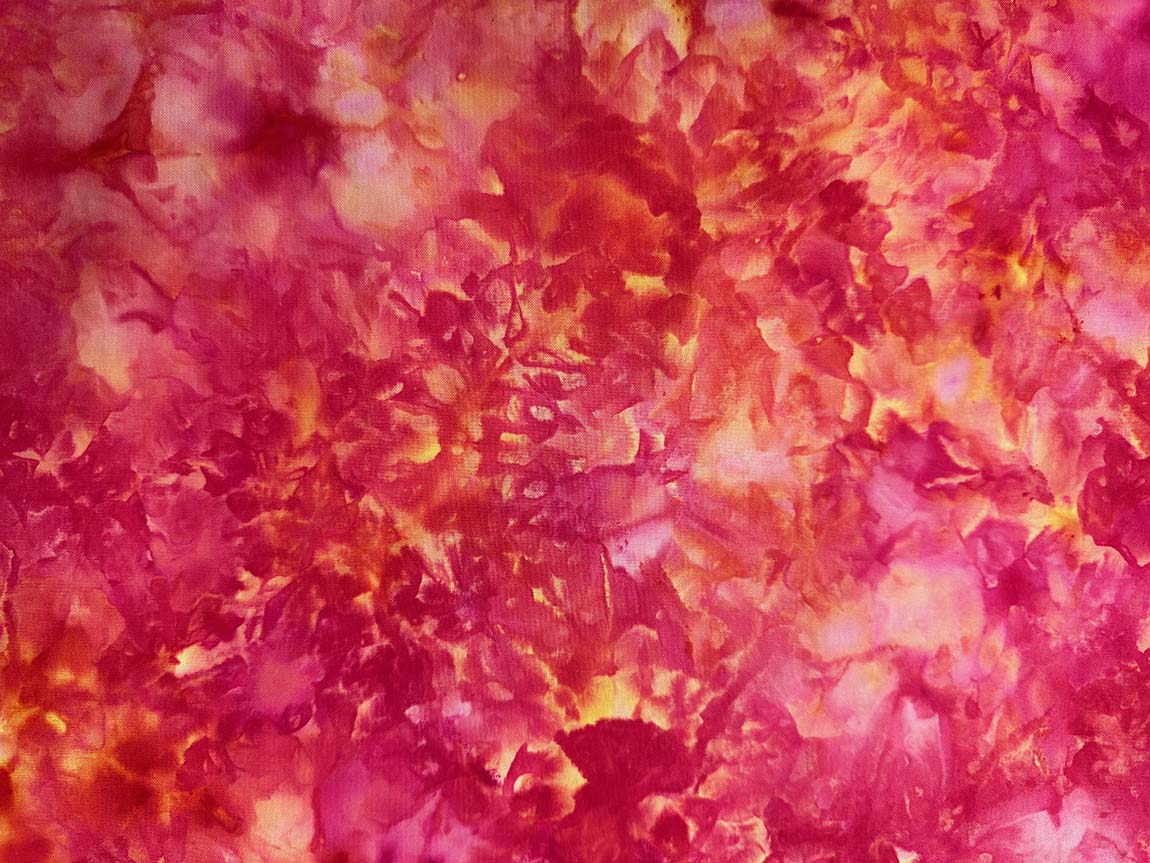
Salmon Mousse and Fuchsia resulted in an explosion of yellow, orange, and pink.
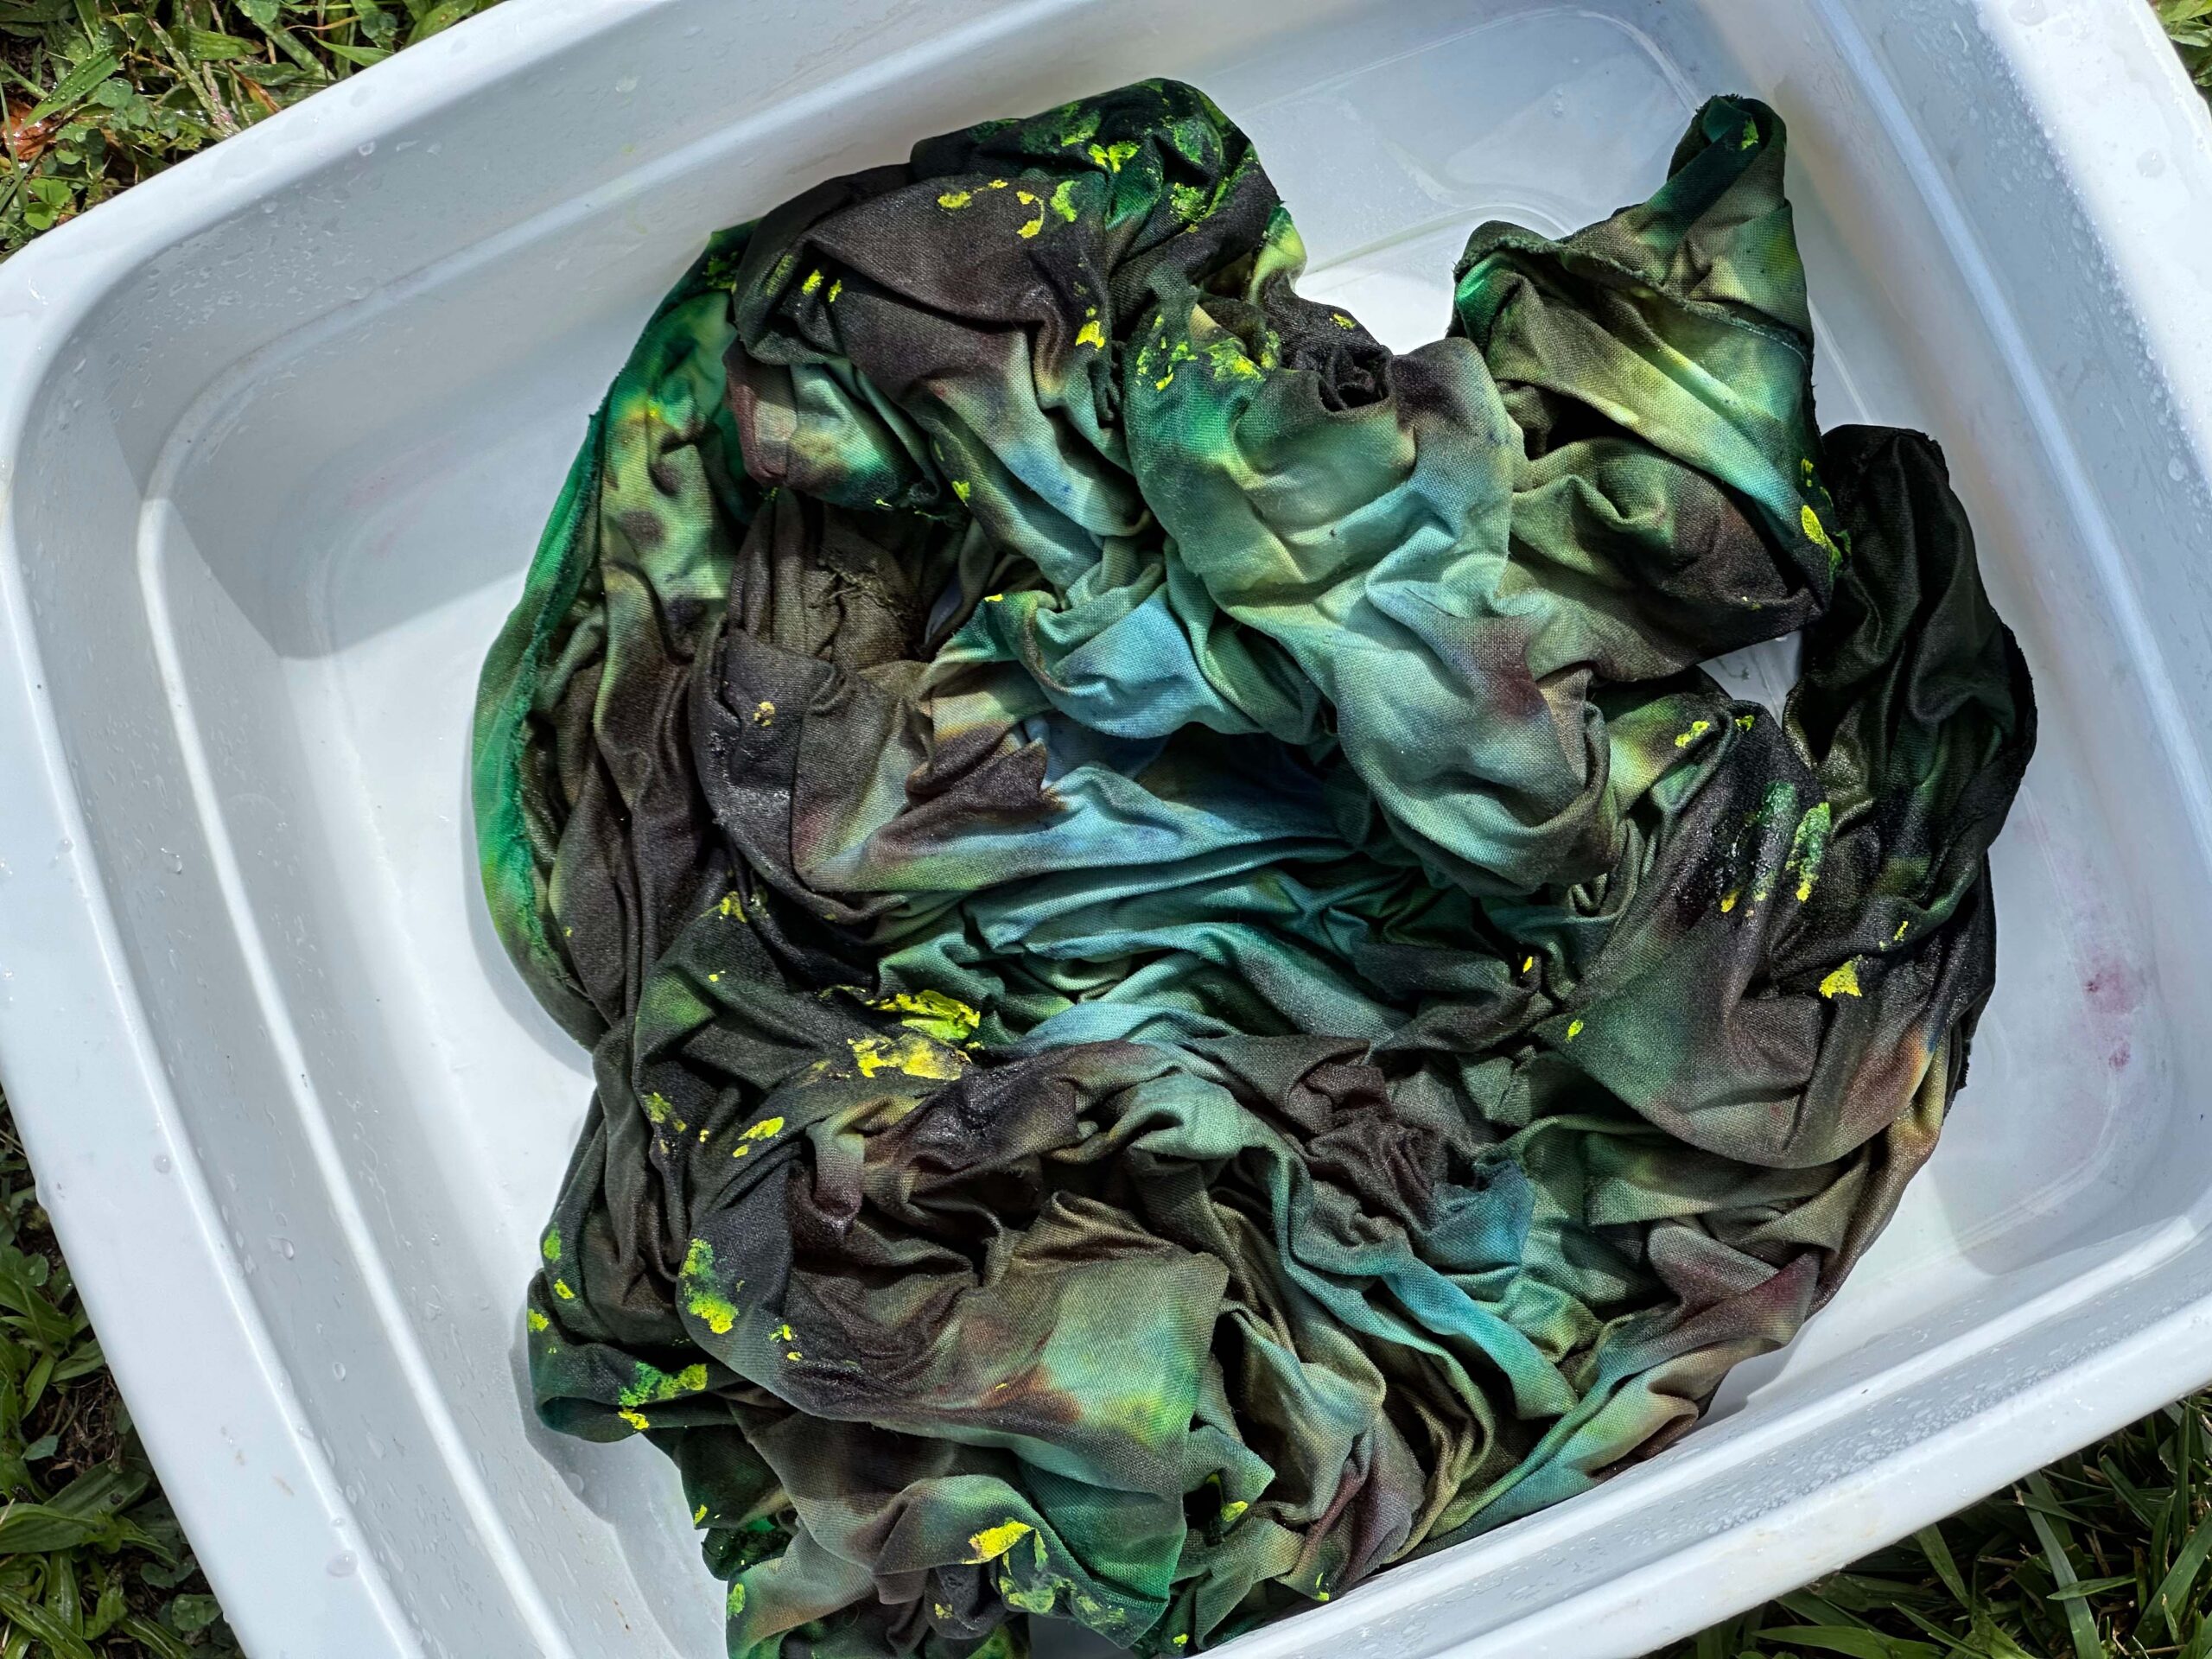
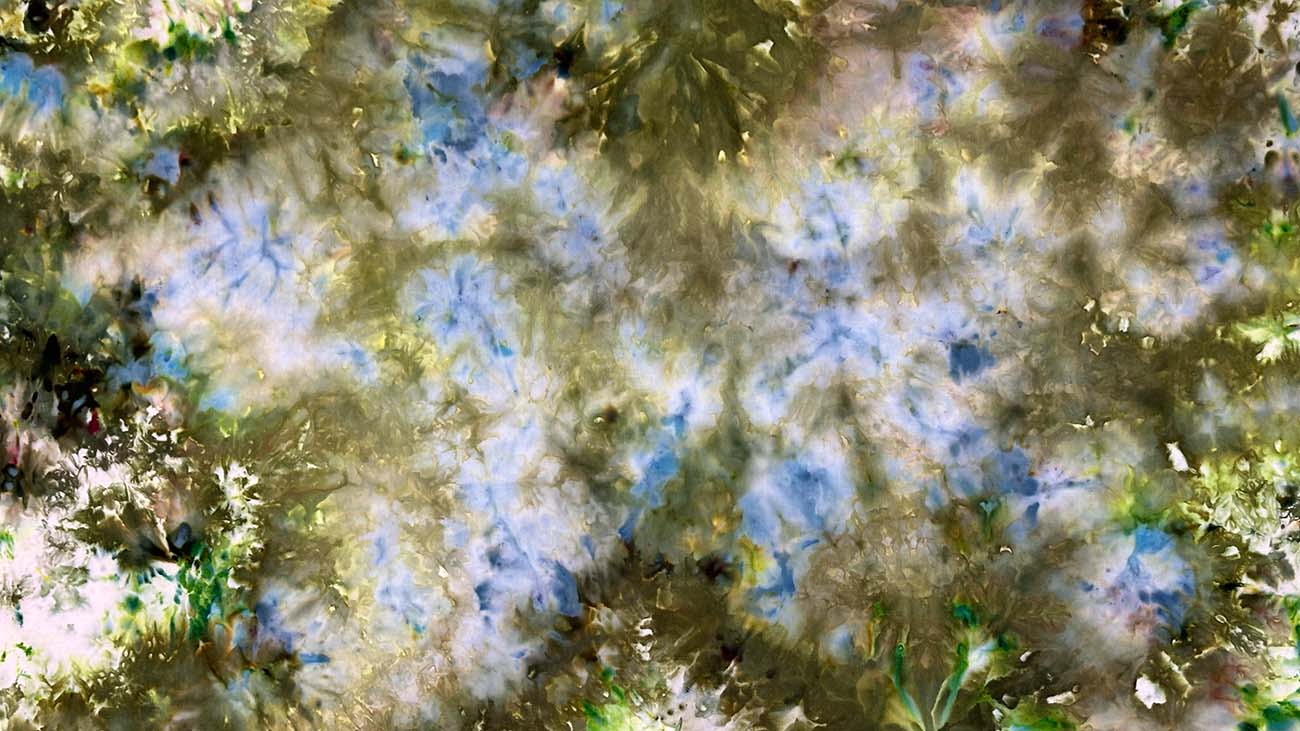
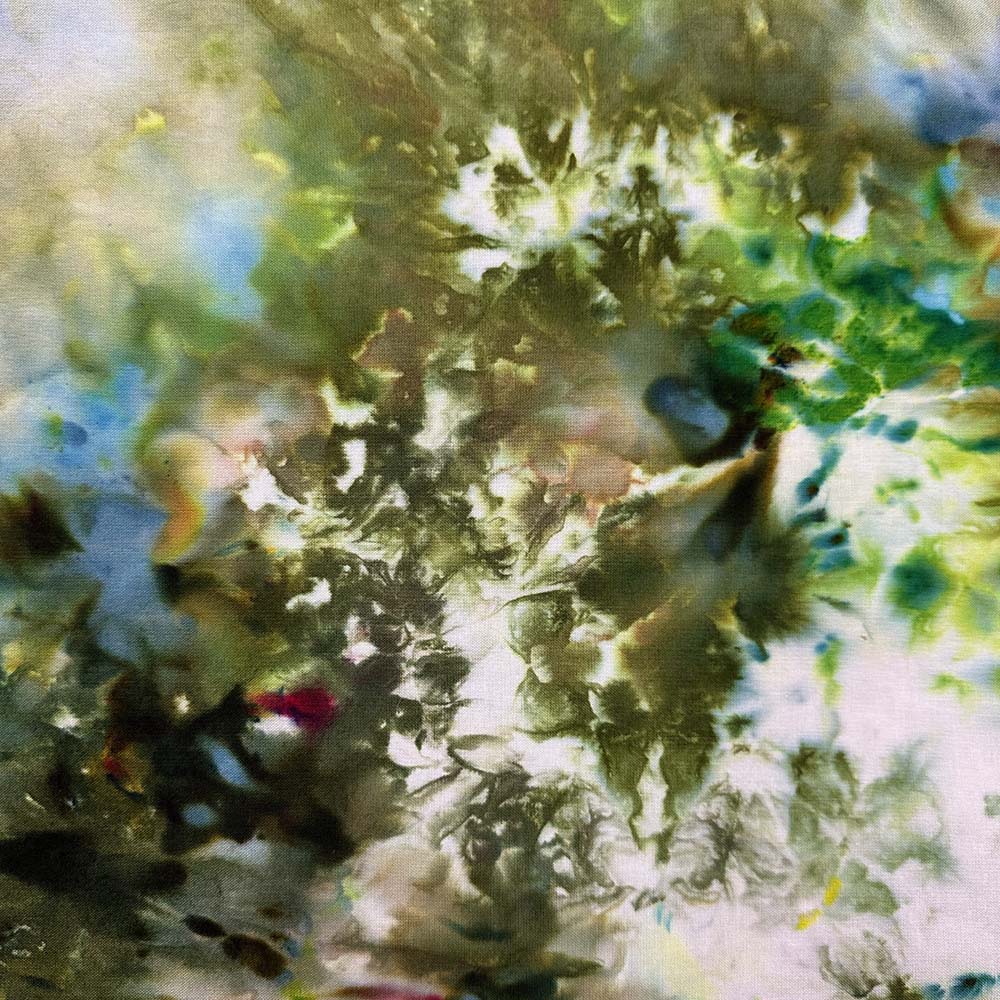
Olive and Brightest Green split in a way that reminds me of lying under a grove of trees and looking at the sky through the branches. It’s fun to see how much blue came out of a design that used only green dye.
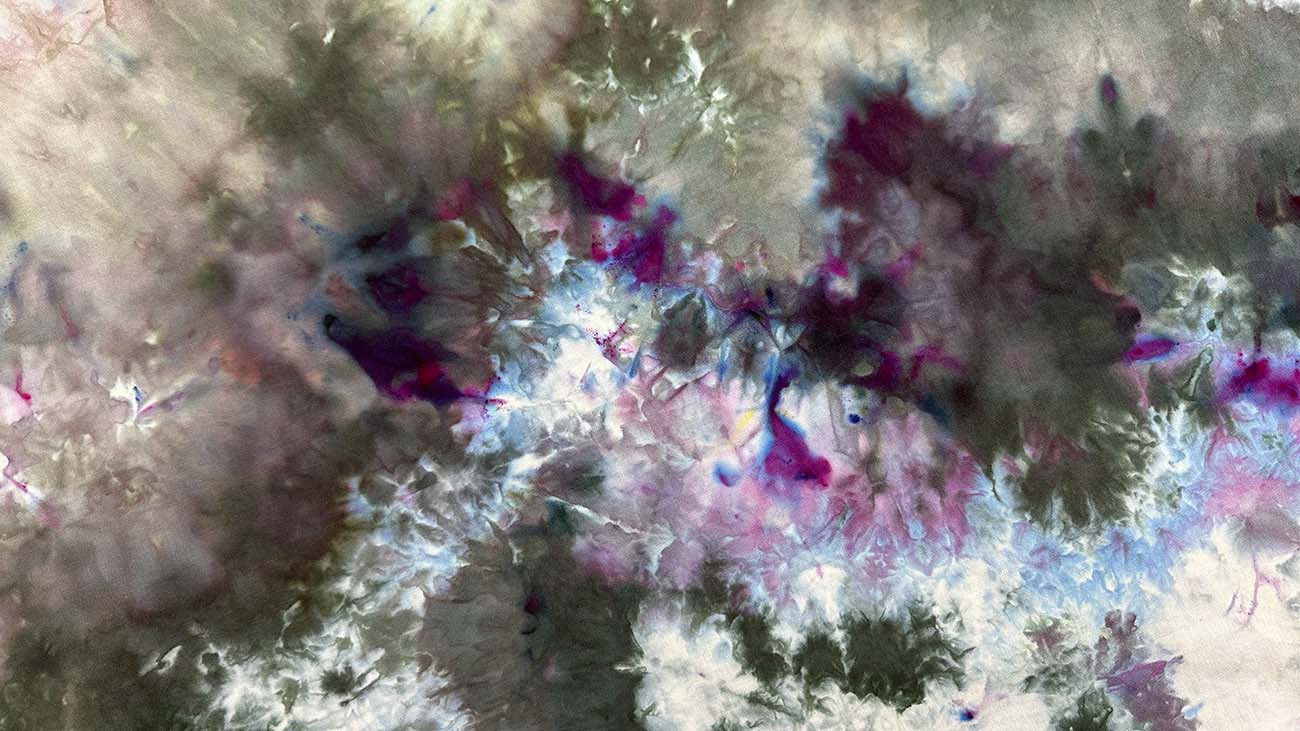
Nickel and Lilac resulted in a marbled look over much of the piece. This was the first time I ice dyed using three yards of fabric in a small space. I think this is about the limit for dying over a dish bin. The center of the fabric has fewer distinctive breaks, and I suspect this effect is the result of a larger piece of fabric.
Is ice dying something you would like to try? It’s a fun project to finish the Summer with!

No Comments