What happens when you run out of bobbin in the middle of a quilting line? How do you start and stop quilting so you don’t see the join?
This process is easier than you think, so let’s look at how it is done!

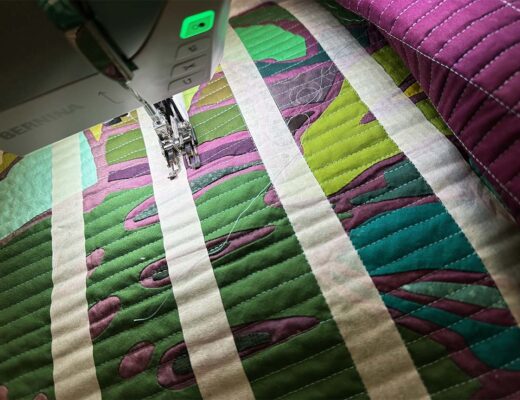
It’s frustrating to run out of bobbin thread in the middle of a quilting line, but it isn’t hard to make the join within the seam invisible on your finished quilt. In the video below, I share how I make my stitching lines appear continuous, even when I run out of bobbin in the middle of stitching.
When you realize your bobbin is empty, cut your top thread with a tail a few inches long. Gently tug on this tail to bring the remainder of the bobbin thread to the top of the quilt sandwich. When the bobbin thread is particularly short, repeat this process until you have a few inches of bobbin thread to knot and bury.
When you realize your bobbin is empty, cut your top thread with a tail a few inches long. Gently tug on this tail to bring the remainder of the bobbin thread to the top of the quilt sandwich. When the bobbin thread is particularly short, repeat this process until you have a few inches of bobbin thread to knot and bury.
Knot the Threads Near the Top of the Quilt Sandwich
To tie the knot, thread both the top and bobbin thread through the eye of a hand sewing needle. I like to use a side-eye or quick threading needle for this step.
- Position the tip of the needle near the quilt sandwich with the needle in your dominant hand.
- Using your non-dominant hand, wrap the center of the threads around the needle approximately three times.
- At this point, you can slide the needle up or down the threads to select the final position of the knot. You don’t want the knot extremely tight to the quilt’s surface because you want to have a small amount of slack when you bury the knot.
- Holding the knot in place with a finger pressed against the quilt, slowly and smoothly pull the needle and thread through the wraps to create the knot.
Bury the Ending Knot and Thread Tail
Next, we bury the knot and thread tail to secure the end of the stitching line.
- Starting as close to the final stitch and knot as possible, travel the needle between the layers of the quilt approximately an inch away from the end of your stitching line. Your needle will be under the quilt top, but it doesn’t show through to the backing of your quilt. You may or may not have gone through some of the batting.
- Pull the needle and thread through the fabric until the knot catches the fabric at the initial entry point.
- You want to pull the knot gently through the fabric at the end of the stitching line. Using the tip of the needle, take a stitch through just the quilt top near the knot and between the knot and the end of the thread. Use the needle in this position to create resistance and tug on the thread to pull the knot through the top layer of fabric. Remove the needle once you have buried the knot.
- To trim the end of the thread, gently tug on it to create a small bubble of fabric in the quilt top. Snip the thread as close to the quilt top as possible without catching the fabric. When the quilt top relaxes, the thread tail will hide between the layers.
Continuing the Line of Stitching
Once you have threaded your machine with a fresh bobbin, you are ready to continue quilting.
- To create a virtually invisible transition, leave several inches of thread tail on both the top and bobbin threads.
- Position your quilt sandwich under the presser foot, aligning the last stitch below the needle.
- Holding the top thread tail, turn the hand wheel on the side of the sewing machine towards you to lower the needle to the end point of the last stitch.
- Lower the presser foot to engage the machine tension, and use the hand wheel to complete the stitch while still holding onto the top thread tail. Make sure the needle is in the highest position at the end of this stitch.
- Raise the presser foot and gently tug on the top thread tail to pull the bobbin thread up to the top of the quilt sandwich.
- Holding firmly to both thread tails, use the hand wheel to lower the needle into the same spot at the end of the last stitch.
- Lower your presser foot and continue your stitching line. Make sure to hold onto both thread tails for the first 3-4 stitches to prevent unwanted knotting.
- When you have completed this line of stitching, knot and bury your thread tails with the same technique you used before.
Can you even tell where you ran out of bobbin thread?


No Comments