One of the most wonderful parts of this tote bag is that you can create the pattern to fit your personal needs. In this post we will go through the steps of drafting a full pattern for your bag. If you have never created a pattern before, you will probably be pleasantly surprised at how easy it is to do!
I have taught this technique in person many times, but this is the first time I have ever put it all down in writing. This is a crazy long post! I have tried to give the most clear directions possible, but if anything is confusing or you have questions please email me. I will do my best to help you through this process.
If you are just joining us, this is a 5 part series. Here are the other segments (links are updated as posts are added):
- Part 1: Gathering Supplies
- Part 2: Drafting Your Pattern (You’re here now!)
- Part 3: Cutting the Fabric
- Part 4: Assembling the Bag
- Part 5: Finishing Techniques
For the sake of clarity, the diagrams in this post are computer generated, but I usually create patterns using a roll of brown paper, pencils, a ruler, and a drafting triangle (or tailor’s/framing square, or large square rotary cutting ruler). There is a complete supply list with descriptions in Part 1.
You will want to think about what you will use this bag for in order to determine the size you would like to make.
- Large: A great size for hauling a few towels, snacks, and some reading material to the pool or beach. I often use this as a personal item carry-on, especially if my other item is a computer bag. This easily holds a change of clothes, my tablet, a couple magazines, and the purse I will carry once I arrive. The buttoned pockets can keep your cell phone at hand. This is the size I make the most often, and it is pictured here. Overall finished measurements are approximately 15″x14″x8″
- Medium: Perfect for the grocery store or farmer’s market, this size is perfect for carrying both heavy or bulky items. I have often used this for carrying library books. This size makes very efficient use of fabric. Overall finished measurements are approximately 15″x11.5″x6″
- Small: A good size for keeping small-ish projects with you, a smaller sized library bag, or a kid’s activity bag. Overall finished measurements are approximately 12″x12″x4″

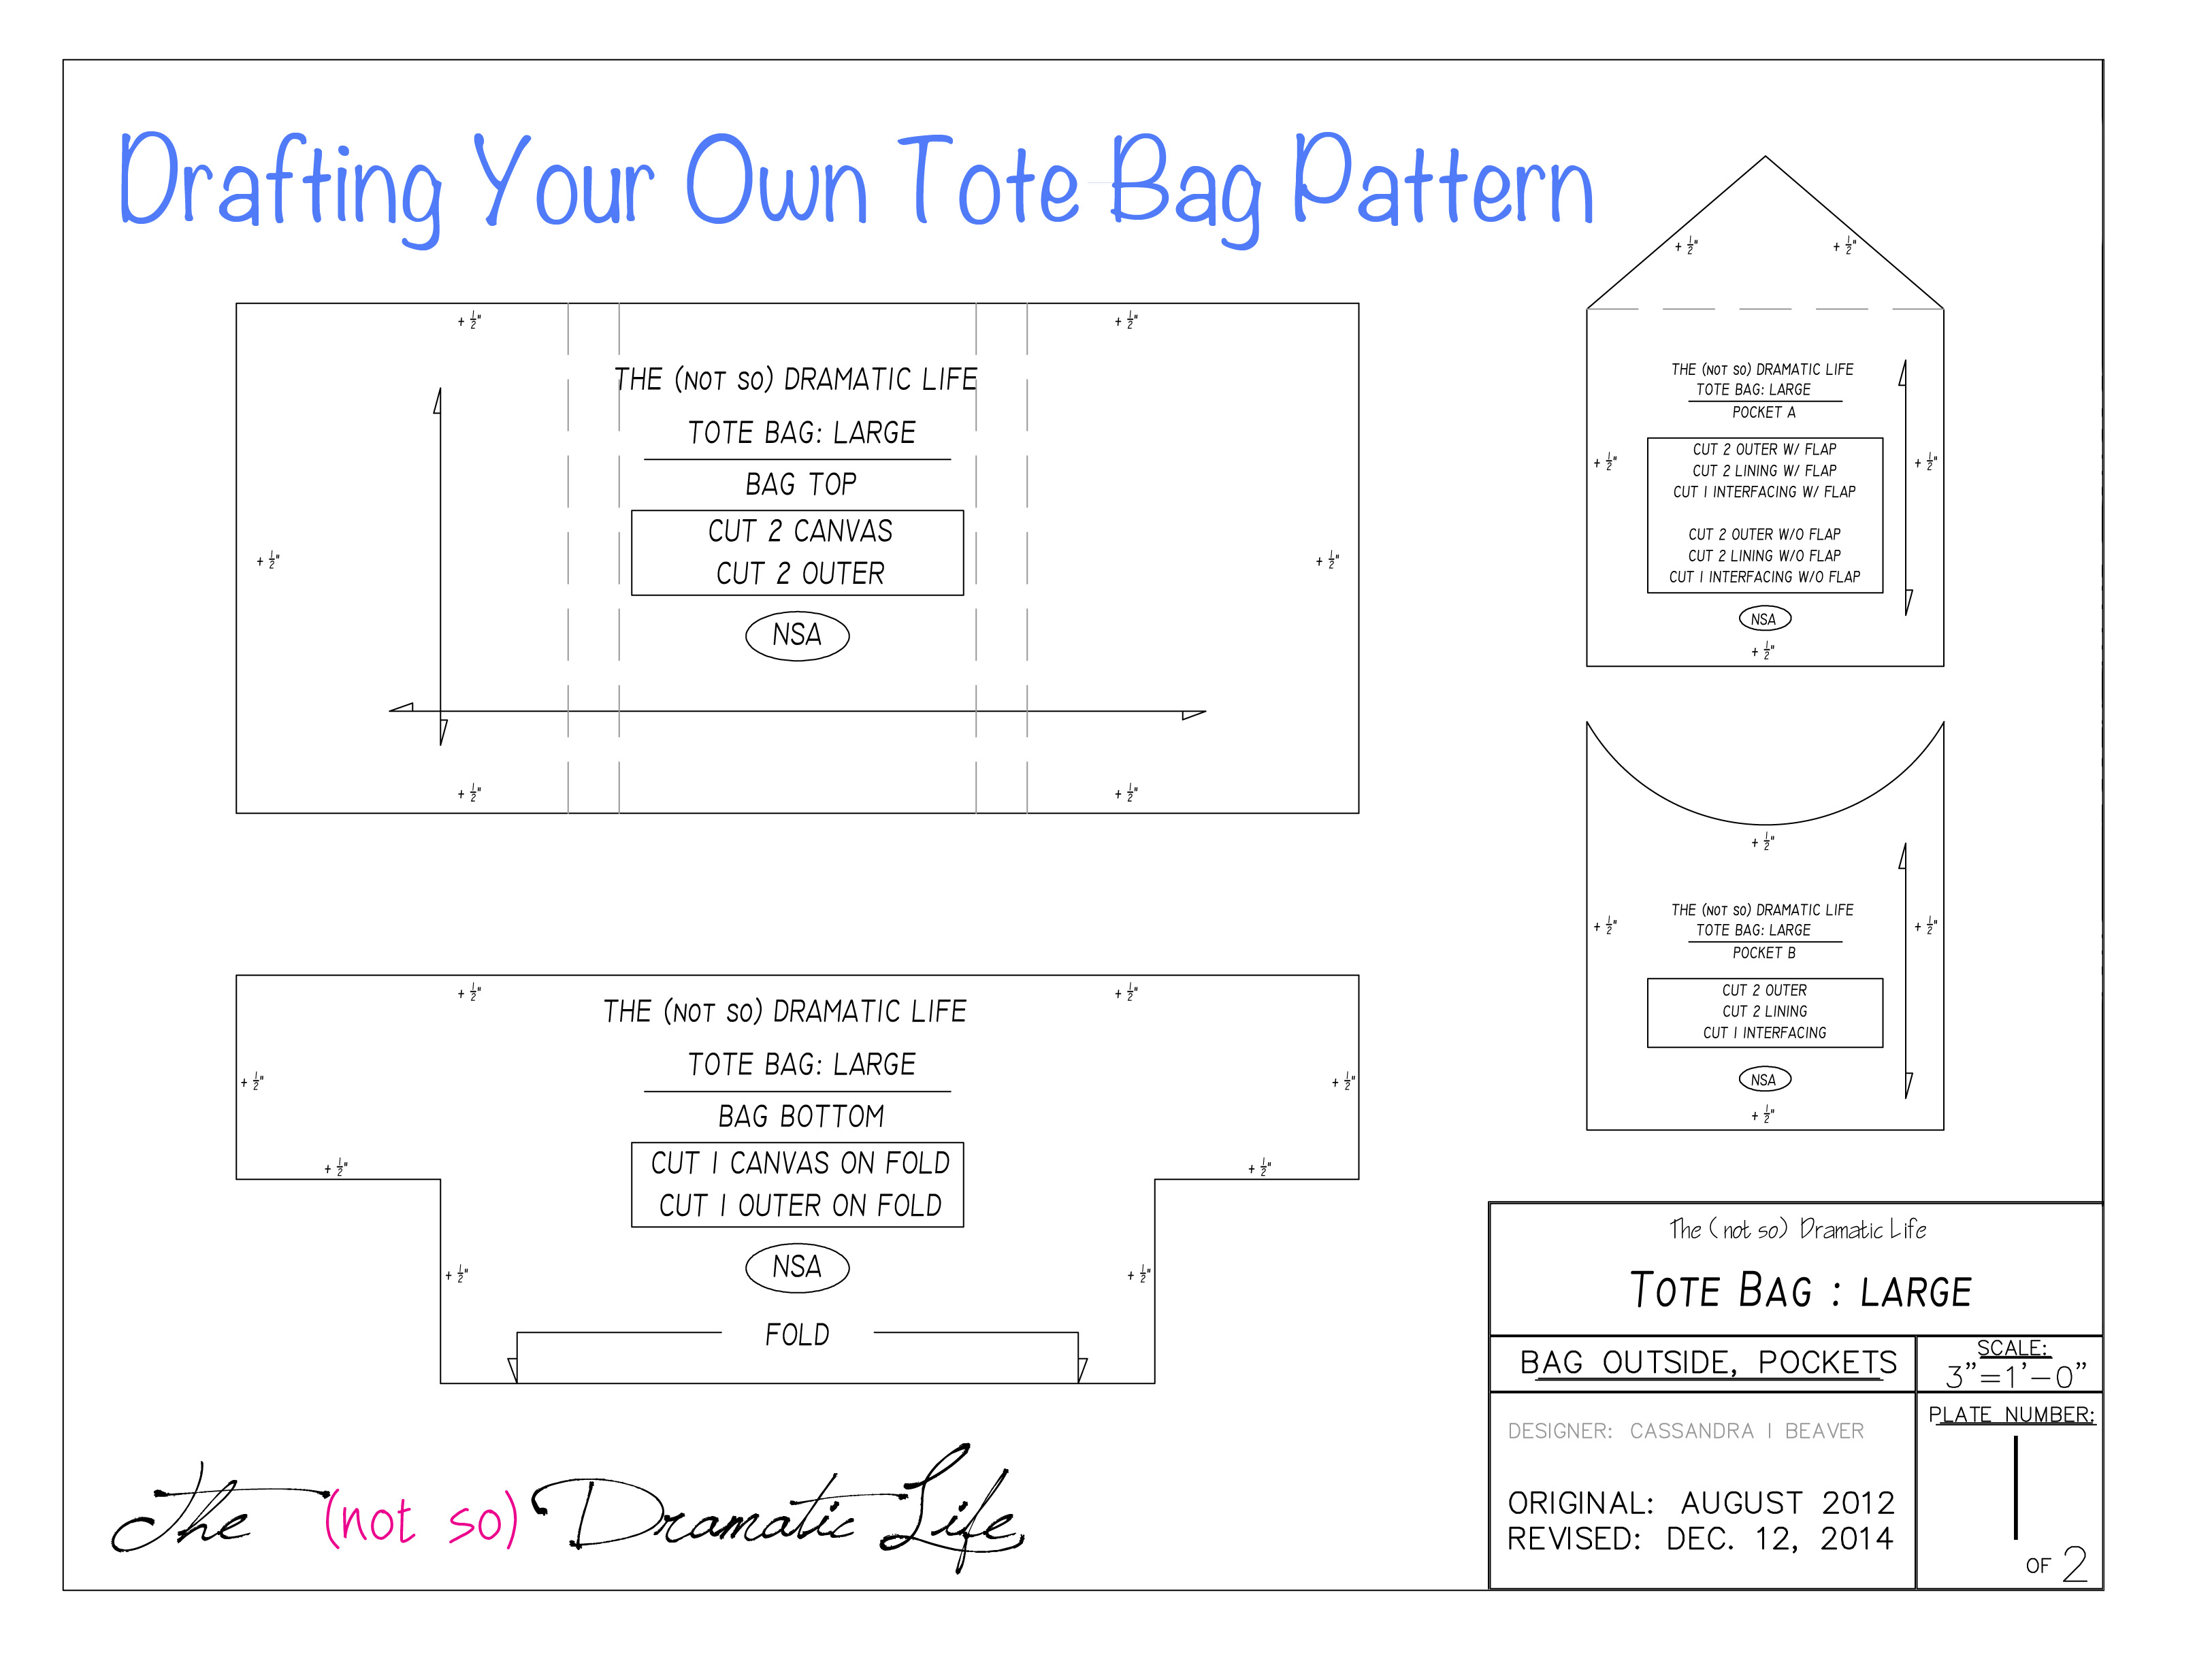
The first pattern piece we will draft is the bag top. This piece is a rectangle. Maintaining 90° angles is the most important part of this piece. Using the largest triangle or square ruler you have, line up one side of the tool with either a straight drawn line or the edge of the paper. (Only use the edge of the paper if it is clean, smooth, and has not warping or contortions.) With the ruler or triangle carefully placed, draw a perpendicular line along the other side of the 90º angle. With the first angle created, you will make a mark along one line indicating the height of the piece (around 2/3 the overall height of the bag is usually a pleasing proportion). On the other line mark the line the width of the bag. You will cut two of this pattern piece (one front and one back), so the width of this piece will be half of the desired circumference of the finished bag. Use your 90 angle to draw the rest of the rectangle. For this bag, the rectangle measured 22″ x 10″. Check the lengths of each side to make sure the measurements of the long sides are equal to each other. The lengths of the short sides should correspond to each other as well. To double check the accuracy of your angles, measure diagonally from one corner to the other and make note of the measurement. Then measure the other set of diagonal corners. If the measurements are equal, the angles are a true 90º! Do not add seam allowances to this, or any pattern piece at this point.
 Once you have the rectangle drawn, you will determine the placement of the bag handles (shown as dashed lines in the diagram above). How wide do you want the pockets on your bag? The pockets are placed between the handles, so their size will indicate handle placement. Subtract the desired pocket width from the width of the rectangle. Then divide that number in half. For example: 22″ (rectangle length) – 7″ (pocket width) = 15″. Half of 15 is 7.5″. This means that you will measure seven and a half inches from each side of the rectangle and draw a dashed line. Look at the proportions of what you have drawn. Adjust as needed, making sure that the pattern remains symmetrical. When you are happy with the pocket width, draw an additional dashed line 1″ toward the outer edge of the rectangle. The handles will be placed between the lines.
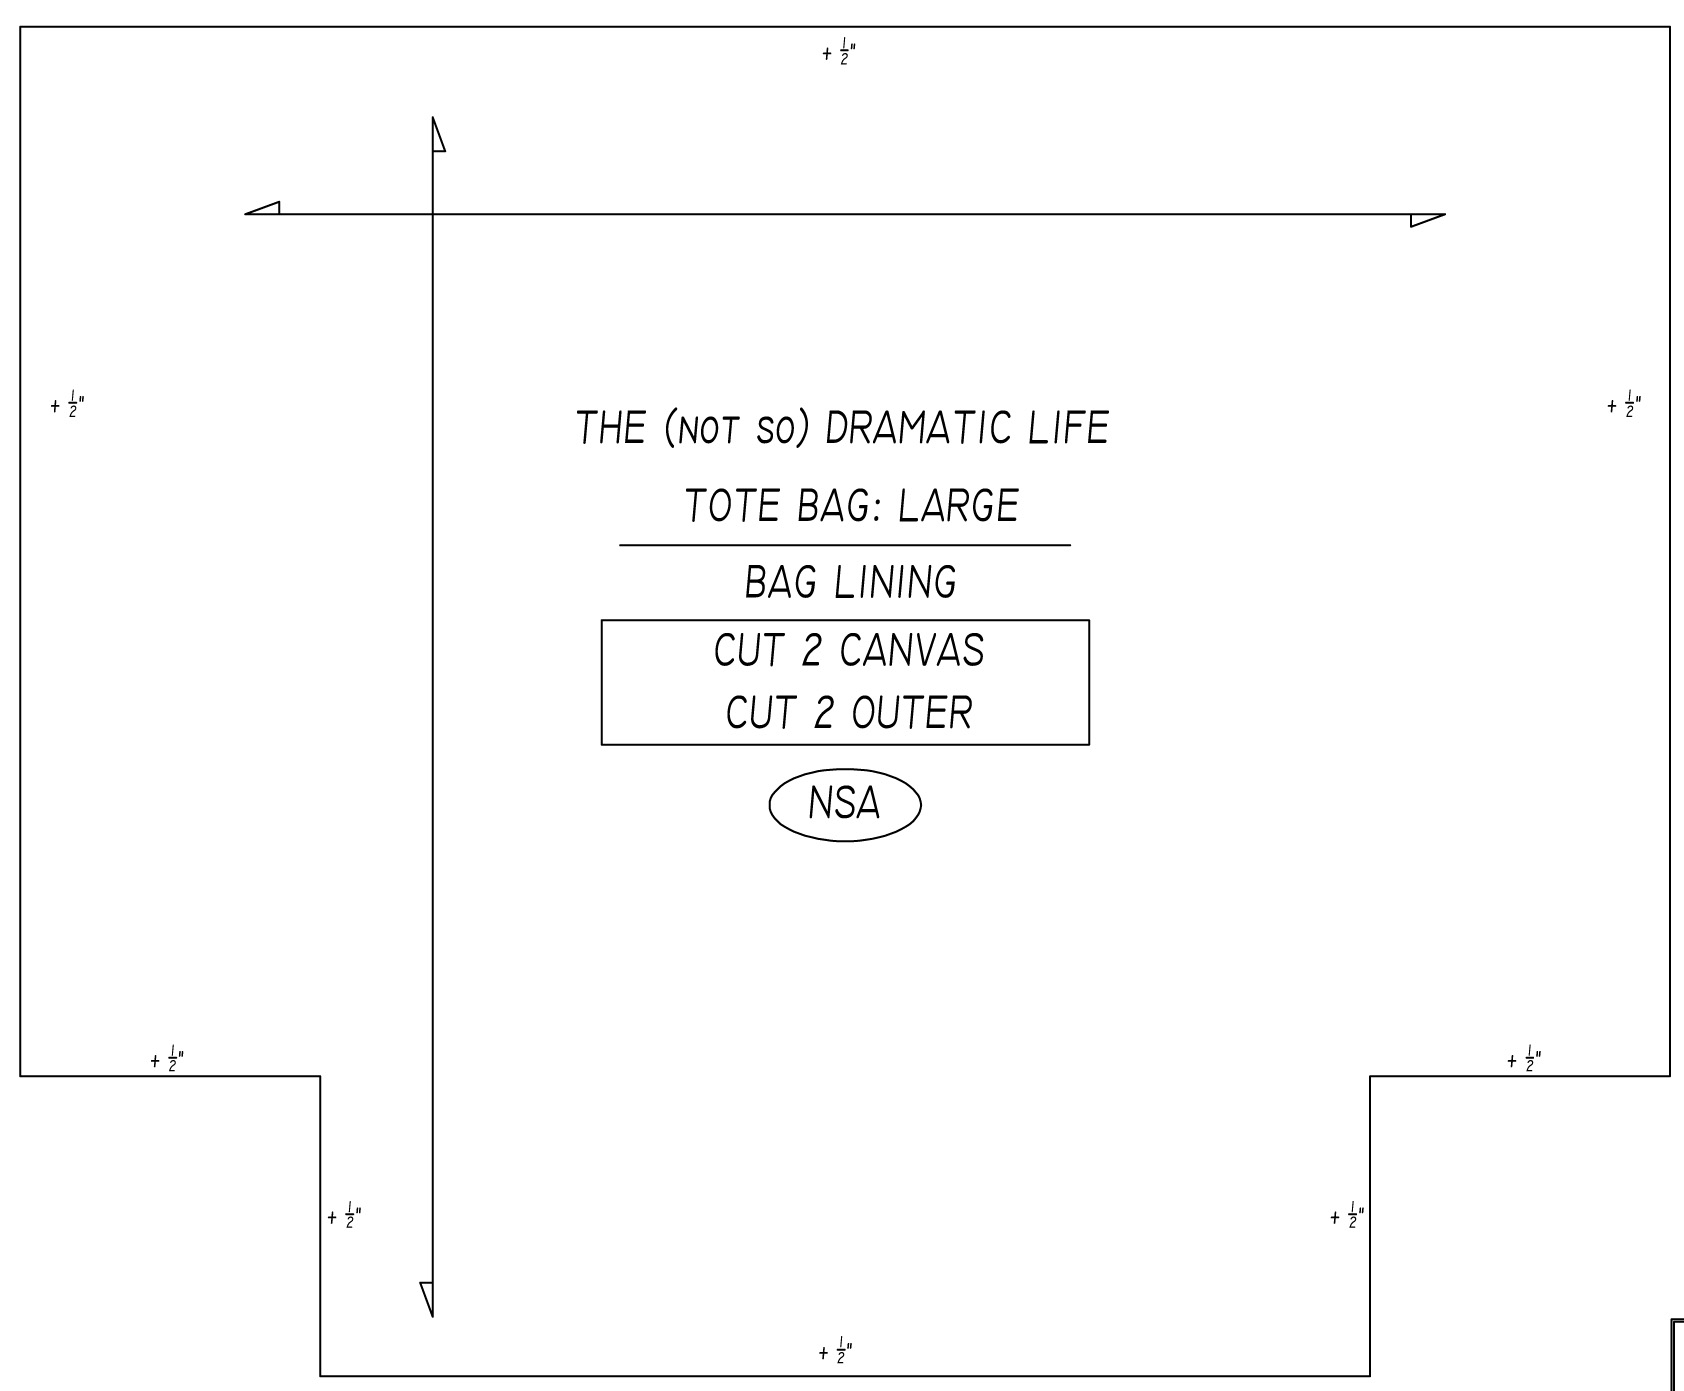
Draw a grain line parallel to the edge of the rectangle. You will label each pattern piece as above- but make sure to list yourself as the pattern designer! Indicate the appropriate size of tote, the pattern piece name, and in a box write how many pieces you will need to cut of each fabric. NSA means that you have included no seam allowance. Along the edges of the pattern piece, you will write how much seam allowance you will want to add when laying out and cutting your bag. In this case I wrote +1/2″. Note: Omitting seam allowance in the pattern making process allows you to more easily make sure the pieces of the bag will fit together. If you would rather include seam allowance in the pattern , you may tape on additional paper after all the pieces are drafted, or you may retrace each piece completely with the added seam allowance. Commercially available patterns include seam allowance, but many people who sew one of a kind garments add seam allowance when cutting the fabric.
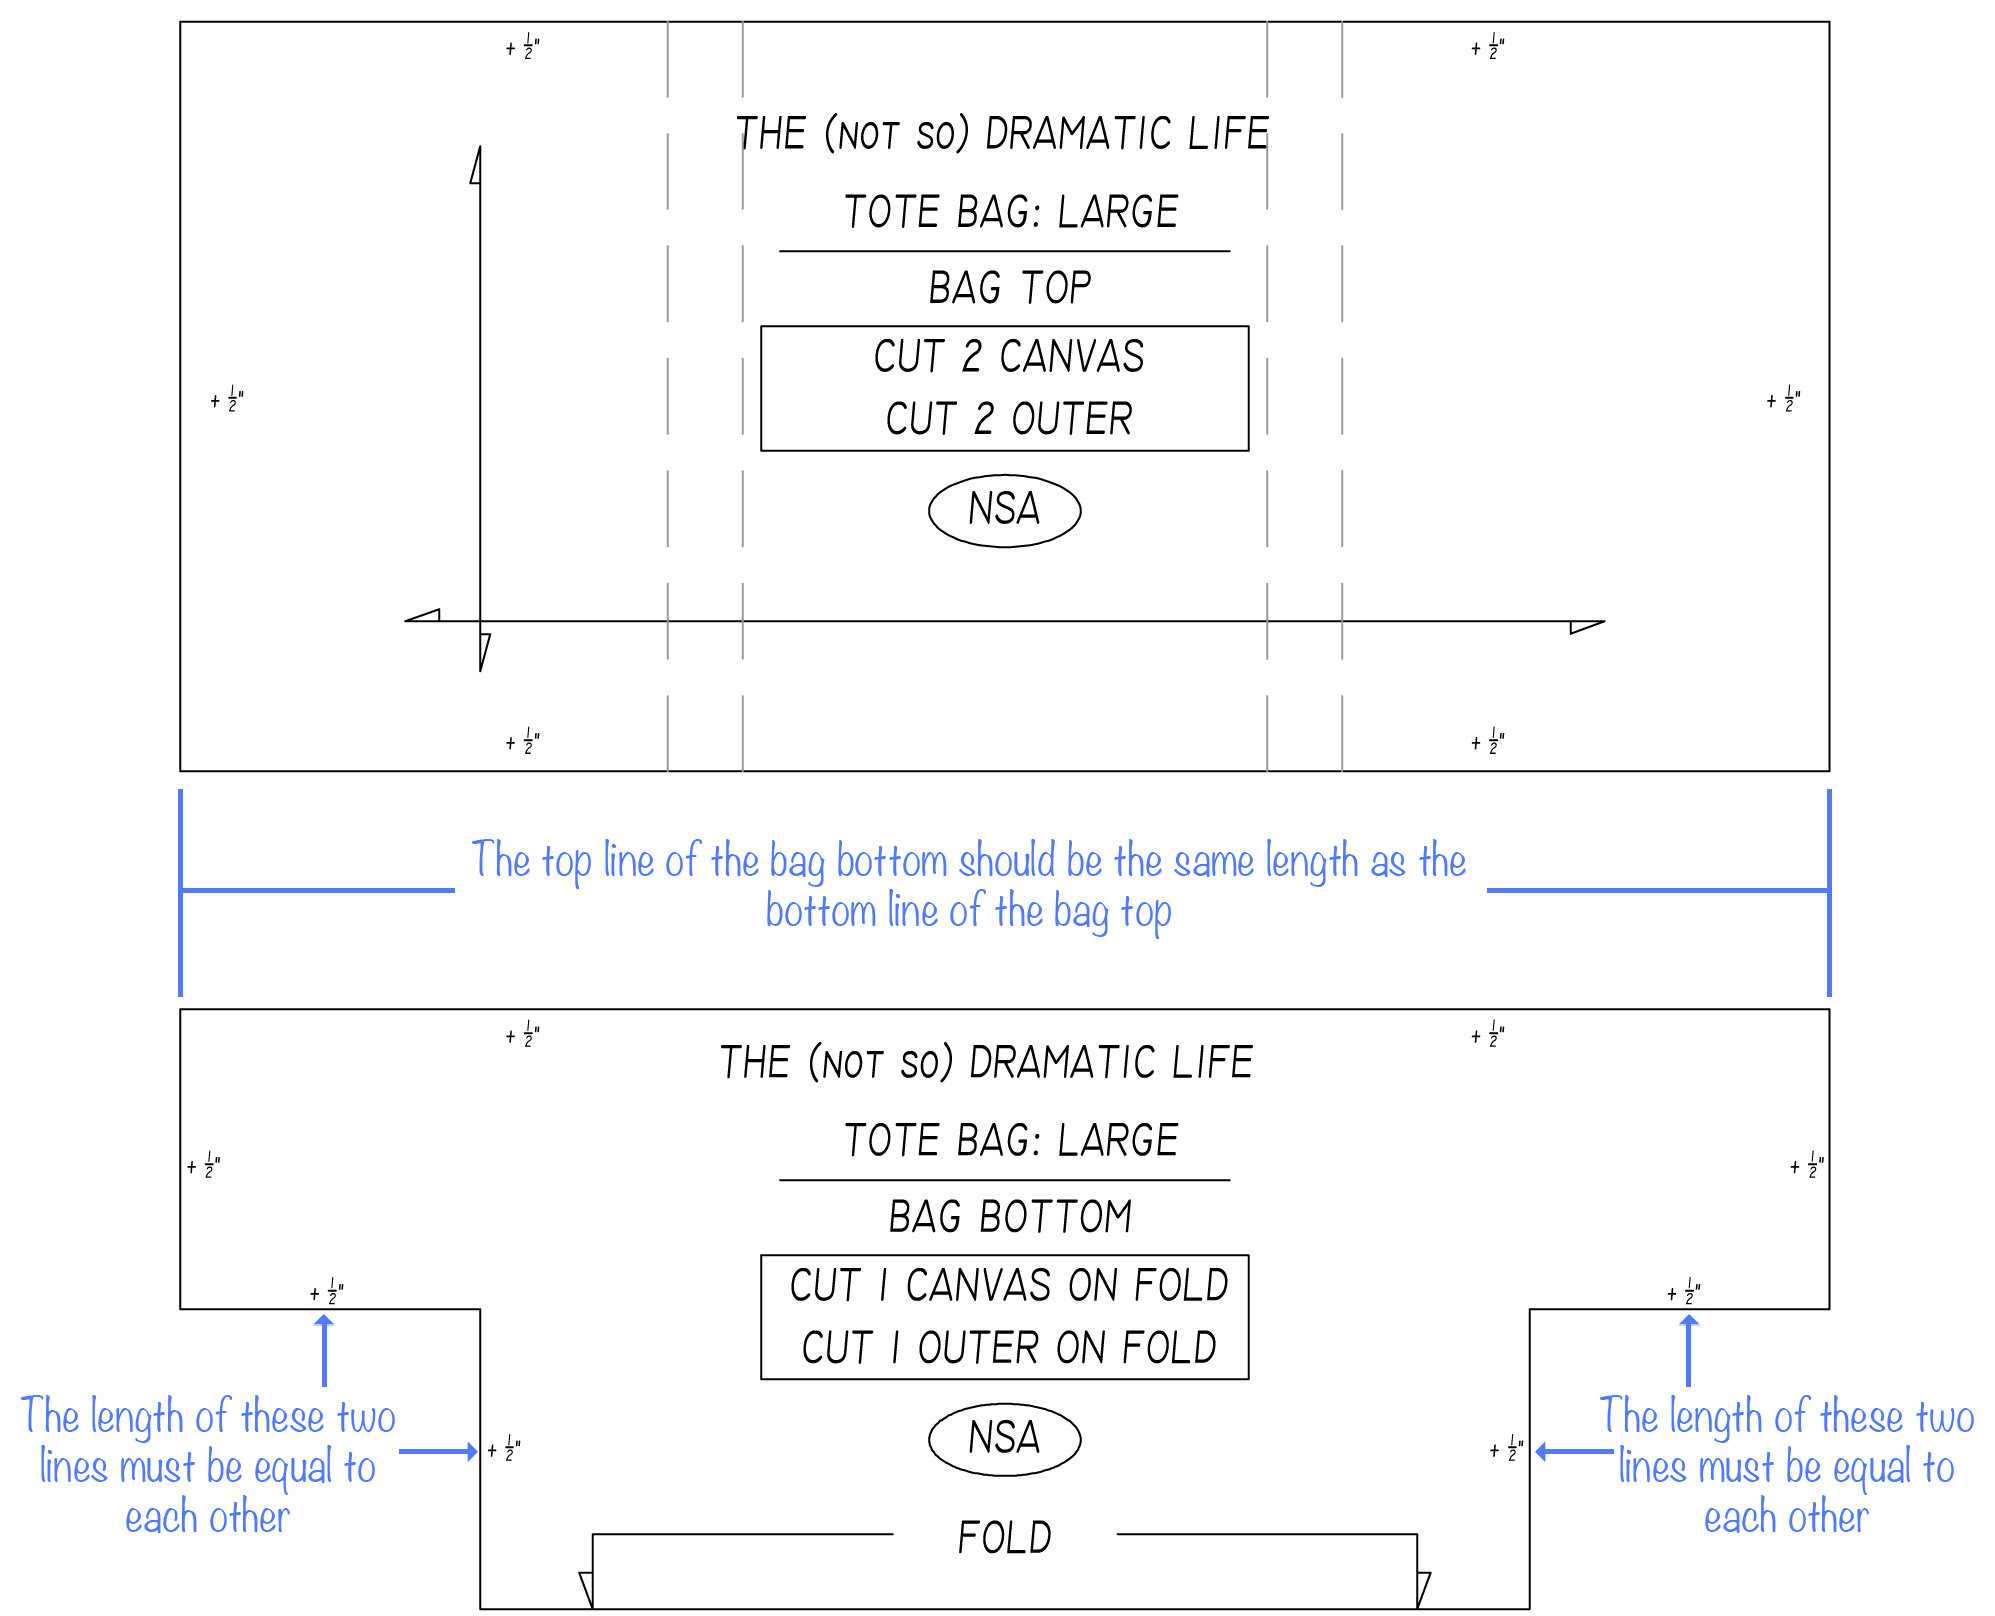
Now you are ready to draw the bag bottom. Begin by drawing a rectangle that is the same length as the bag top pattern piece. This pattern piece includes shaping seams which will create the bottom of the tote bag. To determine the height of the rectangle you are drawing you will want to consider how much depth you would like to create for the bottom of the bag and add that to the amount of the bag bottom piece you would like to see on the front/back of the bag. Draw this rectangle using the same process you used for the bag top. For this bag I started with a rectangle measuring 22″x9″
 Once you have created the bag bottom rectangle, you are ready to add the shaping seams. If you have a square rotary cutting ruler, this is a good time to pull it out. The shaping seams are squares removed from the bottom of the rectangle. The vertical and horizontal lines must be of equal length, and the squares should be the same size on both sides of the bag.
 In the photo above I have drafted the bag top and bottom so that the bottom line of the bag top is the top line of the bag bottom. This guarantees that the length of theses seams will match up perfectly when you are sewing the bag together. The shaping seams in this photo form a 4″ square.
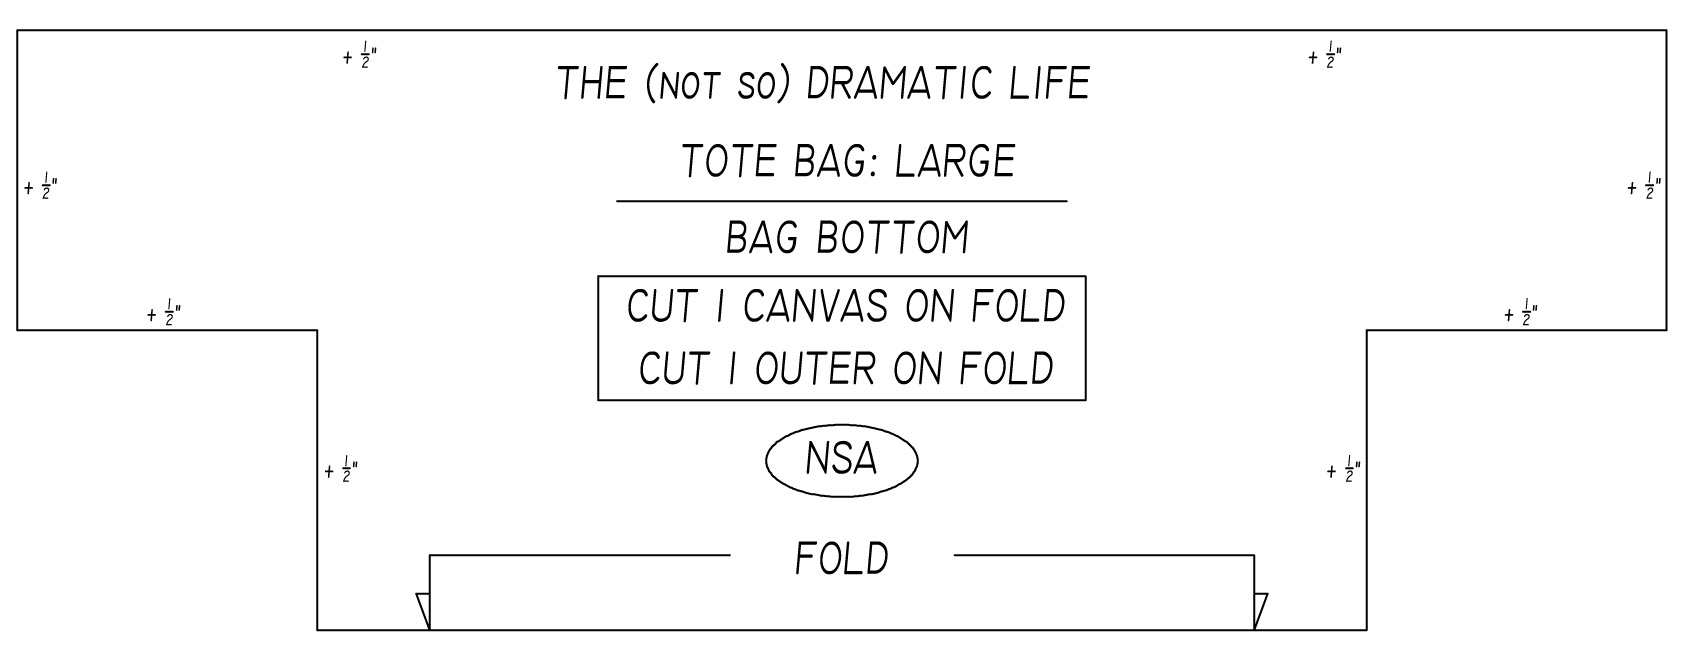 The Bag bottom piece will be cut on the fold of the fabric in order to eliminate the need for a seam at the bottom of the bag. Label the pattern piece as shown above, making sure to indicate the location of the fold line at the bottom of the pattern piece.
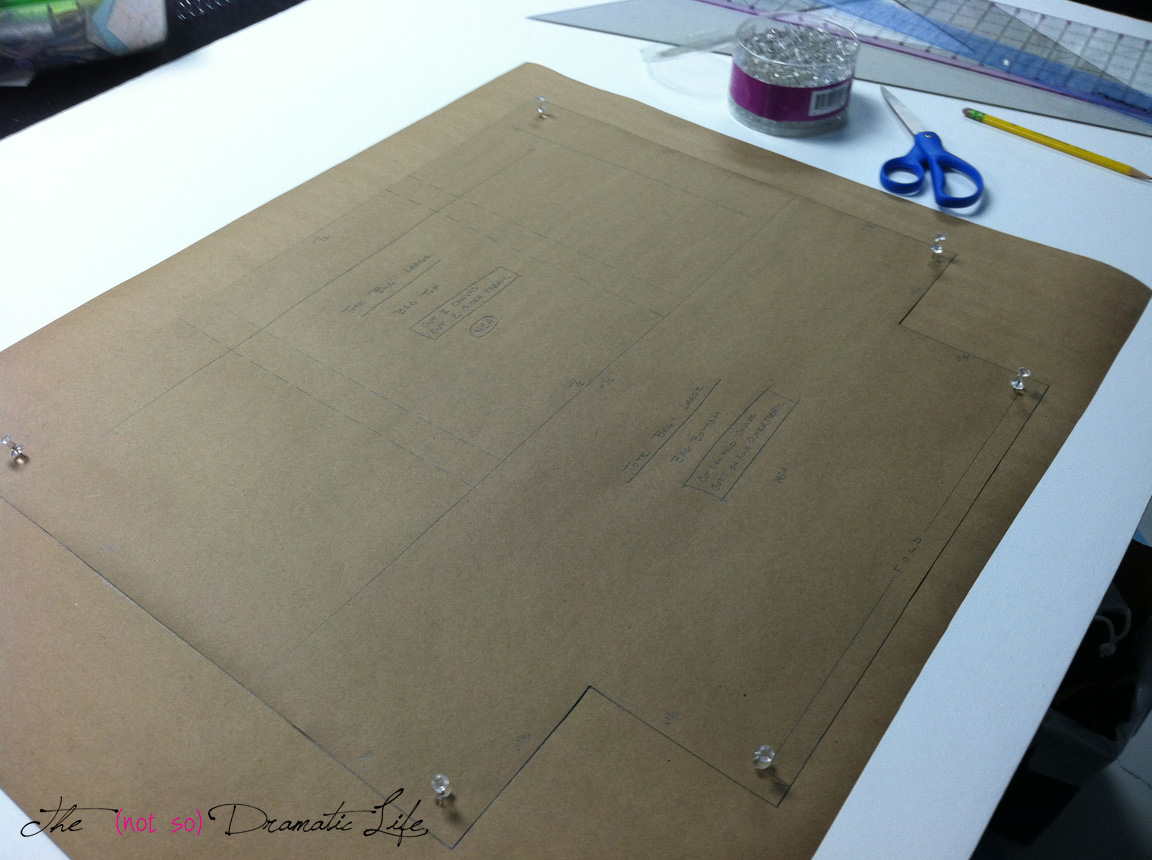
The lining pattern is the next to draw. If you were able to draft the top and bottom pieces so that they shared a line (as shown above), you can create the lining pattern by cutting the exterior lines of the pieces while leaving the line connecting the pieces intact. (Do you see how I used push pins in the homasote topped table? You can also lay down foam core or a piece of foam core to pin into. Don’t have any of that? Try using pattern weights-or even a couple books to hold down your pattern pieces on your regular table) Carefully trace this piece onto another section of paper. Now you have the lining piece- easy right?
 The lining pattern should be equal to the bag top and bag bottom pattern pieces combined.
 Add a grainline parallel to the edge of the pattern piece and label the pattern as shown below.
 Go ahead and cut out the pattern pieces you have made so far. Take out the bag top pattern piece, place the center of the pattern piece over another section of paper that is big enough to create a pocket pattern, and use push pins to hold it in place. Trace the bottom of the pattern using a pencil. Then pull out your tracing wheel to mark the interior dashed lines. This will guarantee that the pocket width will correspond with the width between the bag handles. You may use a ruler to help ensure the line you trace is straight.
 Do you see how the pocket pattern will fit between the handles?
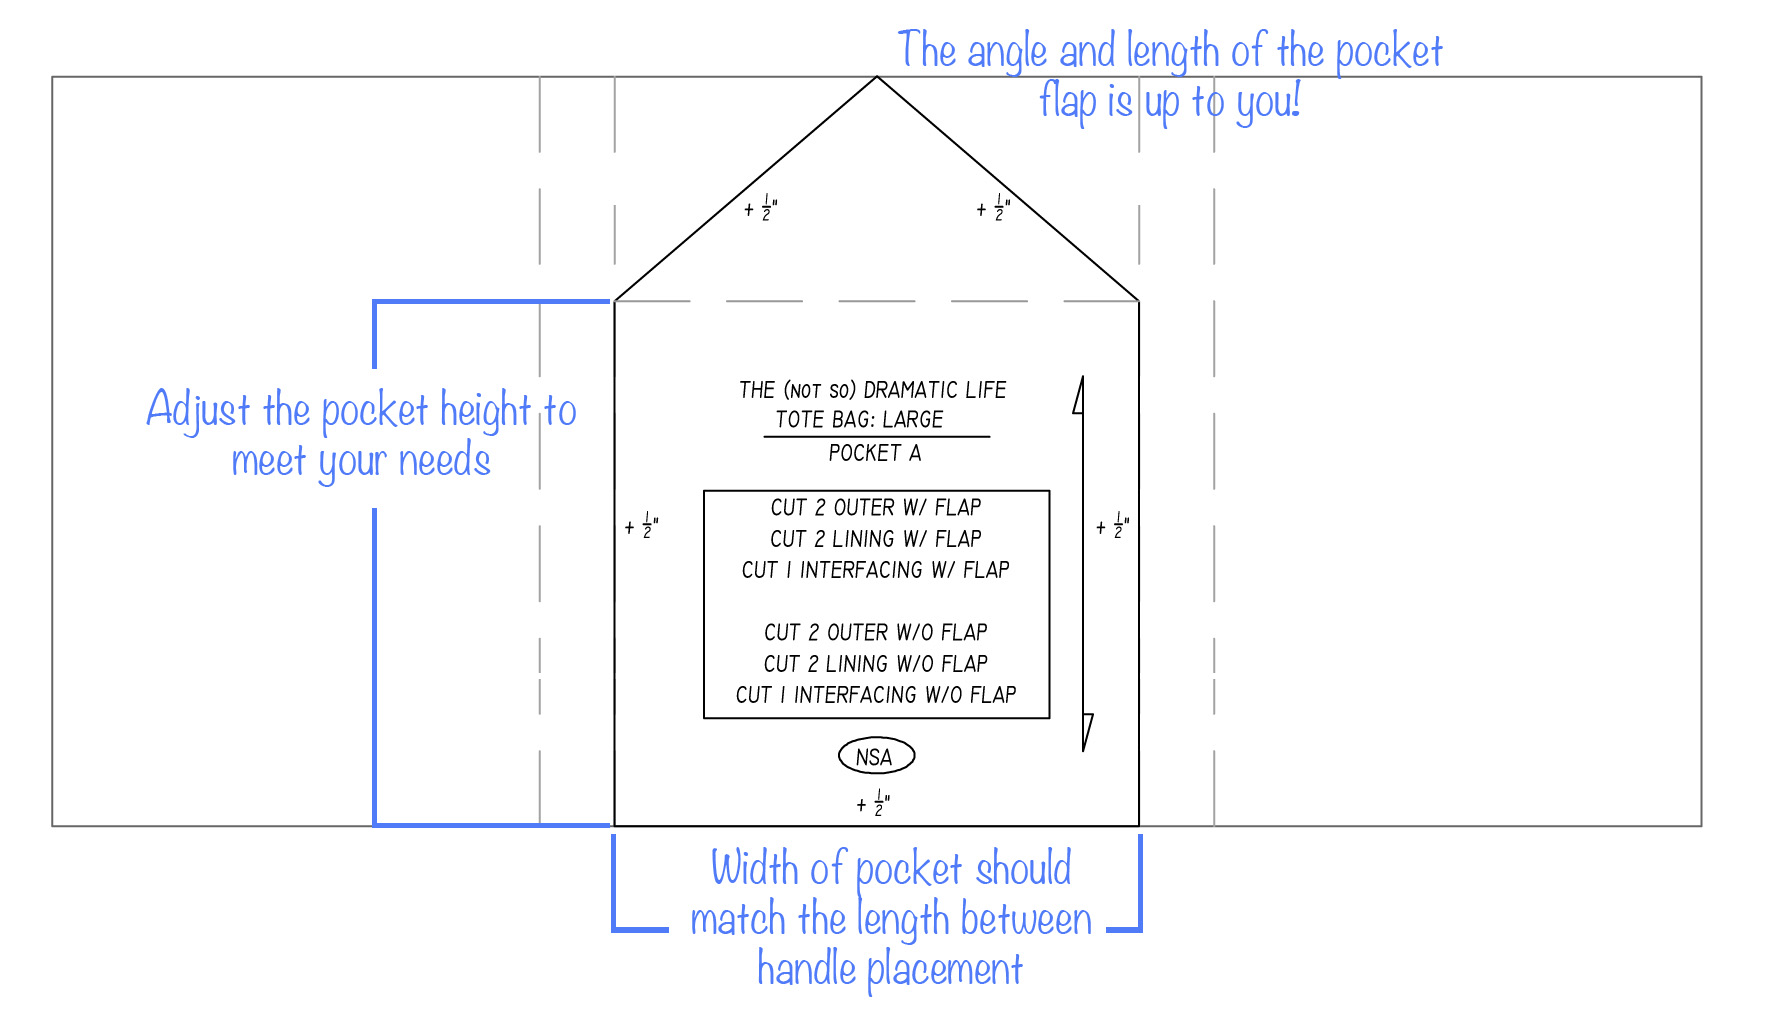 The height of the pocket is up to you. A lot of people like to use this pocket for a cell phone, so you may want to use that as a starting point. The flap on the pocket makes it even more secure, so design something with proportions that are pleasing to you.
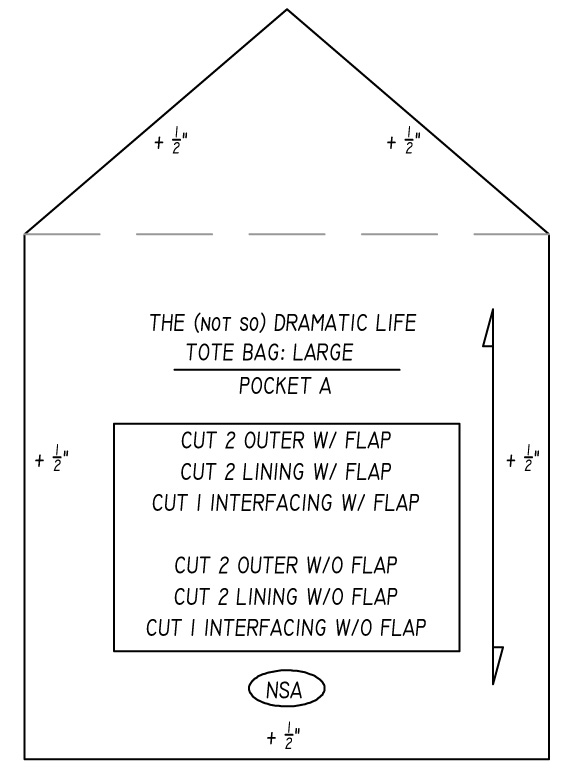 Label the pattern as indicated in the diagram above. Don’t forget a grain line!
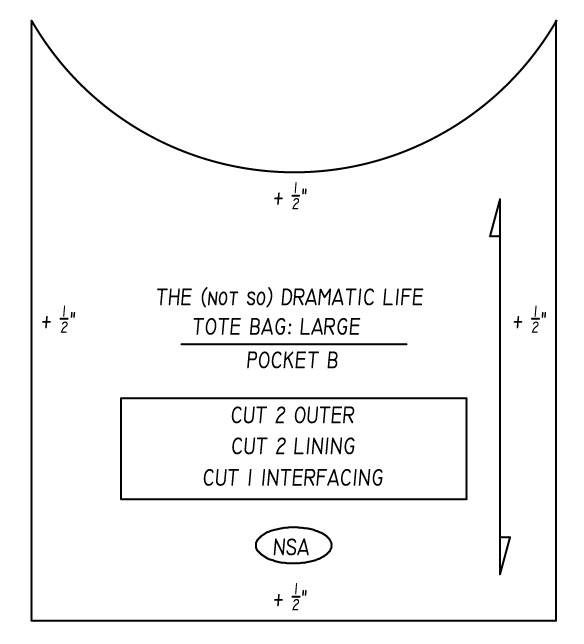
The pocket for the other side of the bag is open with a curved top. Create this pocket using the directions for the above pocket, but instead of designing a flap you will create a concave curve. Tracing around the edge of a plate or round container is a good way to make the curve of the pattern piece.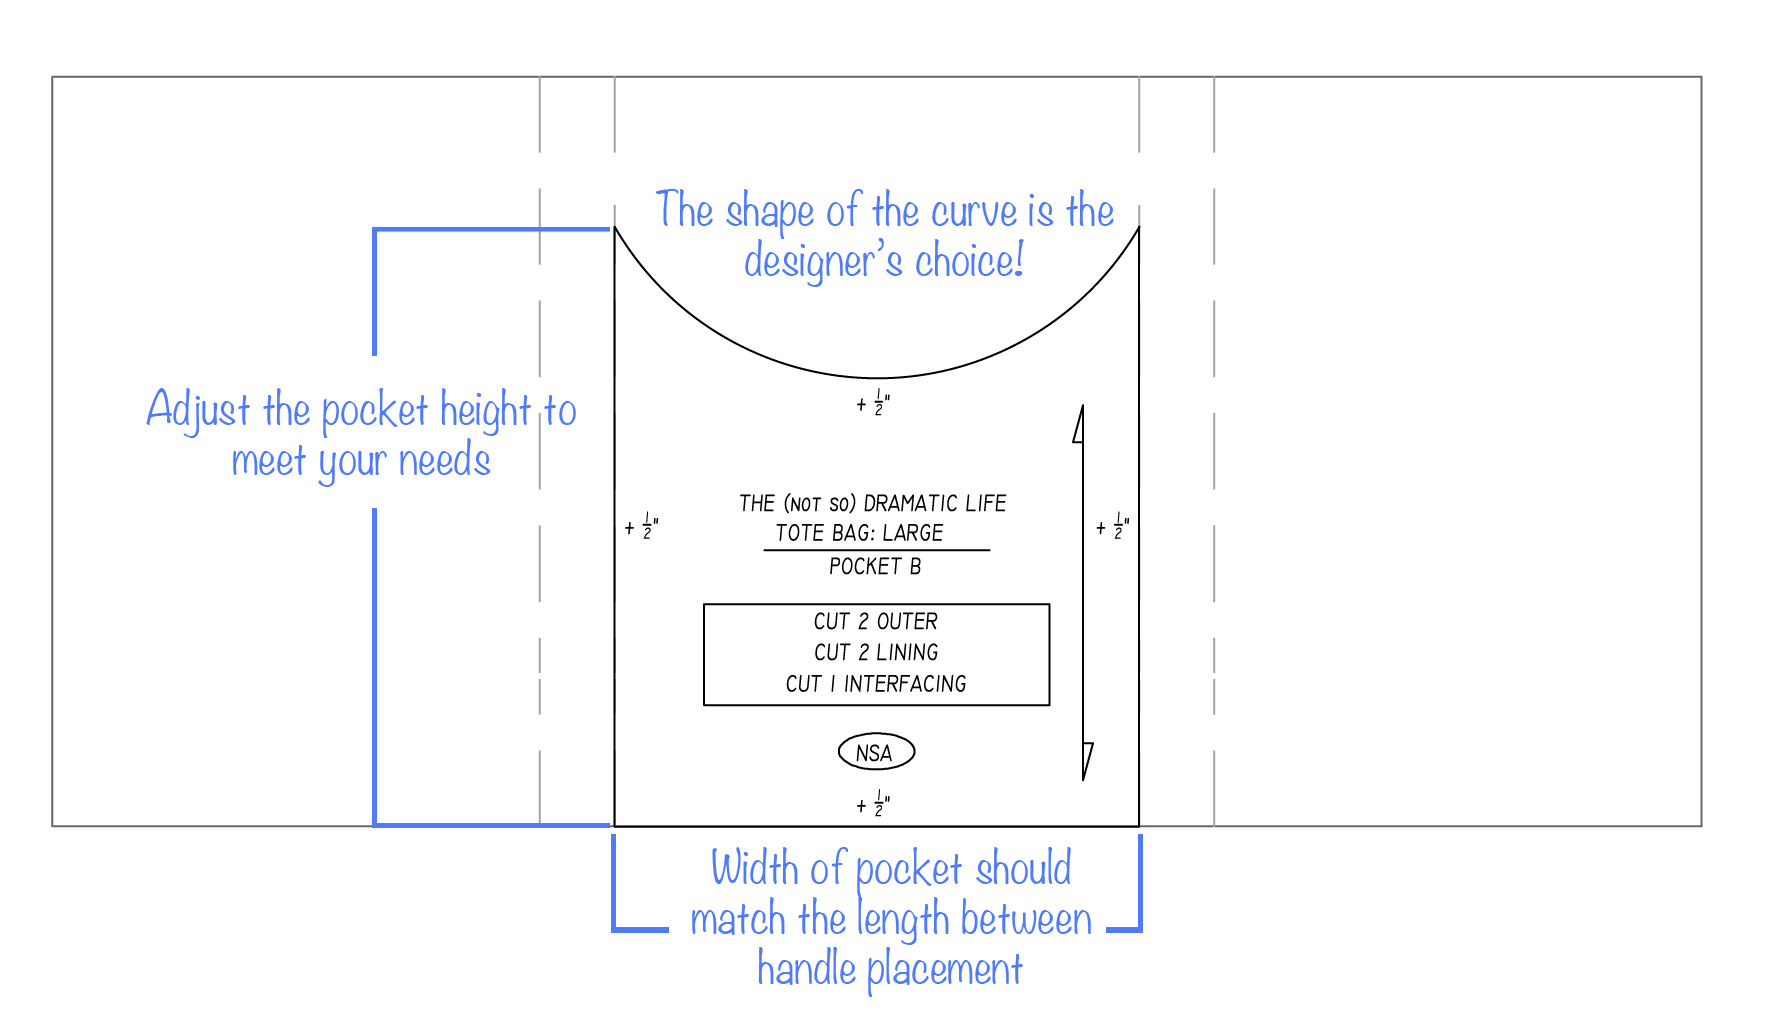 Add a grain line and label the final pattern piece.
 Cut out all of your pattern pieces, and you have finished your tote bag pattern! Happy Dance!
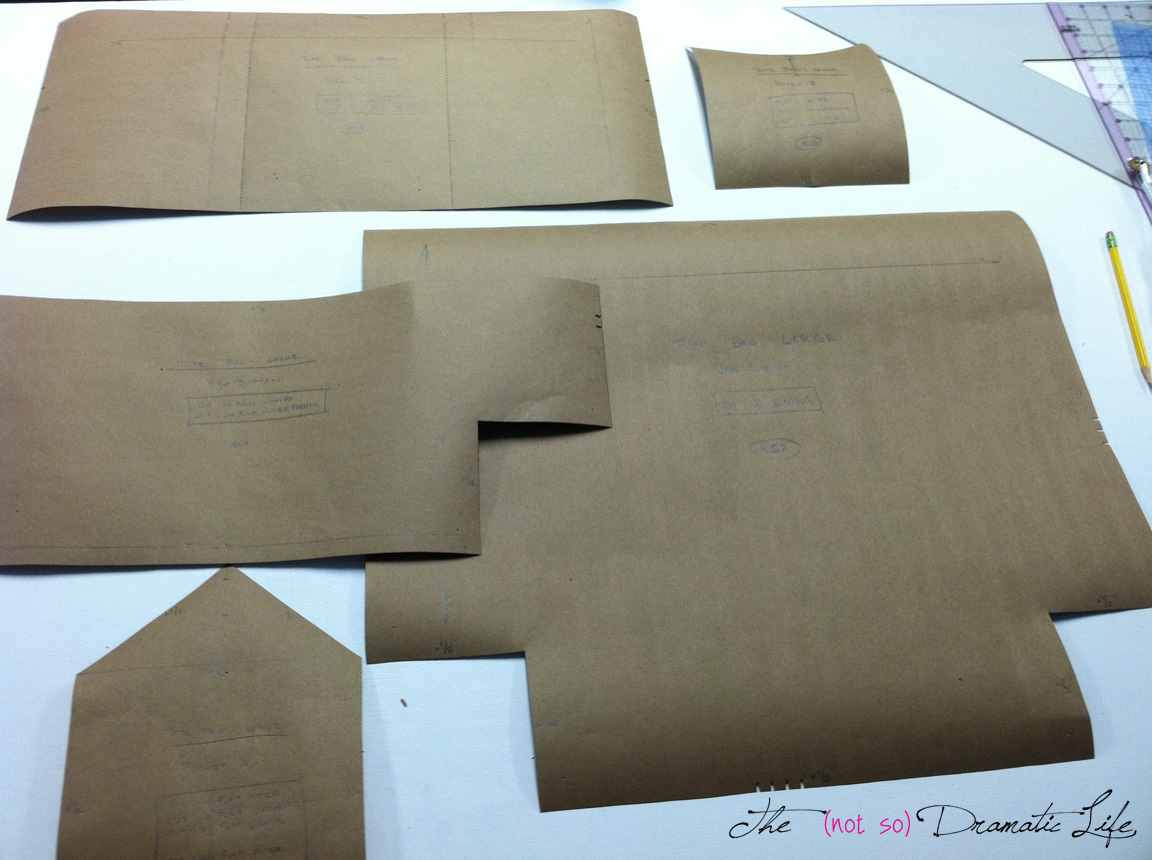 This post is linked up to Let’s Bee Social at Sew Fresh Quilts and WIP Wednesday at Freshly Pieced. Please stop by to check out all of the awesome work being created!
7 Comments
Tote Bag Tutorial Part 1: Gathering Supplies | The (not so) Dramatic Life
January 28, 2015 at 2:12 pm[…] Part 2: Drafting Your Pattern […]
Kathy
January 28, 2015 at 7:14 pmI am always so appreciative of people who put so much effort into creating a tutorial! Thank you!
Jasmine
January 28, 2015 at 9:50 pmYour instructions do make sense. I usually skip this step and go straight to cutting, but I am sure making pattern pieces would help.
Lisa Mc
January 28, 2015 at 10:38 pmActually i really need a summer tote/ purse to carry water bottles as well as my wallet etc, would the medium size work well for that?
thenotsodramaticlifeadmin
January 29, 2015 at 12:07 amThe bag that I consider my “medium” size would definitely hold a couple water bottles and a wallet. I would often take this size bag to the pool if I was on my own. It would easily hold one beach towel, a water bottle, and a novel/magazine. The exterior pockets were great for holding keys, admission cards, etc. The measurements I used for the medium bag are approximately: Bag Top- 18″x10″ and Bag Bottom- 18″x8″ with the cutouts for the shaping seams being 3″x3″. Of course, you get to be the designer for this bag! Feel free to adapt the measurements and proportions to meet your personal needs! I hope that this is a fun project!
Tote Bag Tutorial Part 3: Cutting Out Your Bag | The (not so) Dramatic Life
February 4, 2015 at 1:53 pm[…] Part 2: Drafting Your Pattern […]
Tote Bag Tutorial Part 5: Finishing Techniques | The (not so) Dramatic Life
February 24, 2015 at 11:49 am[…] Part 2: Drafting Your Pattern […]