Have you ever participated in a crafty swap? Swaps were hot when I first joined the Instagram quilting world, and I participated in several. I don’t have time to do a lot of swaps anymore, but this year, my schedule wasn’t as tight, so I decided it would be fun to do a swap and stretch my creativity by making a quilt for someone else.
Why Swap?
Ultimately, a swap is a fantastic creative exercise. For me, the best reason to swap is to make something out of my normal range. I look at someone’s list of likes and dislikes, then poke around their Instagram and develop something they will enjoy having in their home.
Do I love getting some fun mail containing an awesome mini quilt? Absolutely! However, the most rewarding part of the process is trying to make a mini that isn’t necessarily my go-to style while still making a piece infused with a bit of my personality, too.
Designing the Mini
My partner likes geometric designs and the sea colors and dislikes brown and yellow.
Avoiding brown was easy for me, and I don’t use tons of yellow, so keeping her dislikes out of the quilt was simple.
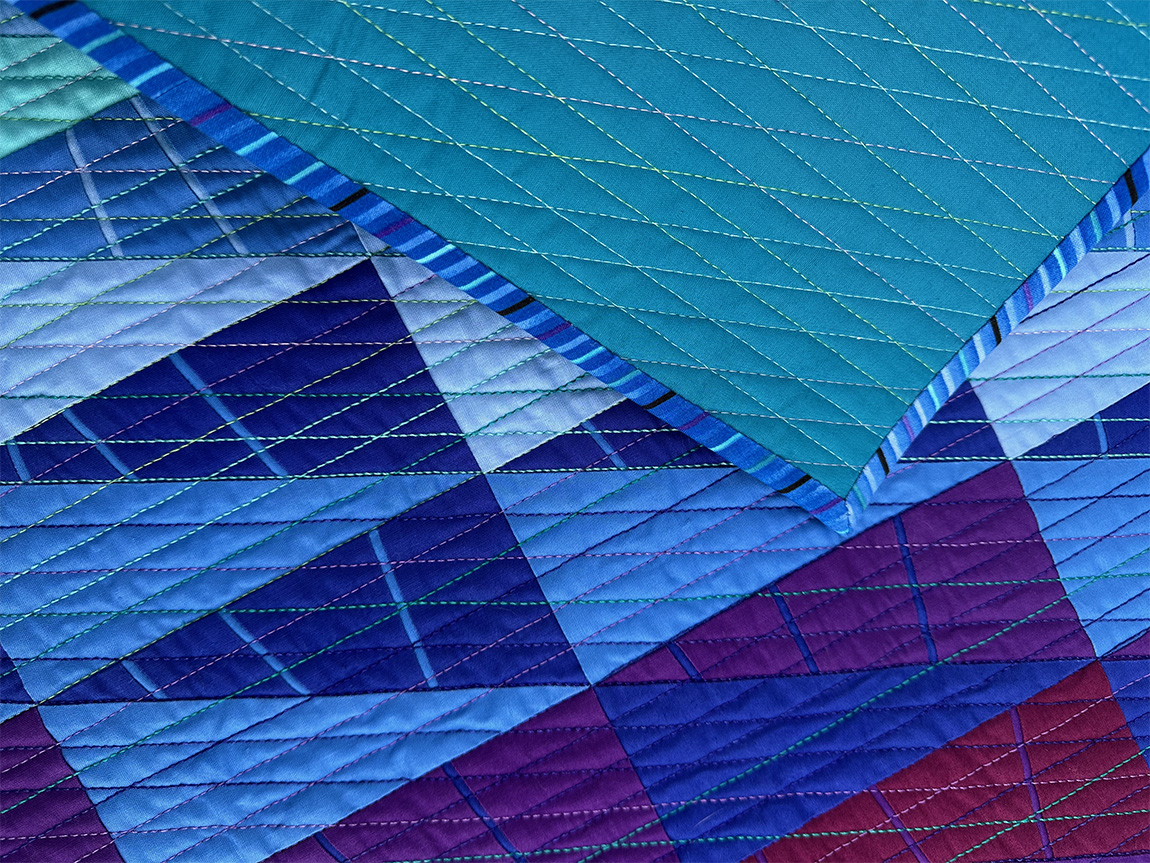
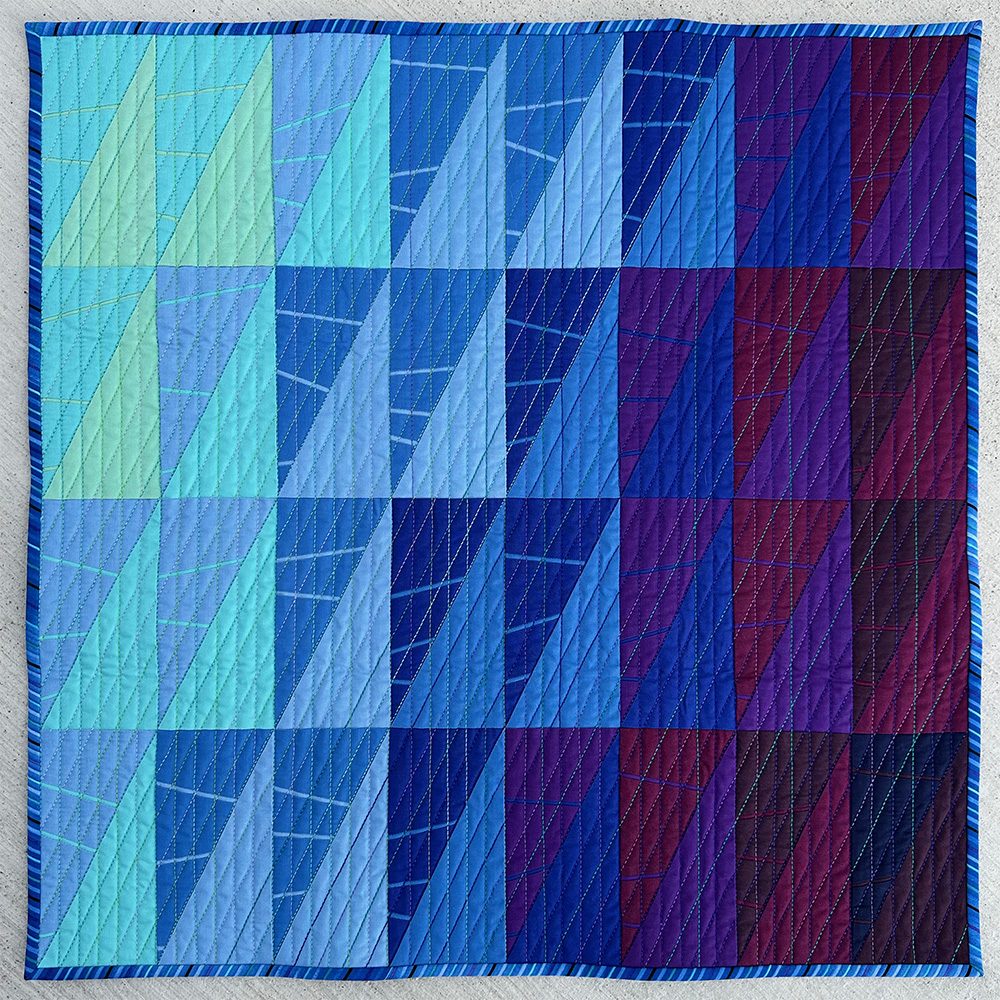
I went through several design iterations, and some got pretty complex before I scaled it back and embraced one of my favorite simple geometric shapes, the half-rectangle triangle.
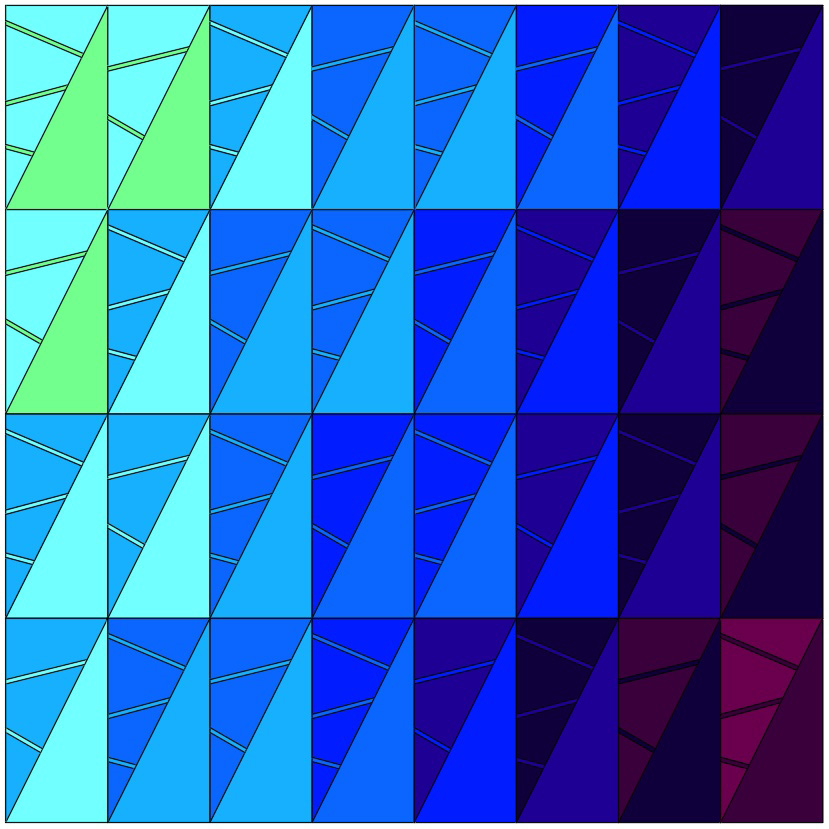
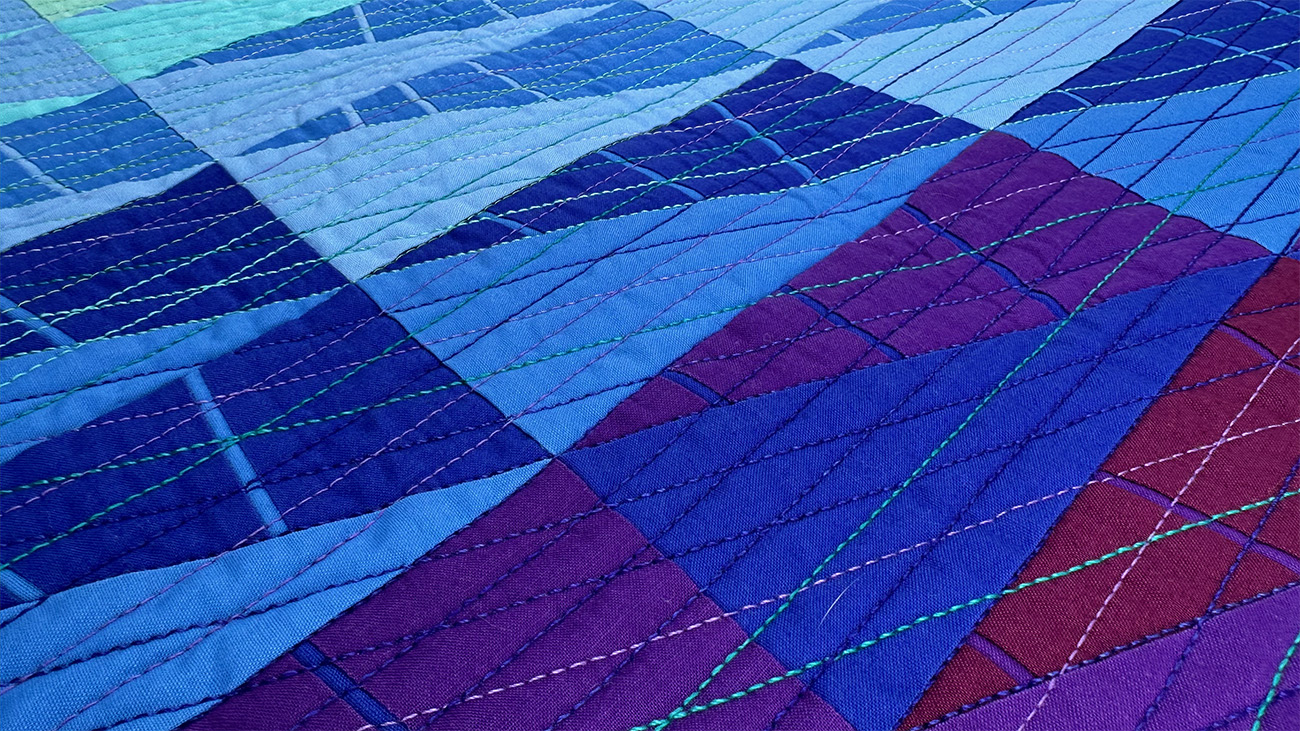
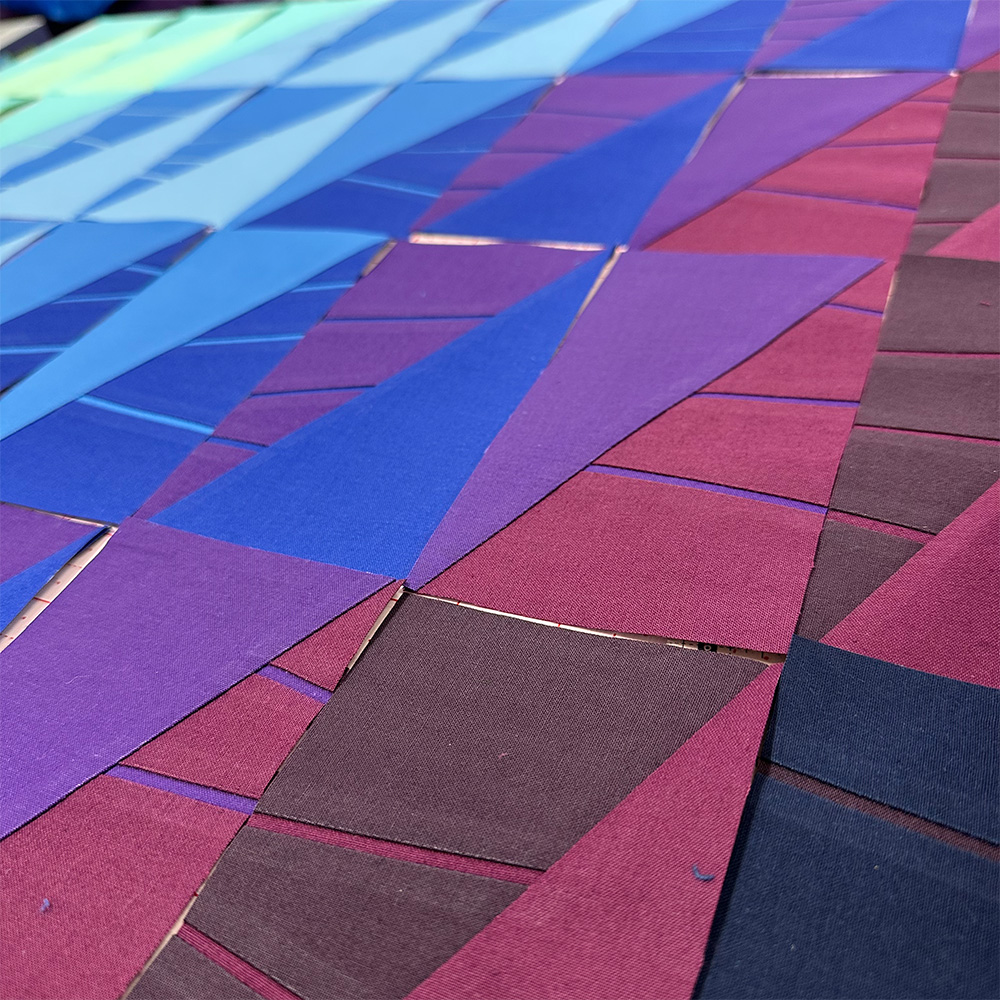
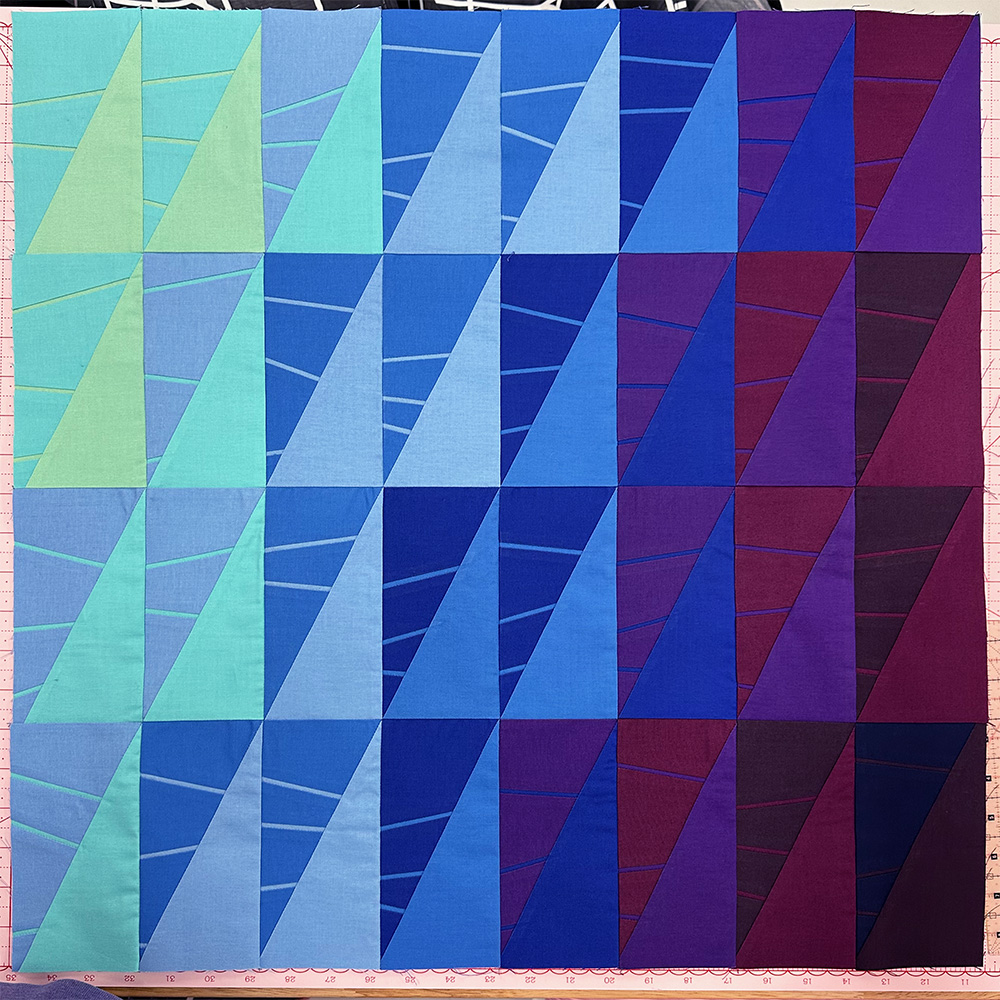
Keeping the colors of the sea in mind, I designed the quilt to go from light turquoise in the upper left corner to deep blues and purples as your eye moves across the quilt. To capture a sense of movement, I used each color in two block sets, once in the pieced upper left triangles, and again in the next block as the solid lower right triangles.
Fabric Selection
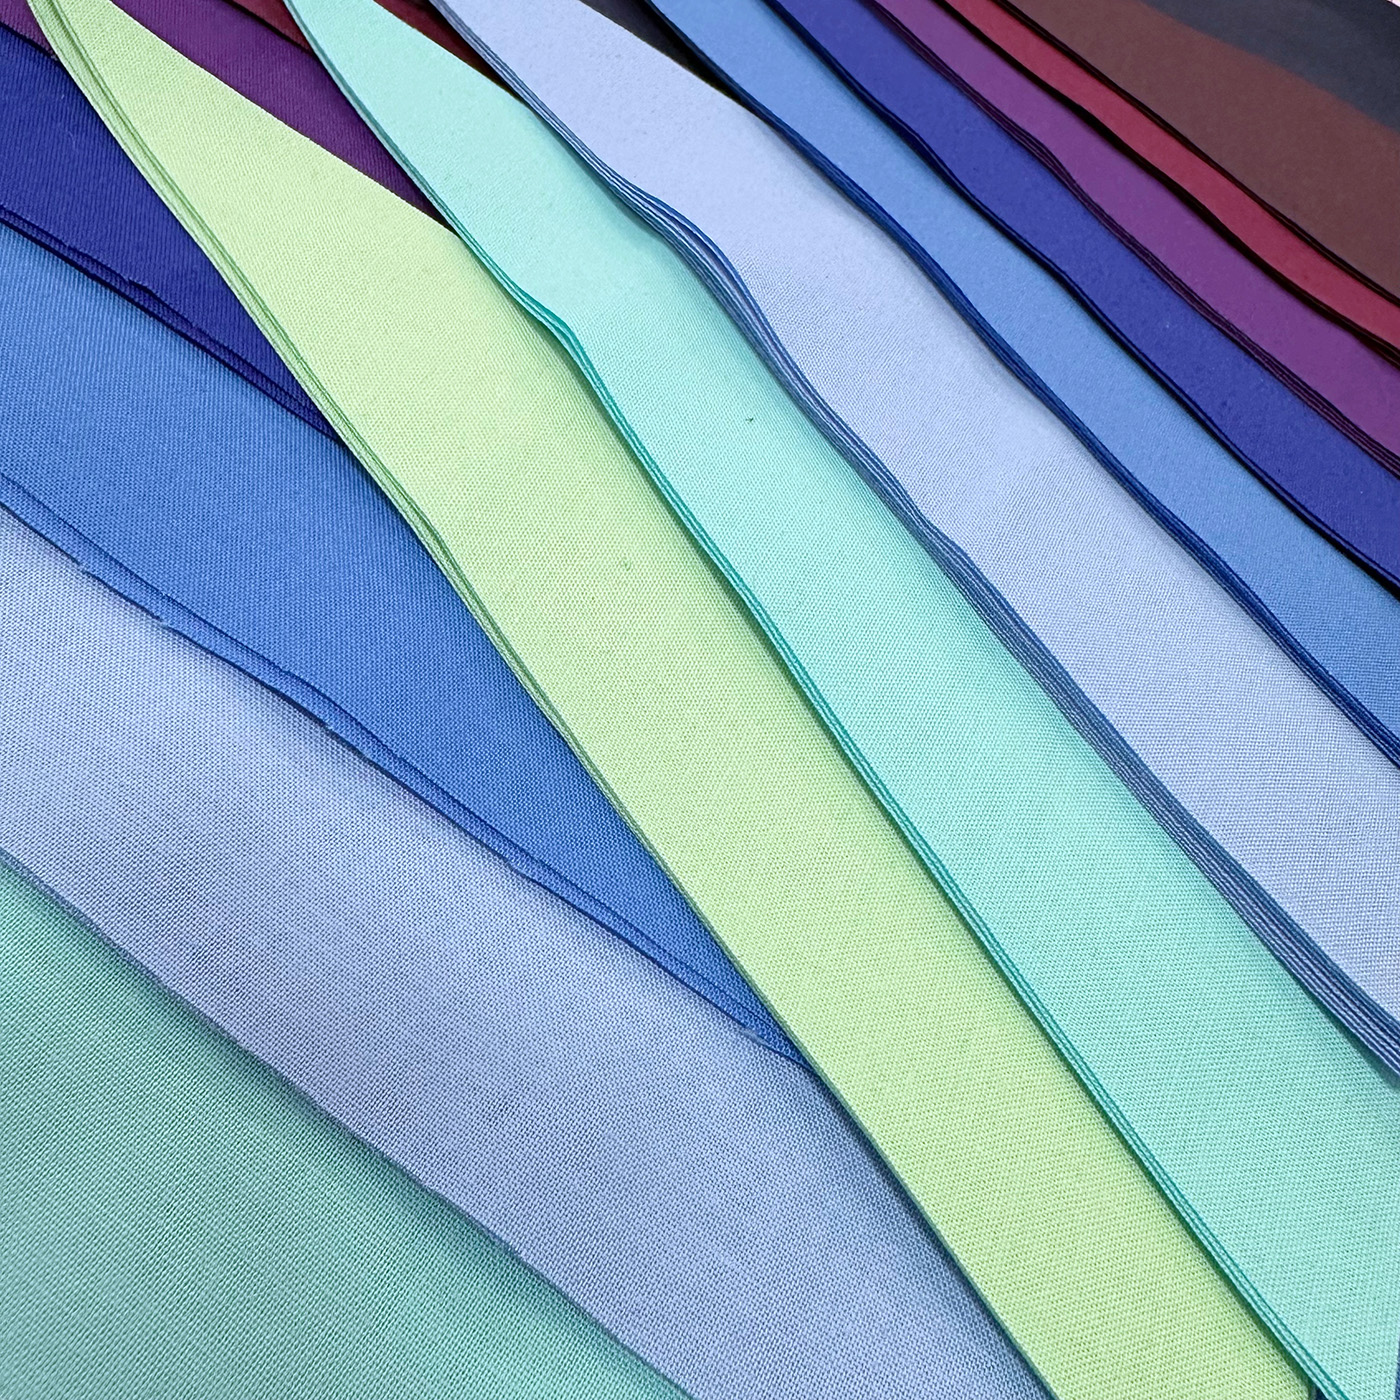
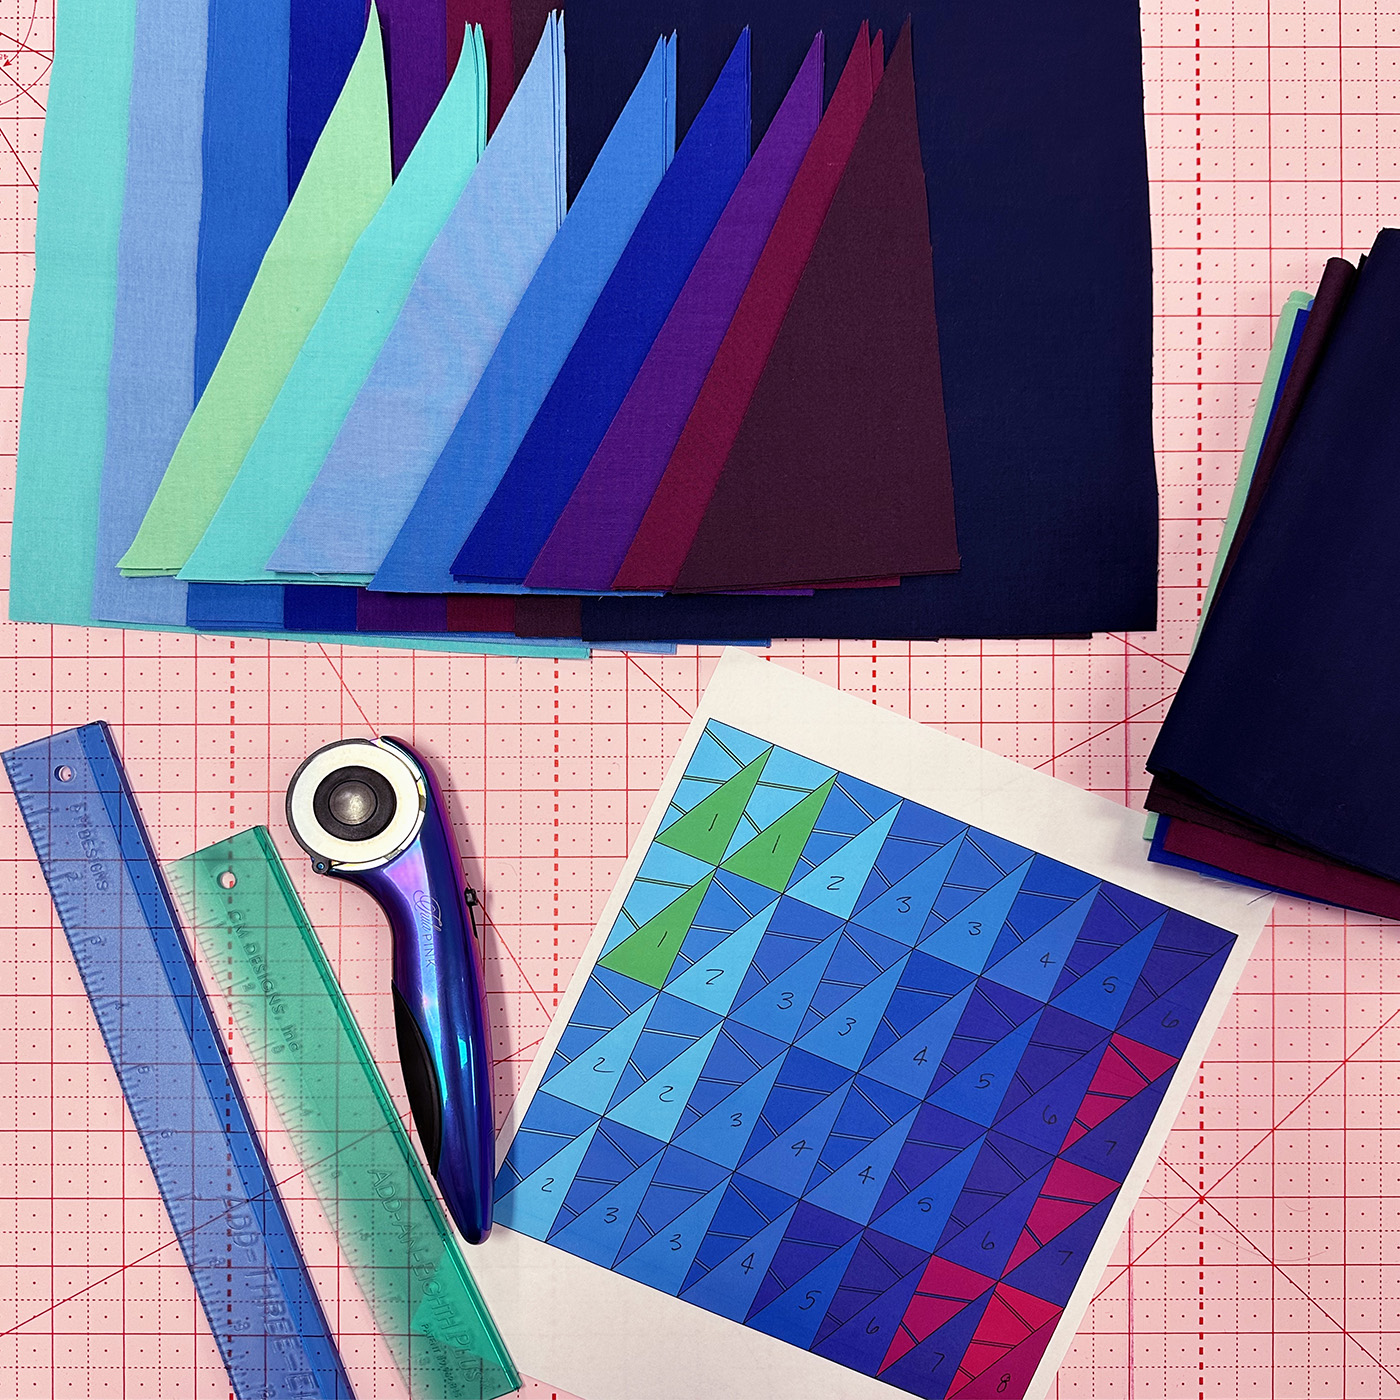
I chose nine colors in a range of values to construct the quilt. All of the fabrics are Painter’s Palette Solids from Paintbrush Studio Fabrics.
Cutting the Mini
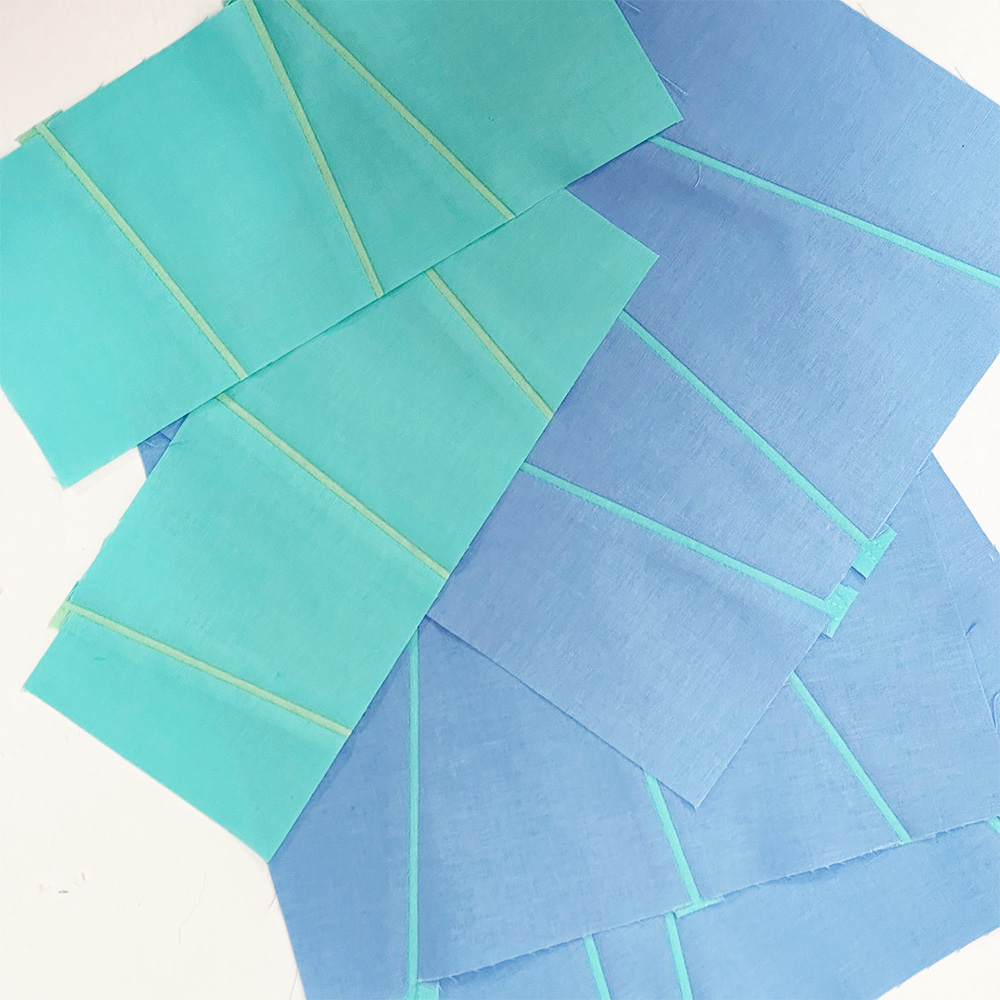
Most of this mini’s fabrics have solid triangles and pieced rectangles. When preparing the pieces, I cut the solid triangles first and left the pieced sections in oversized rectangles to cut down after the piecing process.
Adding the Pieced Sliver Inserts
I kept the piecing simple with slender 1/8″ wide slivers, using the method I shared here:
Each rectangle fits 2-3 pieced inserts in the middle of the piece. I then cut these oversized pieced sections into half rectangles.
Assembling the quilt top
After stitching the blocks, I cut all of my pieces large and trimmed them down using a bloc_loc ruler. A specialty ruler is the easiest way to trim a half-rectangle triangle, but it isn’t required.
I had to watch my block placement carefully because I kept rotating blocks! That’s why I always work with a printed version of the design at this stage in the construction process.
Quilting
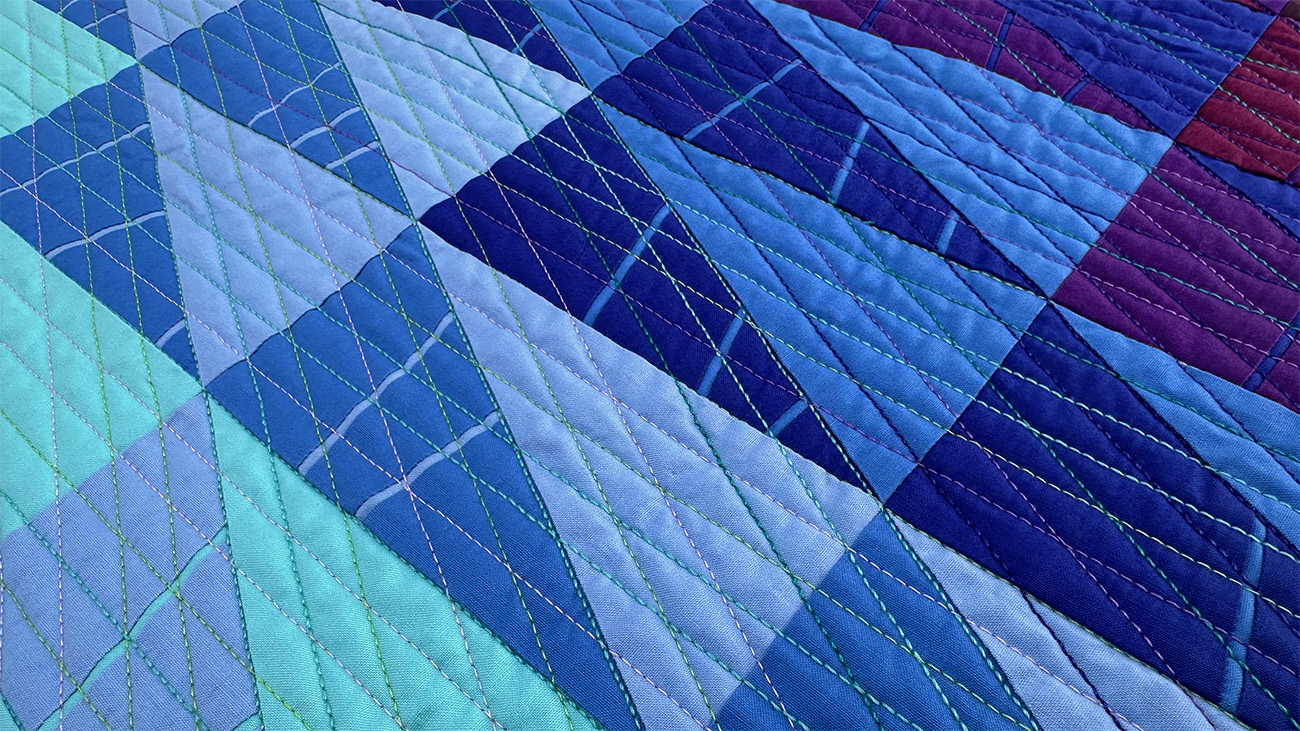
Heavier quilting thread in 28 and 12-weight makes the quilting stitches a dynamic part of the overall quilt design. Instead of a standard grid, I emphasized the piecing lines with a combination of vertical and 60-degree stitching lines. There are several thread colors in various blues, greens, and violets.
Finishing
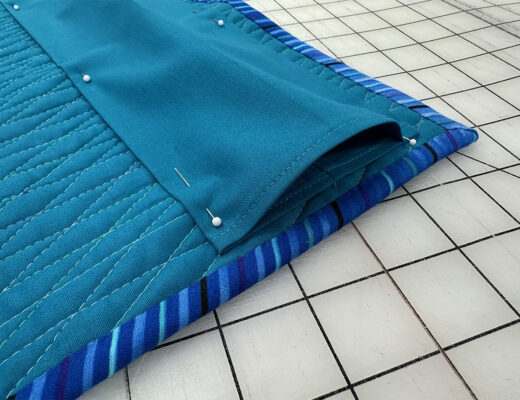
This mini quilt felt like it wanted a binding instead of a facing, and I wanted to use a stripe to reflect the piecing within each block. I found this piece of blue striped fabric in my stash, and it worked well- it even includes turquoise and purple in the print!
I always use bias binding, but this piece of fabric was small, so bias strips would have required a lot of seams. I had almost started cutting straight-of-grain strips when a friend suggested following the angle of the seam in the HRTs. This option was even better because now the binding stripes have the same angle as the piecing at the top and bottom of the mini quilt.
This mini quilt headed out last week and has arrived at its new home!
Quilt Stats
- Size: 24″ x 24″
- Techniques: Machine Piecing, 1/8″ wide sliver piecing
- Quilting: Straight Line Quilting with a walking foot on a BERNINA 770 QE PLUS
- Fabric: Painter’s Palette Solids
- Batting: Hobbs Tuscany 80/20 blend
- Thread: 12, 28, and 50-weight Aurifil in a variety of colors
- Binding: Striped binding cut at an angle to match the angle of the half-rectangle triangles

6 Comments
Fenny Dane
February 21, 2025 at 9:18 amWhat a beauty, really nice design and coloring
Kristin
February 21, 2025 at 11:02 amOhhhhh, your mini-quilt is just so luscious! Bravo!
Marty
February 21, 2025 at 4:40 pmBeautiful!
Carol McCaig
February 21, 2025 at 5:12 pmYour quilt is quite inspirational and I really appreciate the how to’s ❤️
Kitty Ann
February 21, 2025 at 5:25 pmYour swap quilt is amazing! I’m sure the recipient was wowed; I would have been! 🙂 I’m so happy I learned to do your mini strip insertion method at the Atlanta QuiltCon, I’ve used it a couple of times since.
I’ve only done one mini-swap for the Con, unfortunately it was quite disconcerting and I’ve not the heart to do another because of it. The quilt I received had a few fused-on shapes, on a solid white background – the shapes were falling off and it had no quilting at all. I was so sad. I guess I couldn’t hide the disappoint from my face, the woman gave my quilt back to me. Very strange experience!
Deb Hardman
March 12, 2025 at 1:45 pmReally pretty!! Wow💕