Summer Starburst Quilt Block is created using foundation paper piecing. This technique gives you lovely, precise points, resulting in a block with a clean, professional appearance. If you have never tried this process before, it may sound complex, but I encourage you to give it a try. Once you have done it a few times, you will develop a rhythm and may even come to love this technique as much as I do!
I designed this block in conjunction with the Fabri-Quilt New Block Blog Hop which is a continuation of this Summer’s New Blogger’s Blog Hop.

There are going to be tutorials for more than 60 different brand new blocks over the next four days! Not only do you get the directions for all of these lovely designs, but there are also several chances to win a bundle of Fabri-Quilt Prairie Cloth Cotton Solids in the Watermelon Summer color palette we have used to make these blocks. For a chance to win, check out the daily host’s blog. Links to all of today’s blocks and all of the host’s websites can be found at the end of this post. I’m excited to see everyone’s creations, and I hope you are too!
Fabri-Quilt generously supplied each blogger involved in this hop a fat eighth of each of the six colors in the Watermelon Summer palette. The blocks that have been made from the Fabri-Quilt solids are being turned into charity quilts by our generous hosts. There will be at least three quilts created and donated to children facing challenging circumstances.
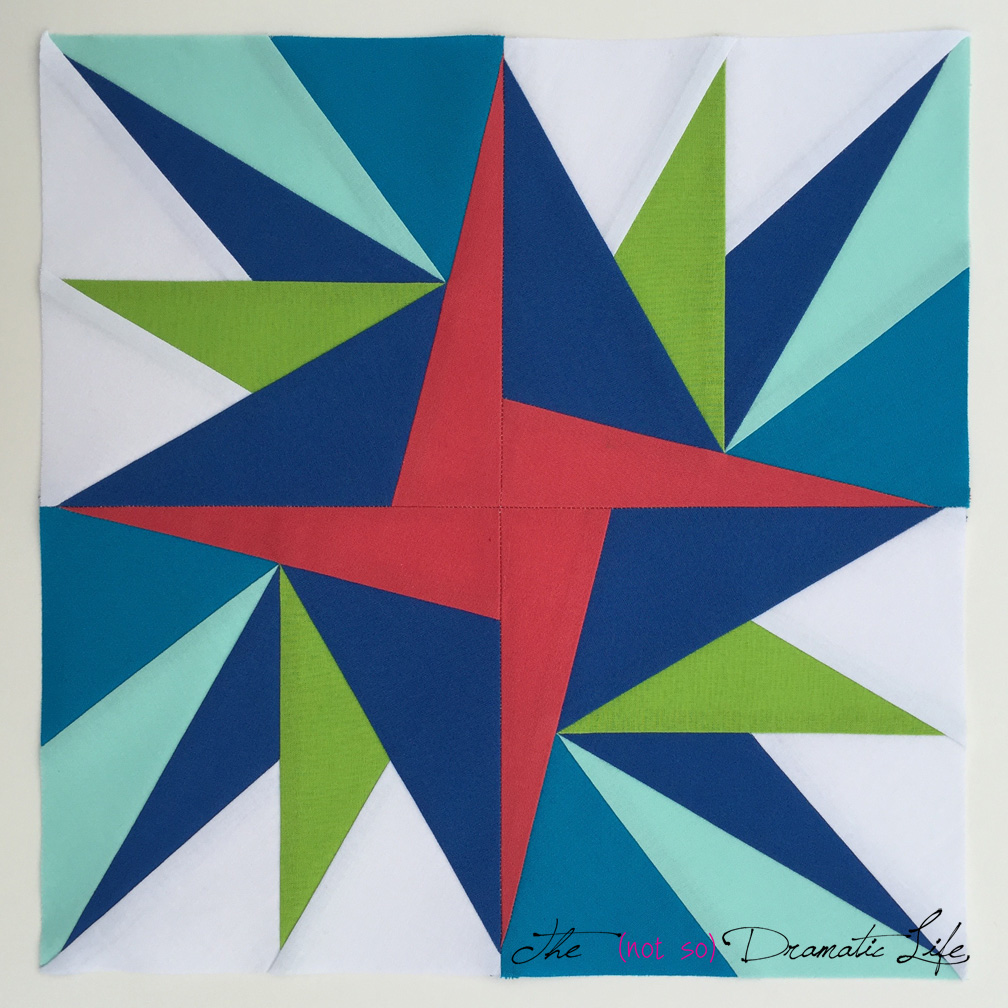
Summer Starburst
Finished Size: 12’’ x 12’’ (This block consists of four 6-1/2” square sections and the finished block will be 12-1/2’’ x 12- 1/2’’ before being joined to other blocks or borders)
Preparing the Foundation Paper
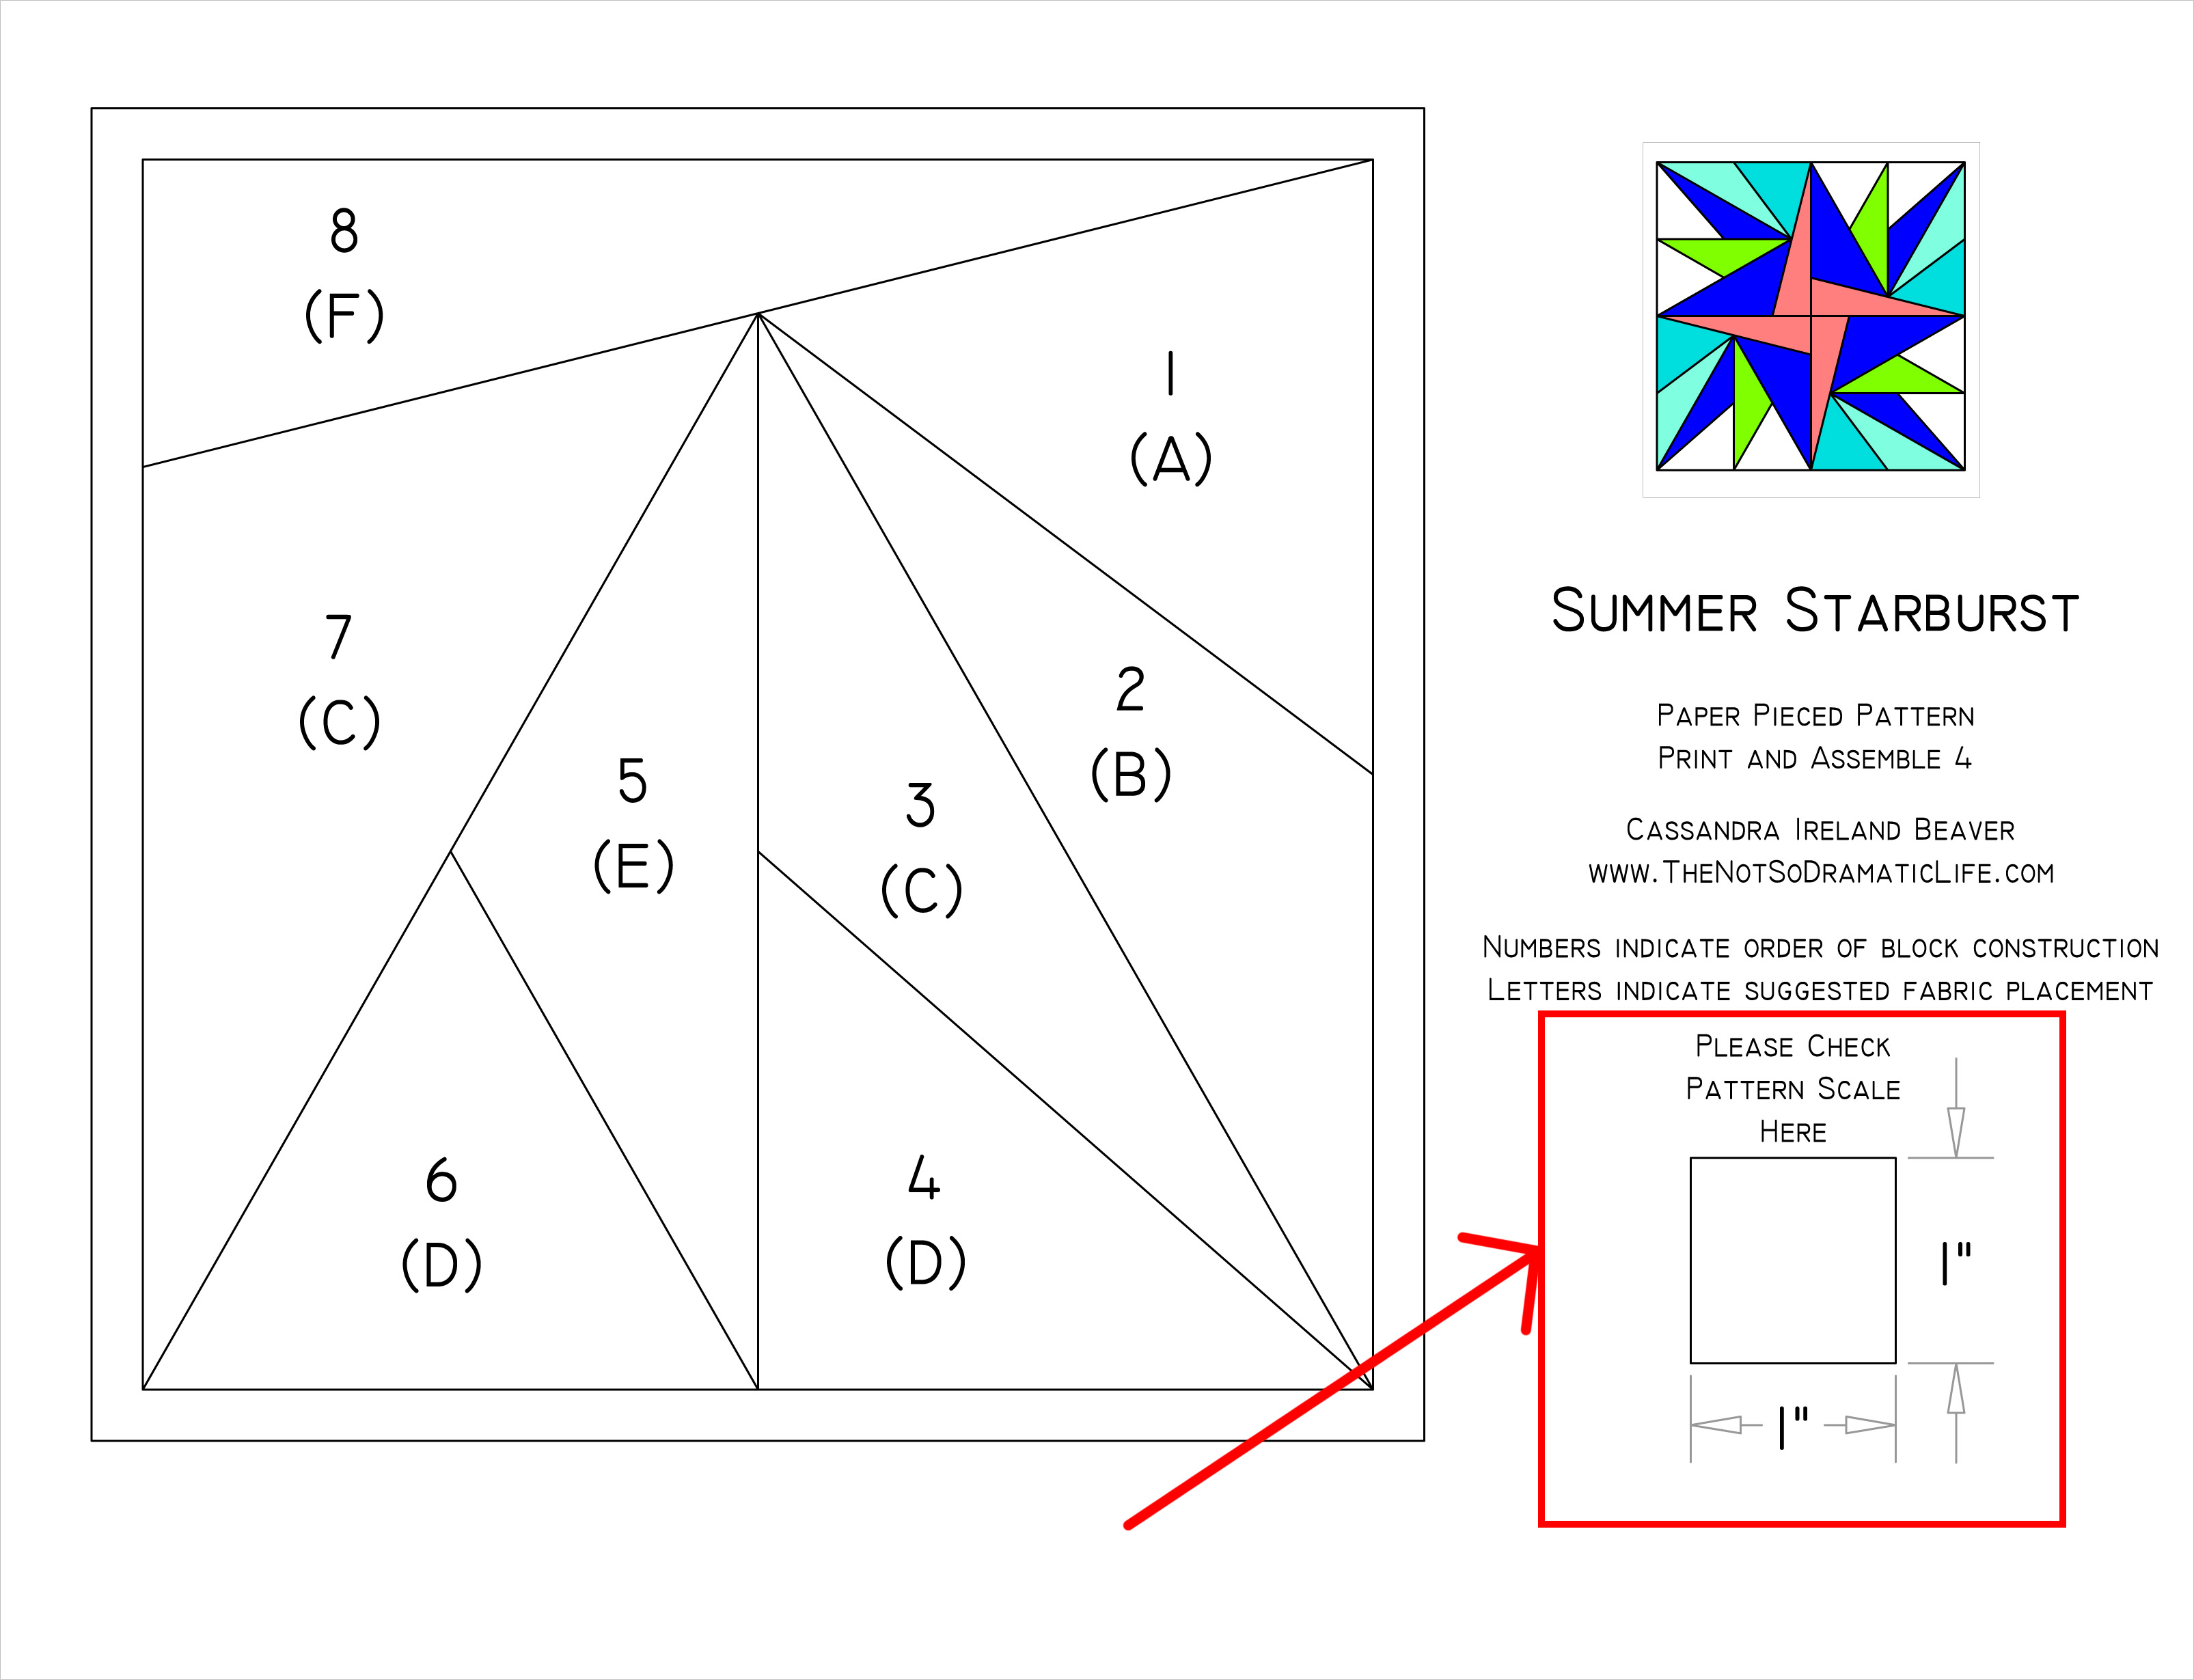
Download the PDF foundation paper piecing template to your desktop or folder of your choice.
Quilt Block Designs-Summer Starburst Paper Piecing
The Summer Starburst pattern along with PDF Instructions are also available on Craftsy.
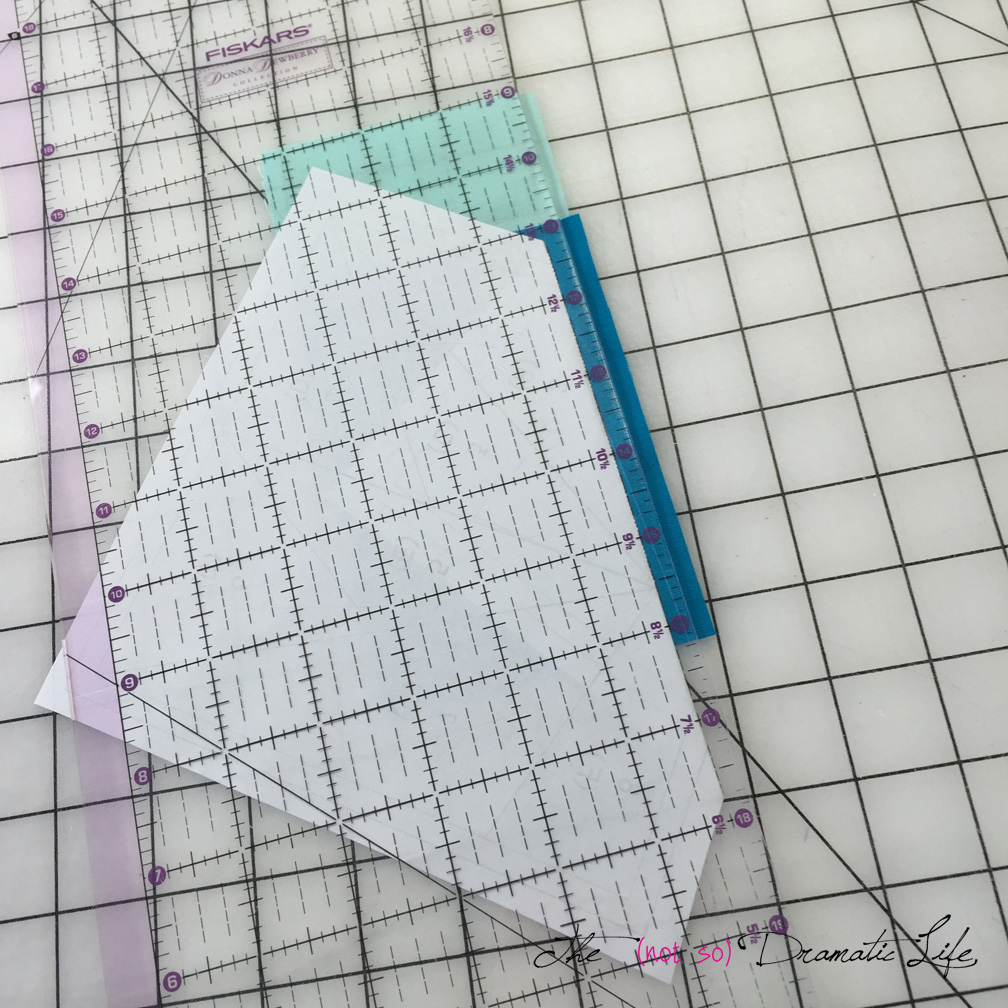
Print one PDF at 100% scale. There is a one inch square next to the pattern. Please take a moment to measure all sides of this square to make sure that there are no scale or distortion issues that occurred in the printing process. After this check, print three more (4 total) foundation papers. Double check the 1” square on each print to ensure accuracy.
Note: You may print this pattern on standard printer paper or a specialty foundation paper of your choice.
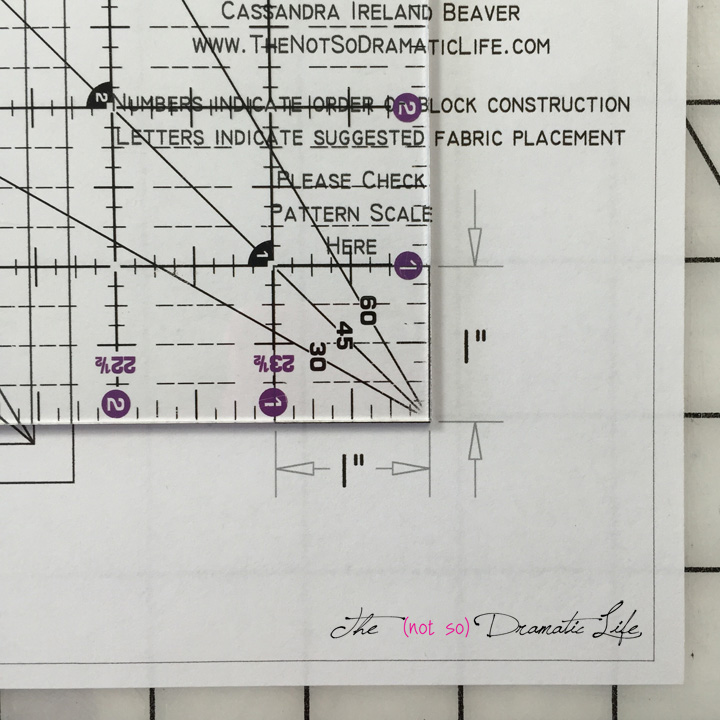
Using a ruler to check template scale
Cutting
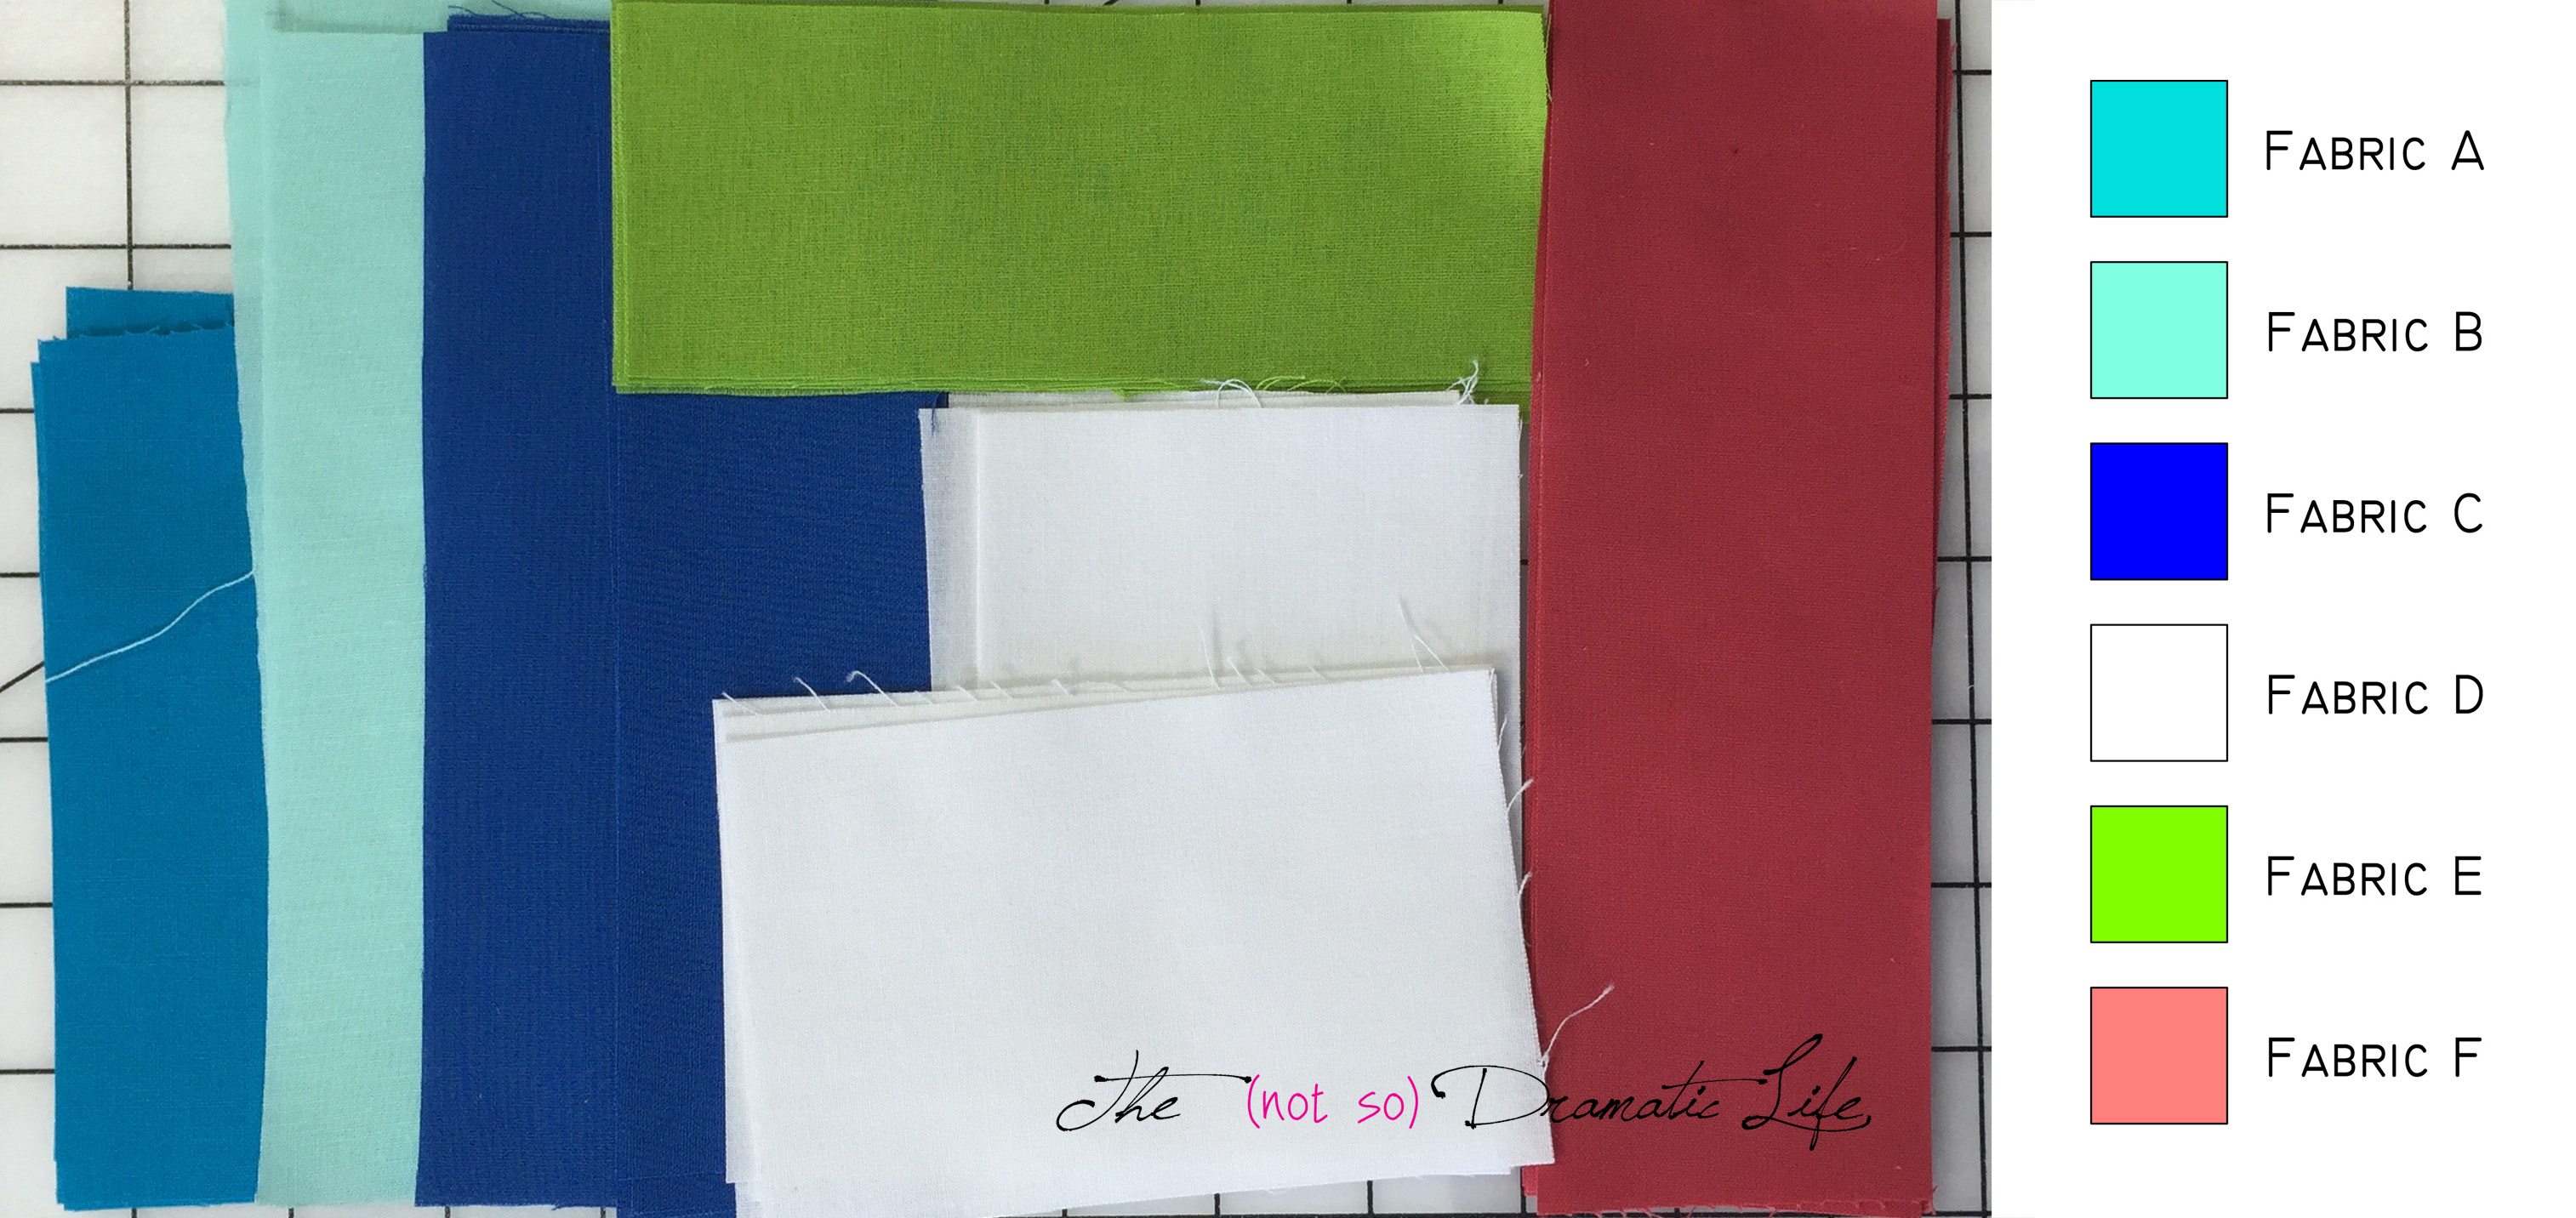
To prepare for foundation paper piecing, cut the following size rectangles from the indicated fabrics. Italicized Colors in parenthesis indicate the color used for block construction in the following tutorial. Please Note: By nature, foundation paper piecing involves a certain amount of fabric waste. The rectangle sizes below allow for the easiest construction of this block. It may be possible to save some additional fabric by rough cutting triangle shapes rather than rectangles. I only suggest this option for experienced foundation paper piecers.
Fabric A (Turquoise):
- Section 1: Four pieces 3-1/2’’ x 5’’
Fabric B (Aqua):
- Section 2: Four pieces 3’’ x 7’’
Fabric C (Lapis Blue):
- Section 3: Four Pieces 2’’ x 7’’
- Section 7: Four Pieces 3-1/4’’ x 7’’
Fabric D (White):
- Section 4: Four Pieces 3’’ x 5’’
- Section 6: Four Pieces 3-1/2’’ x 4’’
Fabric E (Chartreuse):
- Section 5: Four Pieces 2-1/4’’ x 6’’
Fabric F (Coral):
- Section 8: Four Pieces 2-1/2’’ x 7-1/4’’
Piecing
This block is foundation paper pieced in four sections which are joined in the final step of block construction.
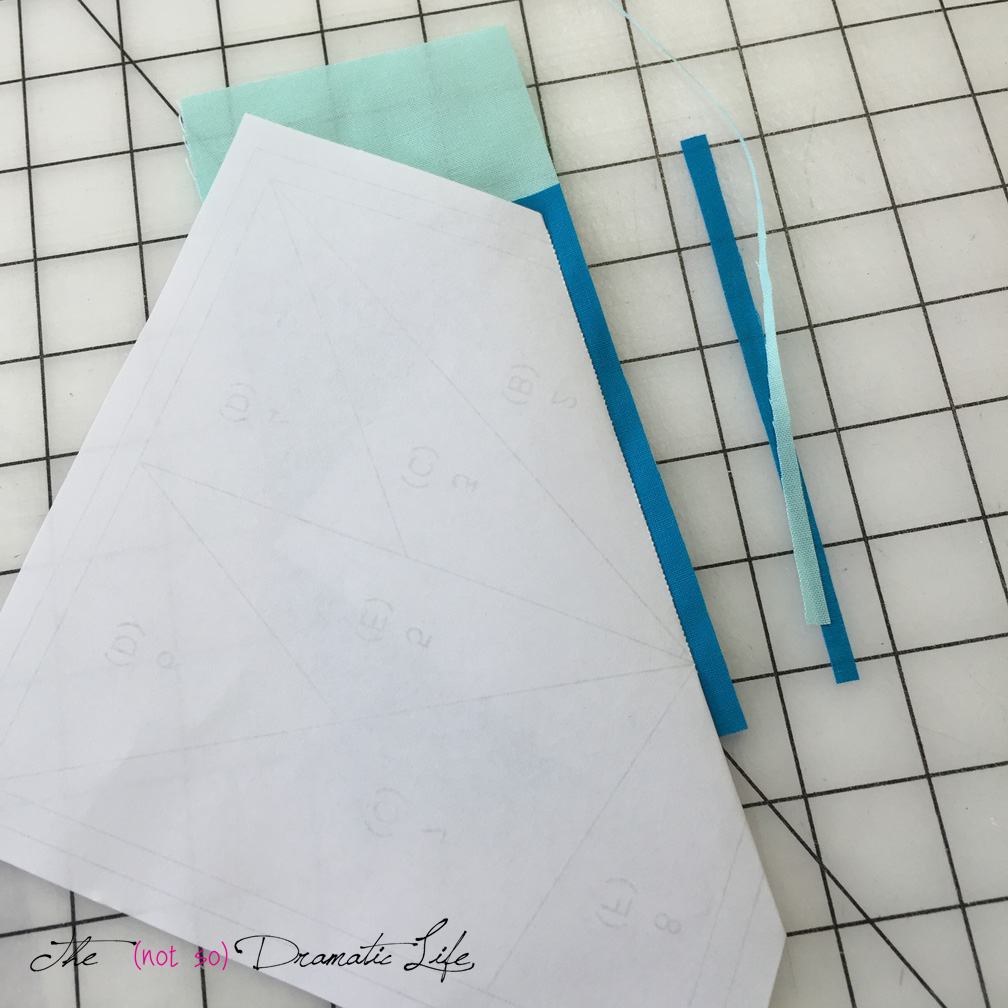
Step 1: Rough cut the foundation paper to be approximately 1/4’’ larger on all sides than the outermost printed lines.

Four templates that have been rough cut for stitching
Note: The fabric construction of the paper pieced block occurs on the non-printed side of the pattern.
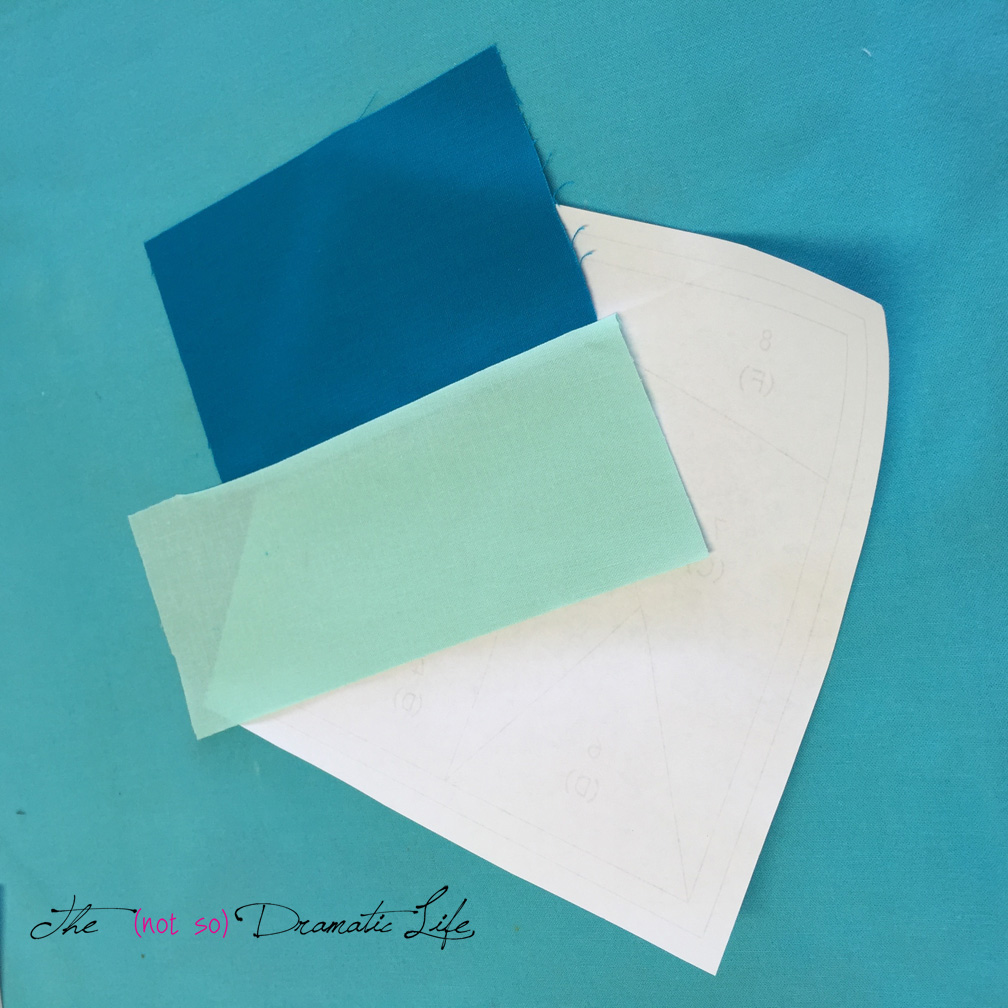
Step 2: With the printed side of the pattern facing down, place a piece of fabric A right side up directly over section 1. (See Figure A) If desired, you may pin this to the paper. Hold the paper up to a light source to ensure all of section 1 is covered by the fabric and there is at least 1/4” of extra fabric extending over the section 1 boundary lines into all adjoining areas.
Please Note: Fabric is placed on the non-printed side of your paper piecing template. For clarity, the diagrams in this pattern include grey lines that indicate what you would see if the template was held up to a light source.

Note: When foundation paper piecing, section 1 is the only section that the fabric is placed right side up.
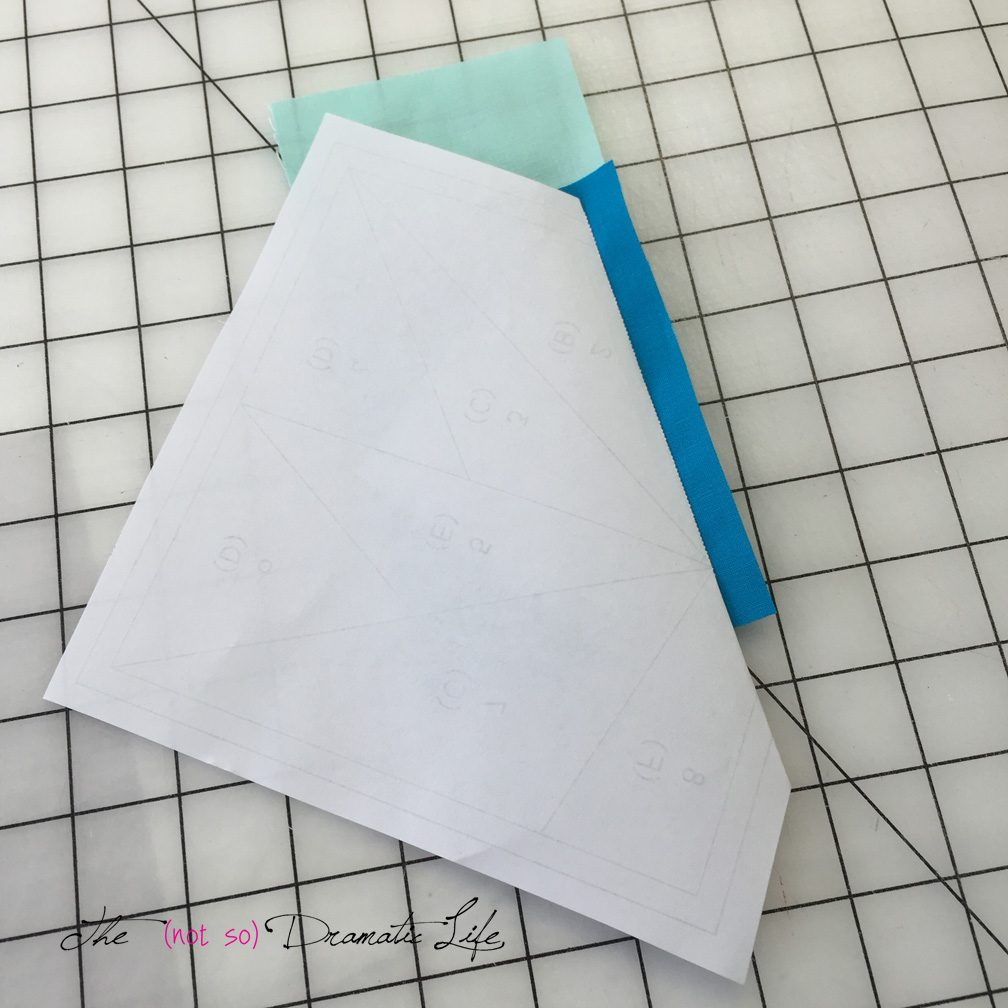
Step 3: Position the fabric for section 2 wrong side up over the section 1 fabric with a small amount crossing the line between the two sections and the main body of the fabric over section 1. (See Figure B) Pin both fabrics along the stitching line between sections 1 & 2. Flip the section 2 fabric along the pin line. Hold the block up to a light source to see if the fabric will cover all of section two. Adjust the fabric placement as needed.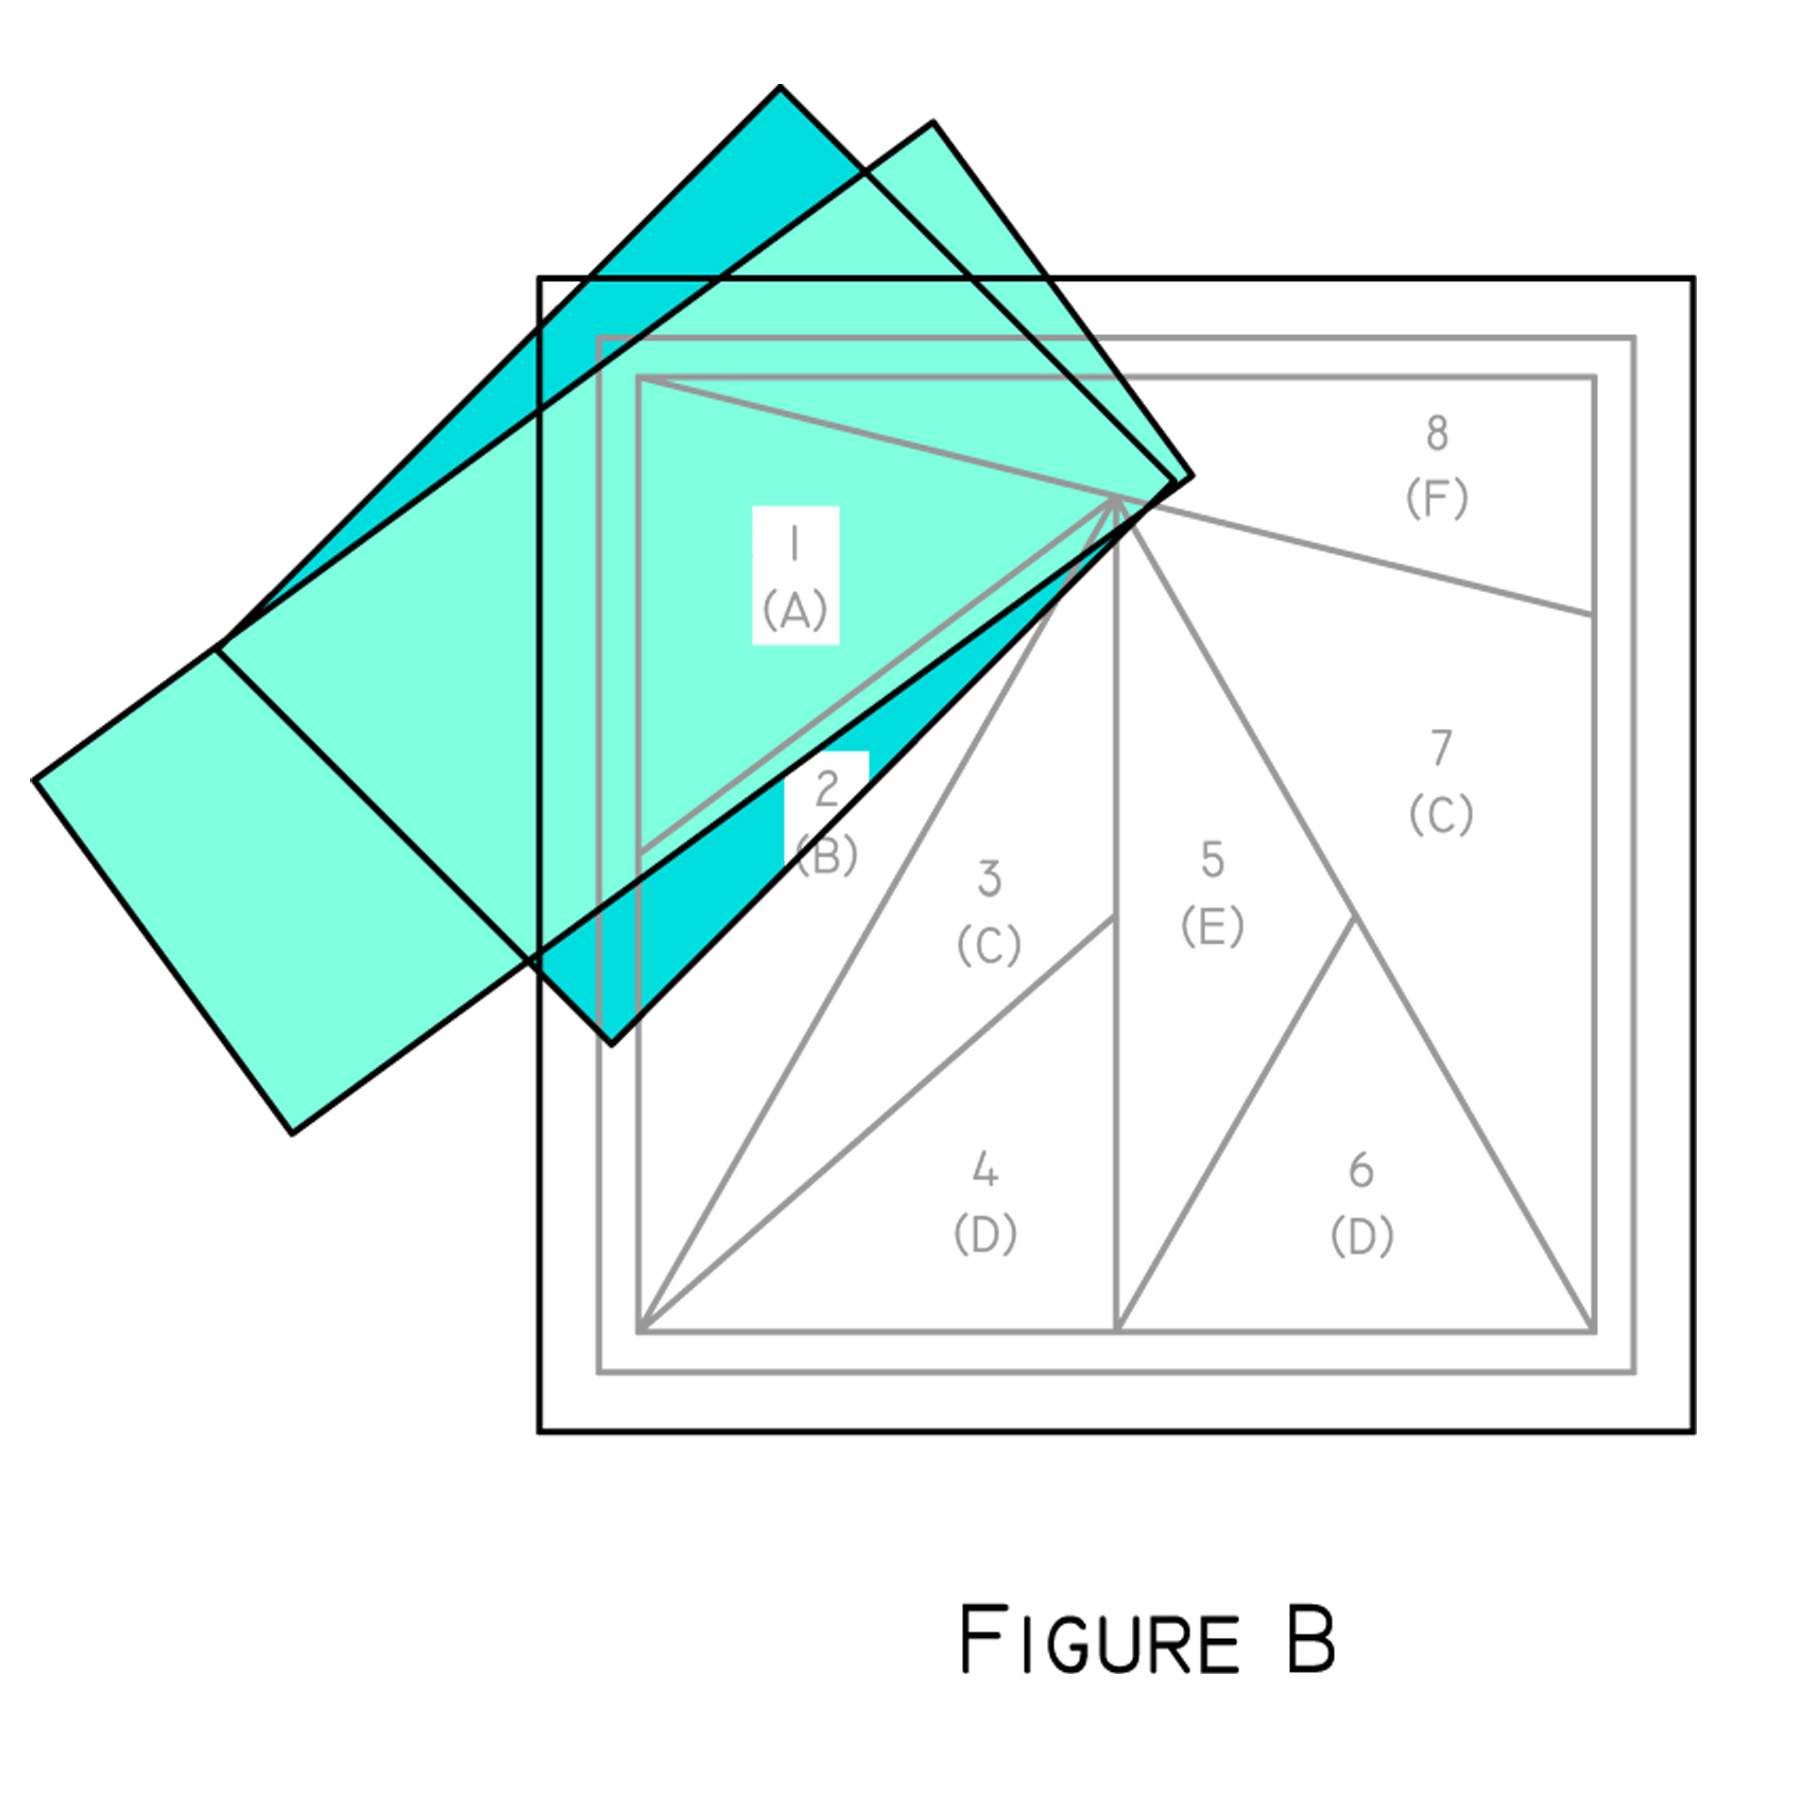
Step 4: When you are happy with the fabric placement, turn the block so the paper is on top. With the printed side of the paper facing up, carefully machine straight stitch along the line between sections one and two. I suggest using a small stitch and backstitching at the beginning and end of the stitching line. You may extend the stitching beyond the line on either end, but it is not required.
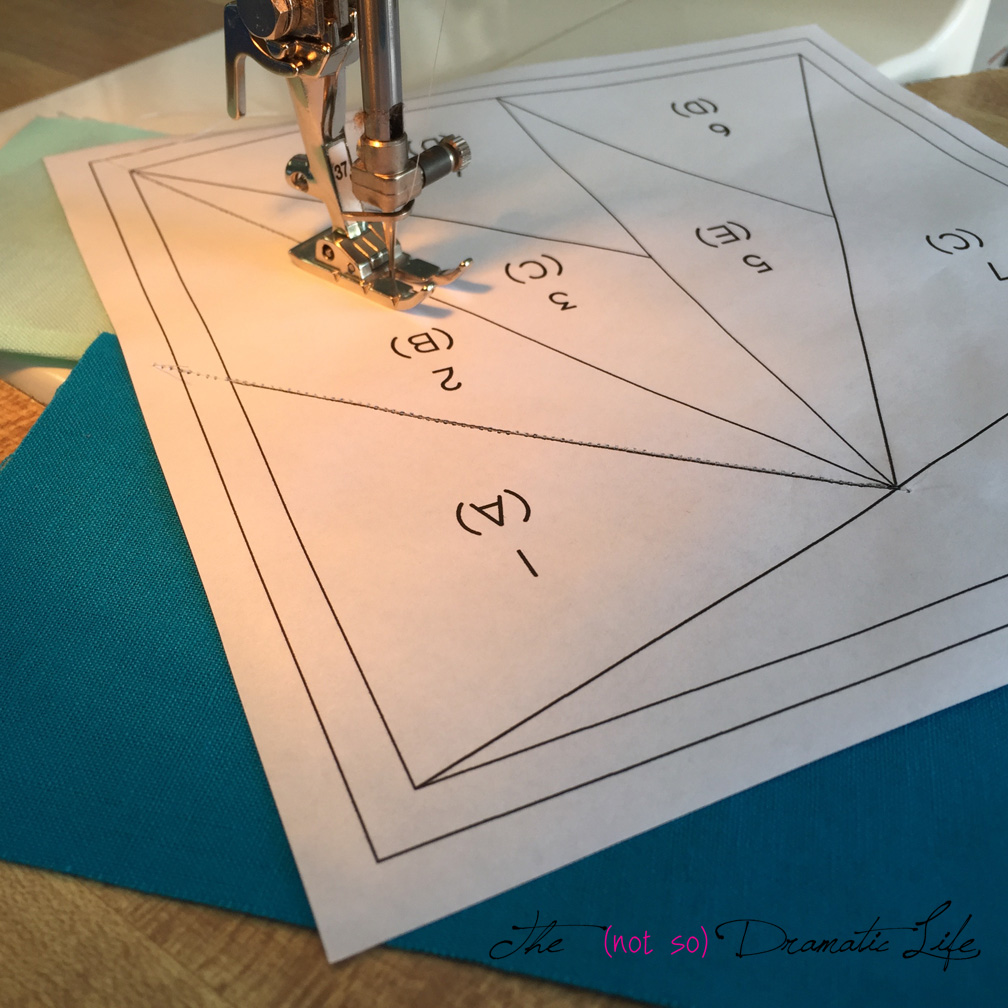
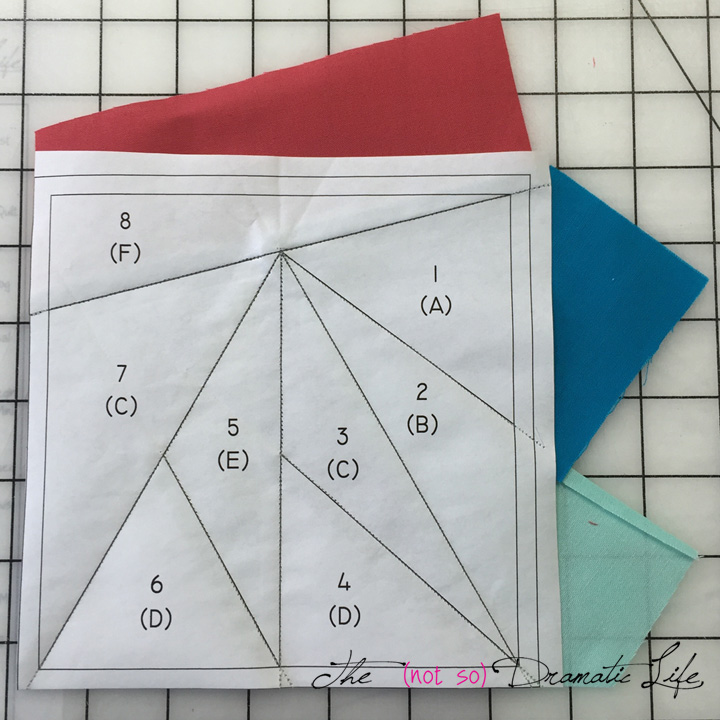
So, I forgot to take a photo of the stitching the line for segments 1 & 2. This is the photo adding segment 3, but you can still see how the paper is printed side up, fabric down, and you are stitching directly on the line.
Step 5: Flip the section two fabric toward its finished position to double check that all of section two is covered. Turn the section two fabric back over section one and fold the paper foundation back along the stitching line. Trim the excess fabric away from the stitching line leaving about a quarter inch to act as seam allowance.
Folding back the template to trim the excess fabric
Measuring a 1/4″ seam allowance
Trimming the seam allowance
Trimmed seam allowance
Step 6: Carefully press the section two fabric into place over area two. (See Figure C)
Note: Now you will work around the foundation template in numerical order following steps 2-6 for each section.
Section 3: Position the section three fabric wrong side up with the main body of the fabric over section two. (See Figure D) Use a light source to check the fabric positioning. 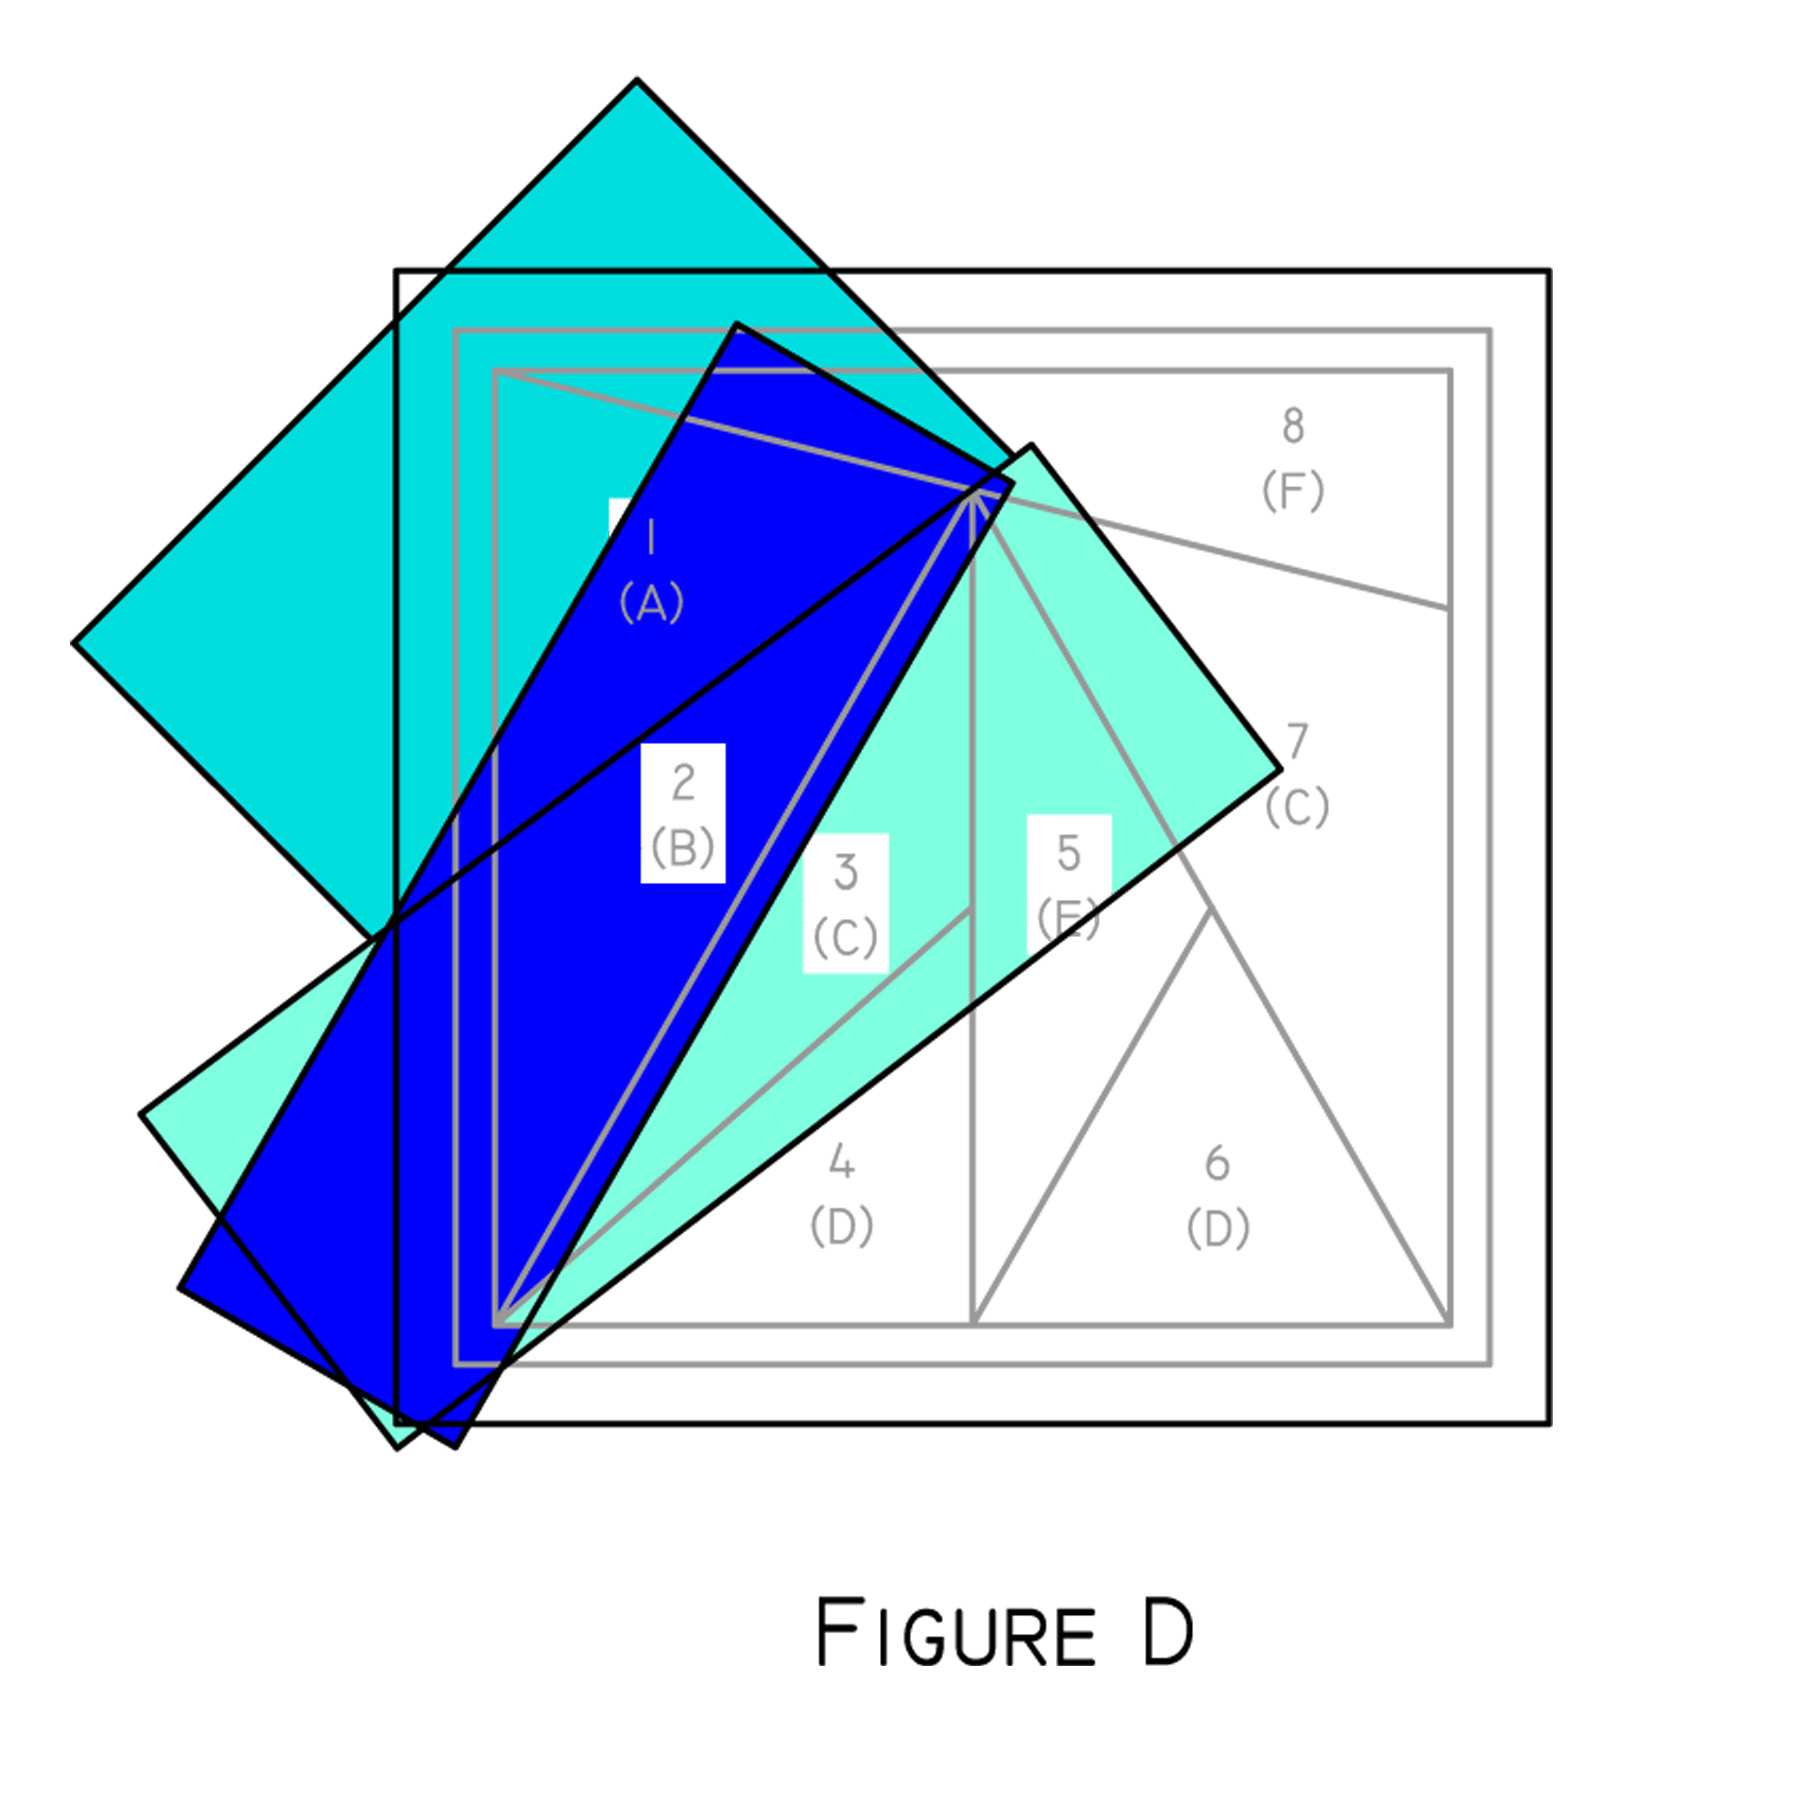
With the printed side of the paper facing up, stitch along the line between sections two and three, trim the seam allowance, and press the section three fabric into place. (See Figure E)
Section 4: Position the section four fabric wrong side up with the main body of the fabric over section three. (See Figure F) Use a light source to check the fabric positioning. 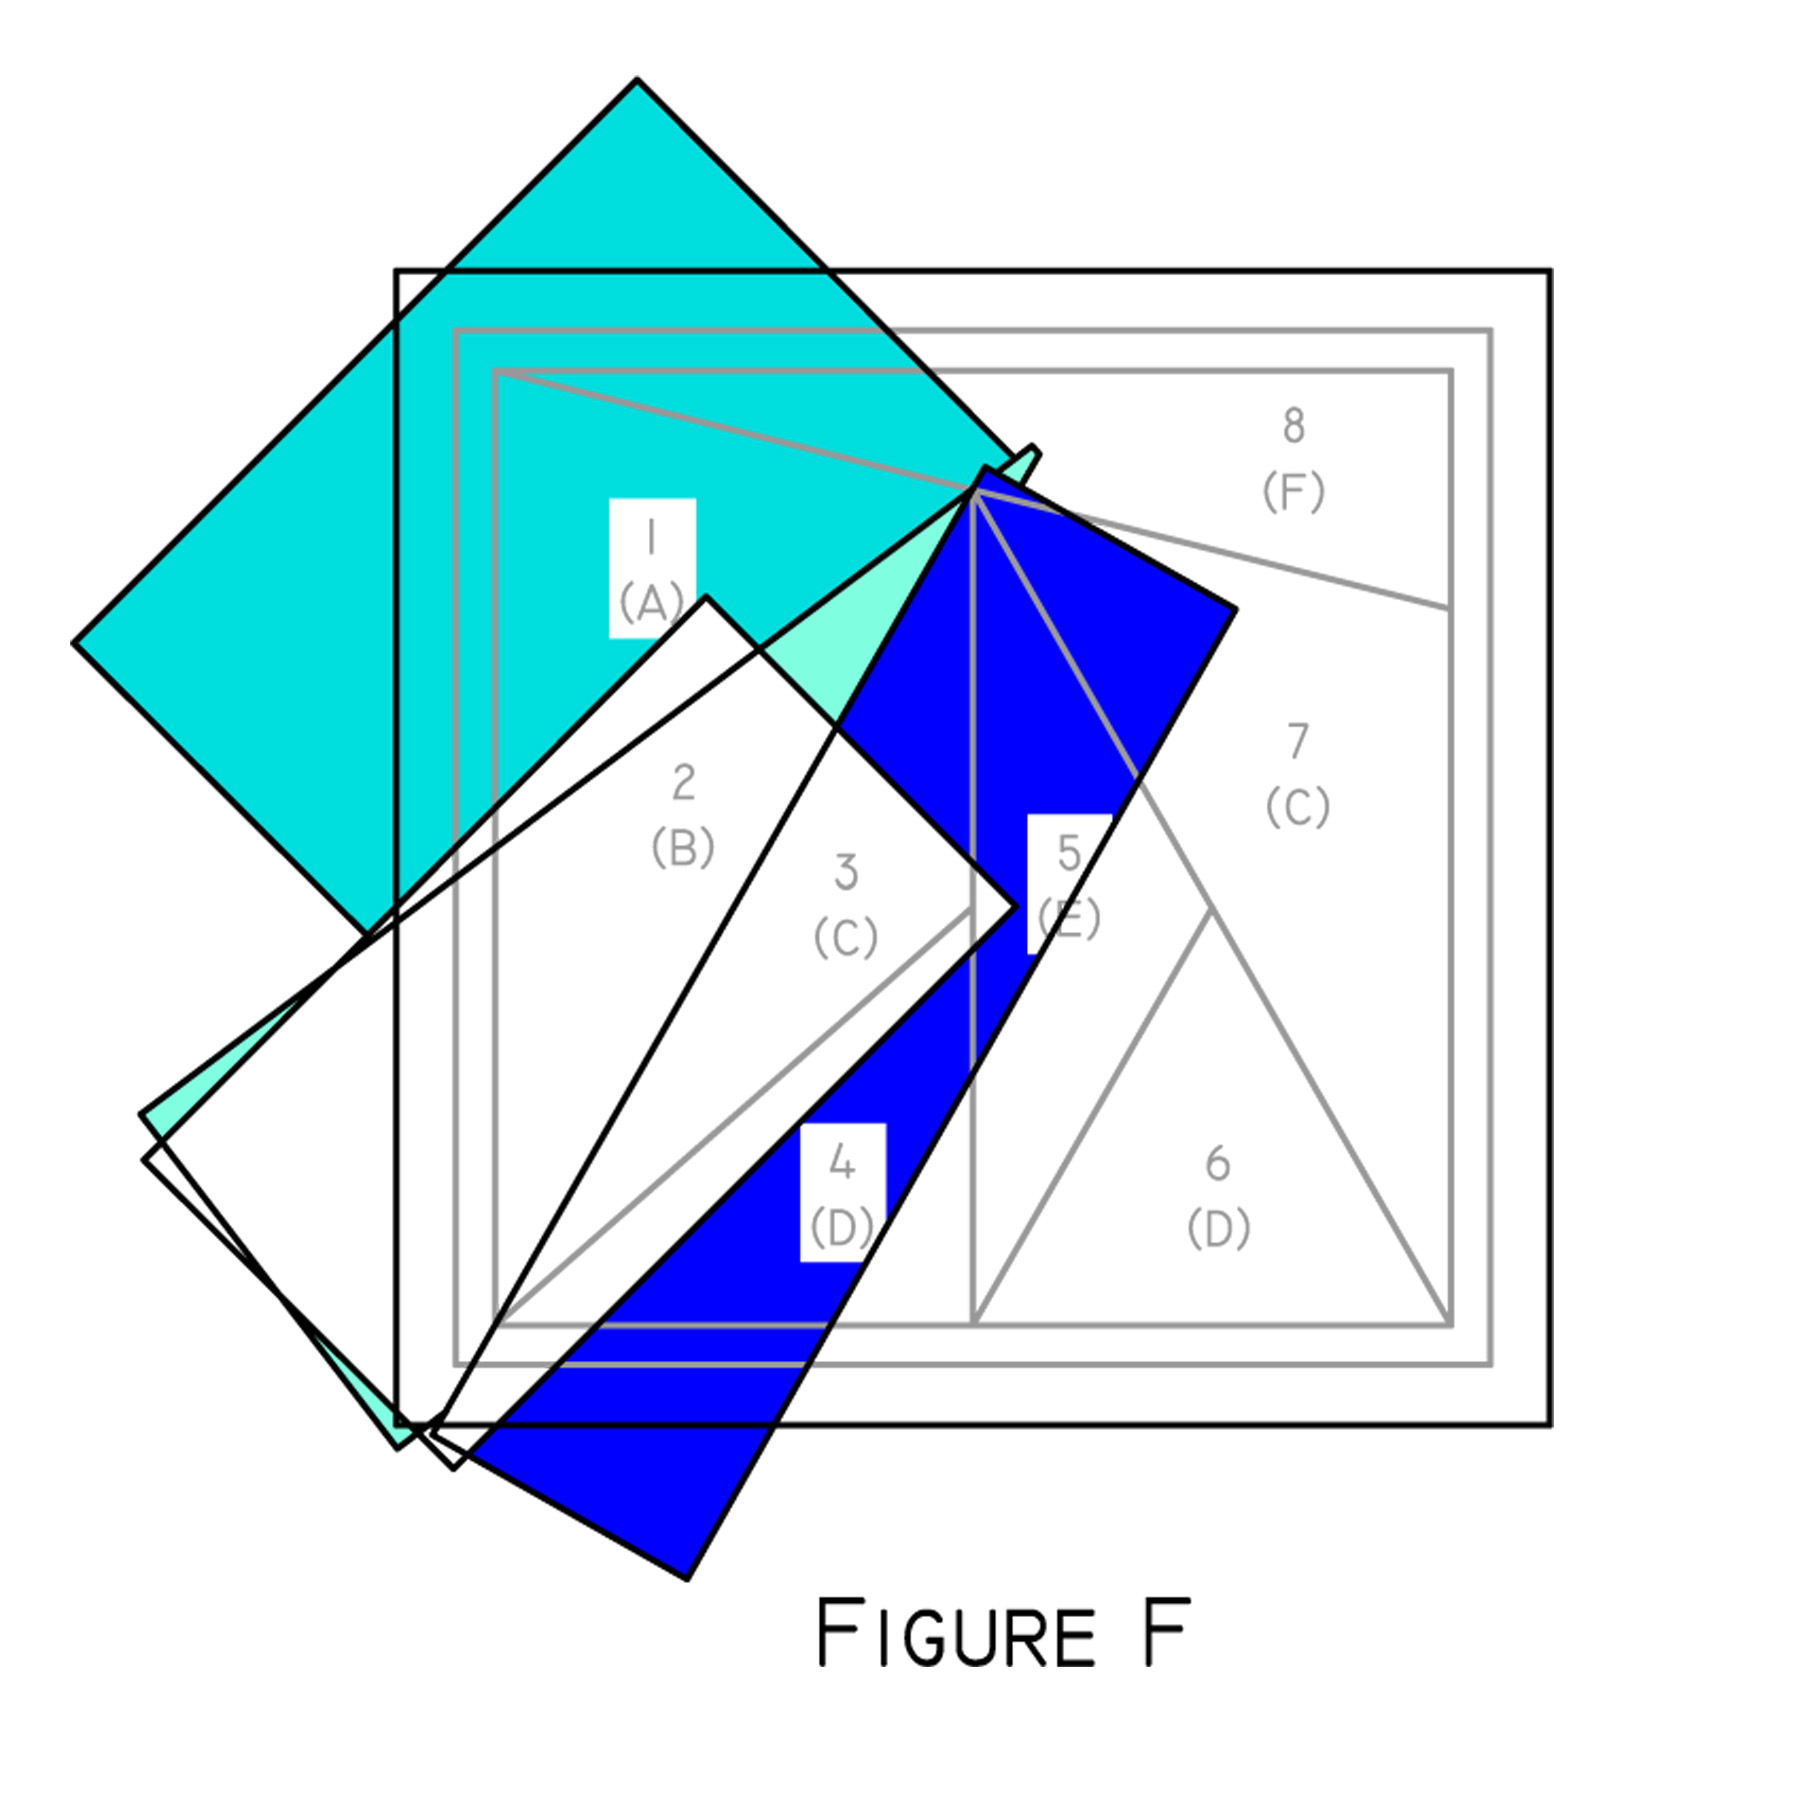
Stitch along the line between sections three and four, trim the seam allowance, and press the section four fabric into place. (See Figure G)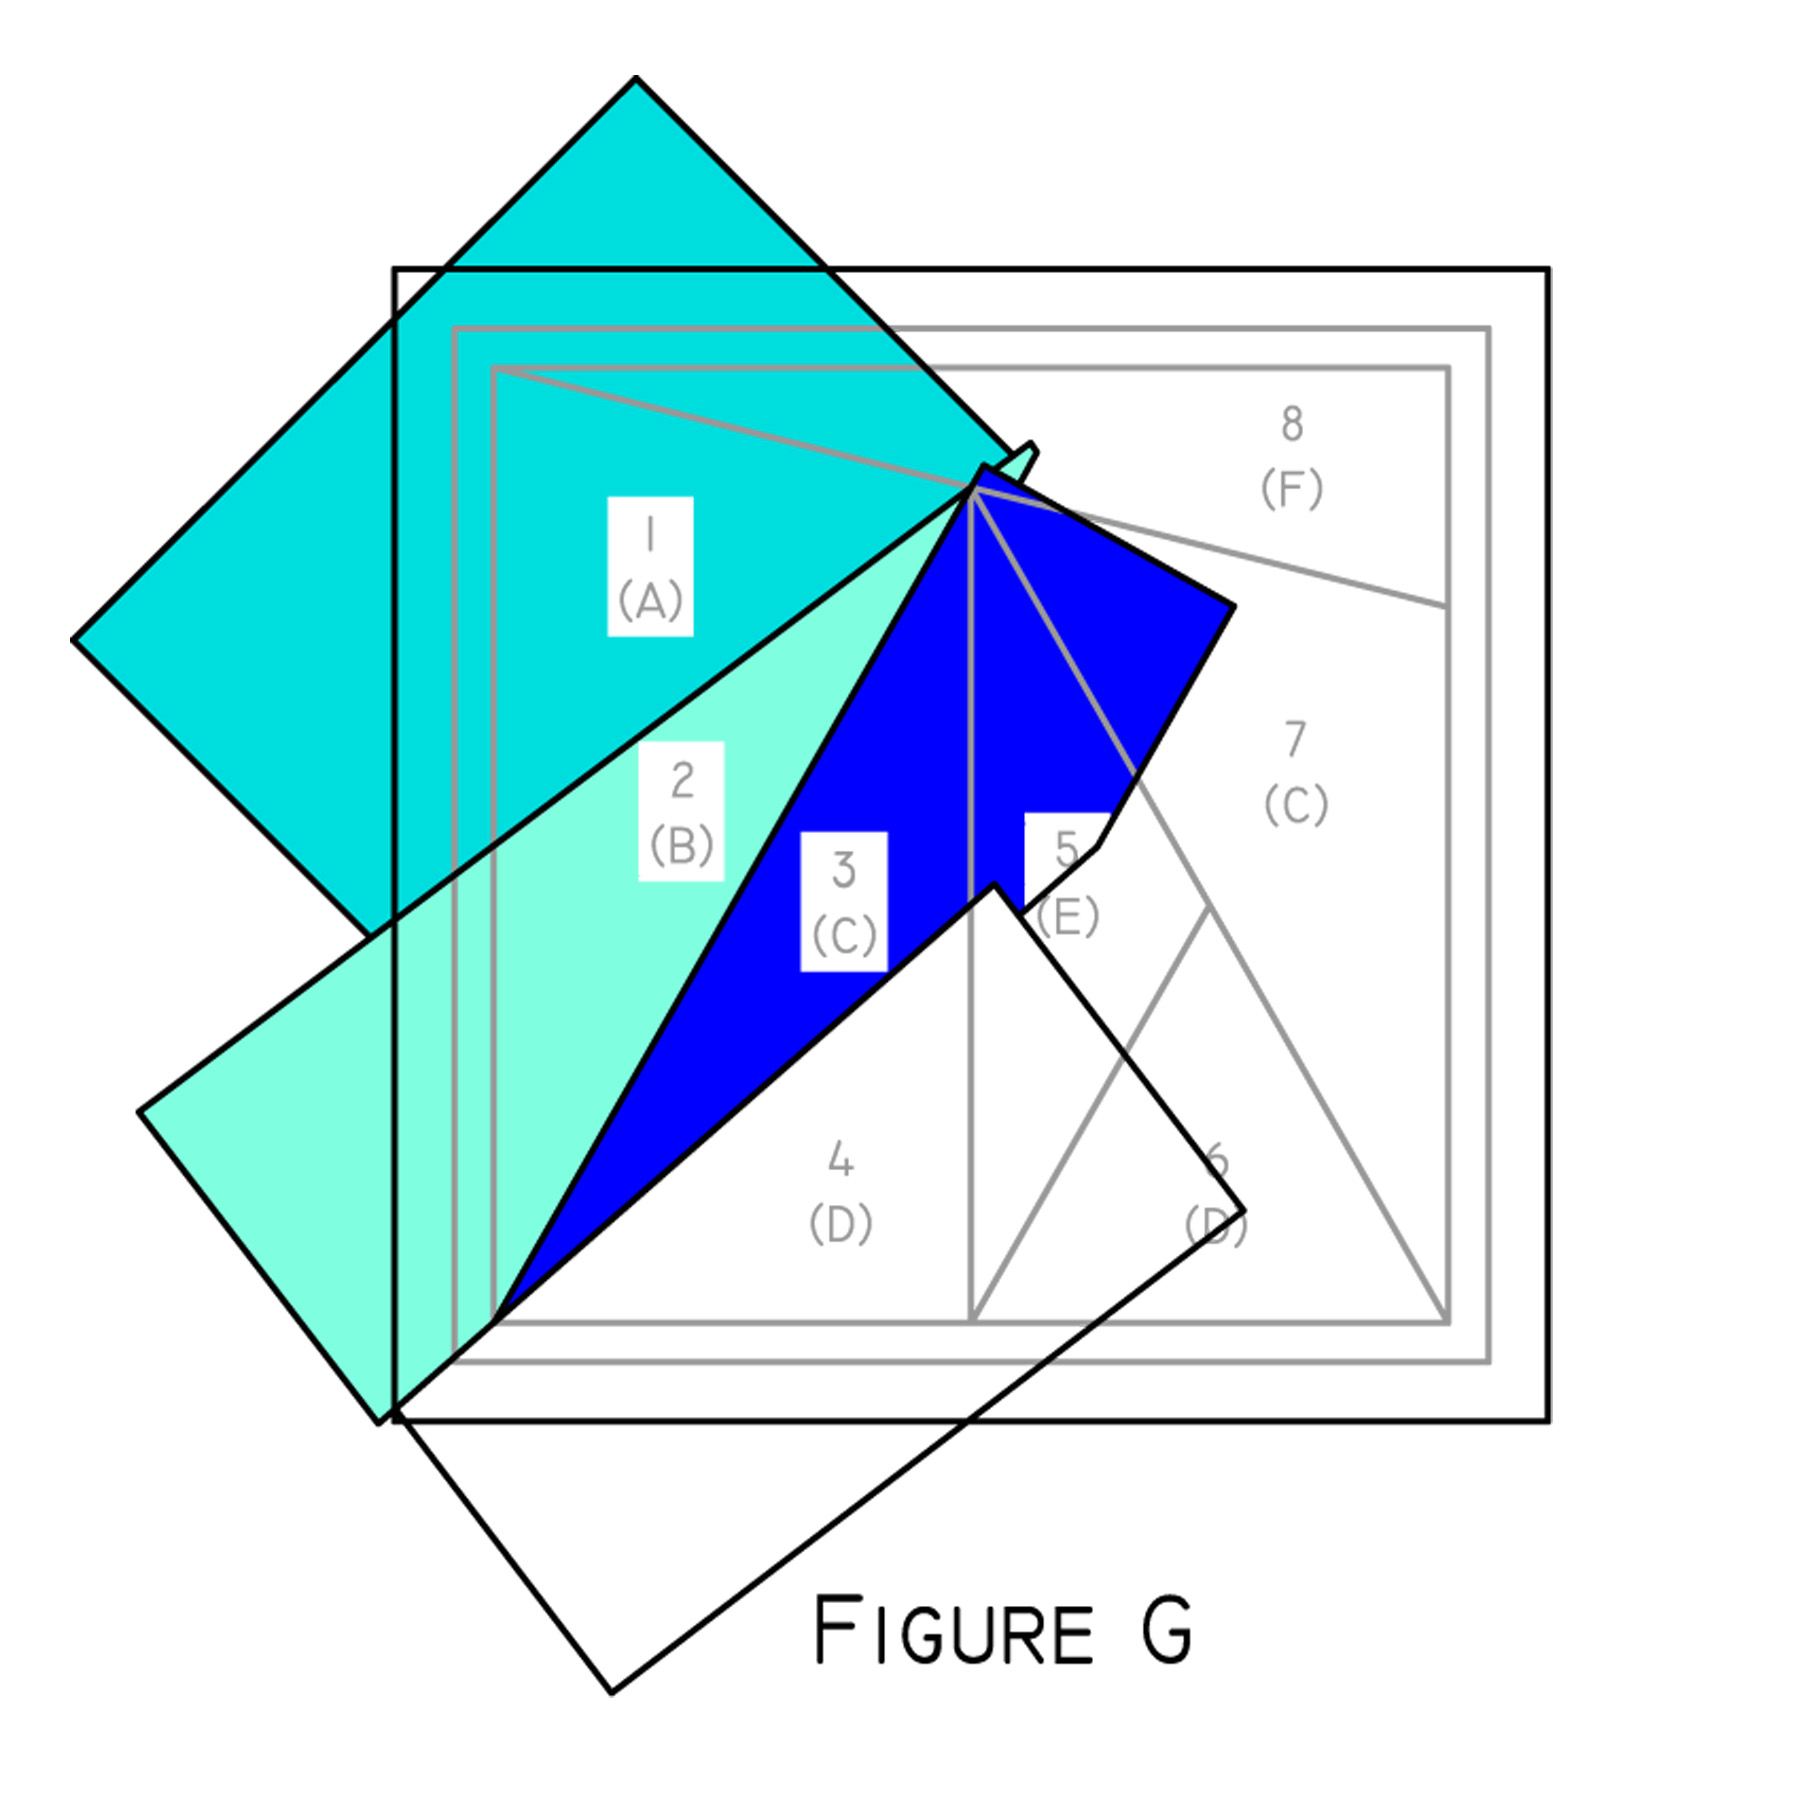
Section 5: Position the section five fabric wrong side up with the main body of the fabric over sections three and four. (See Figure H) Use a light source to check the fabric positioning. 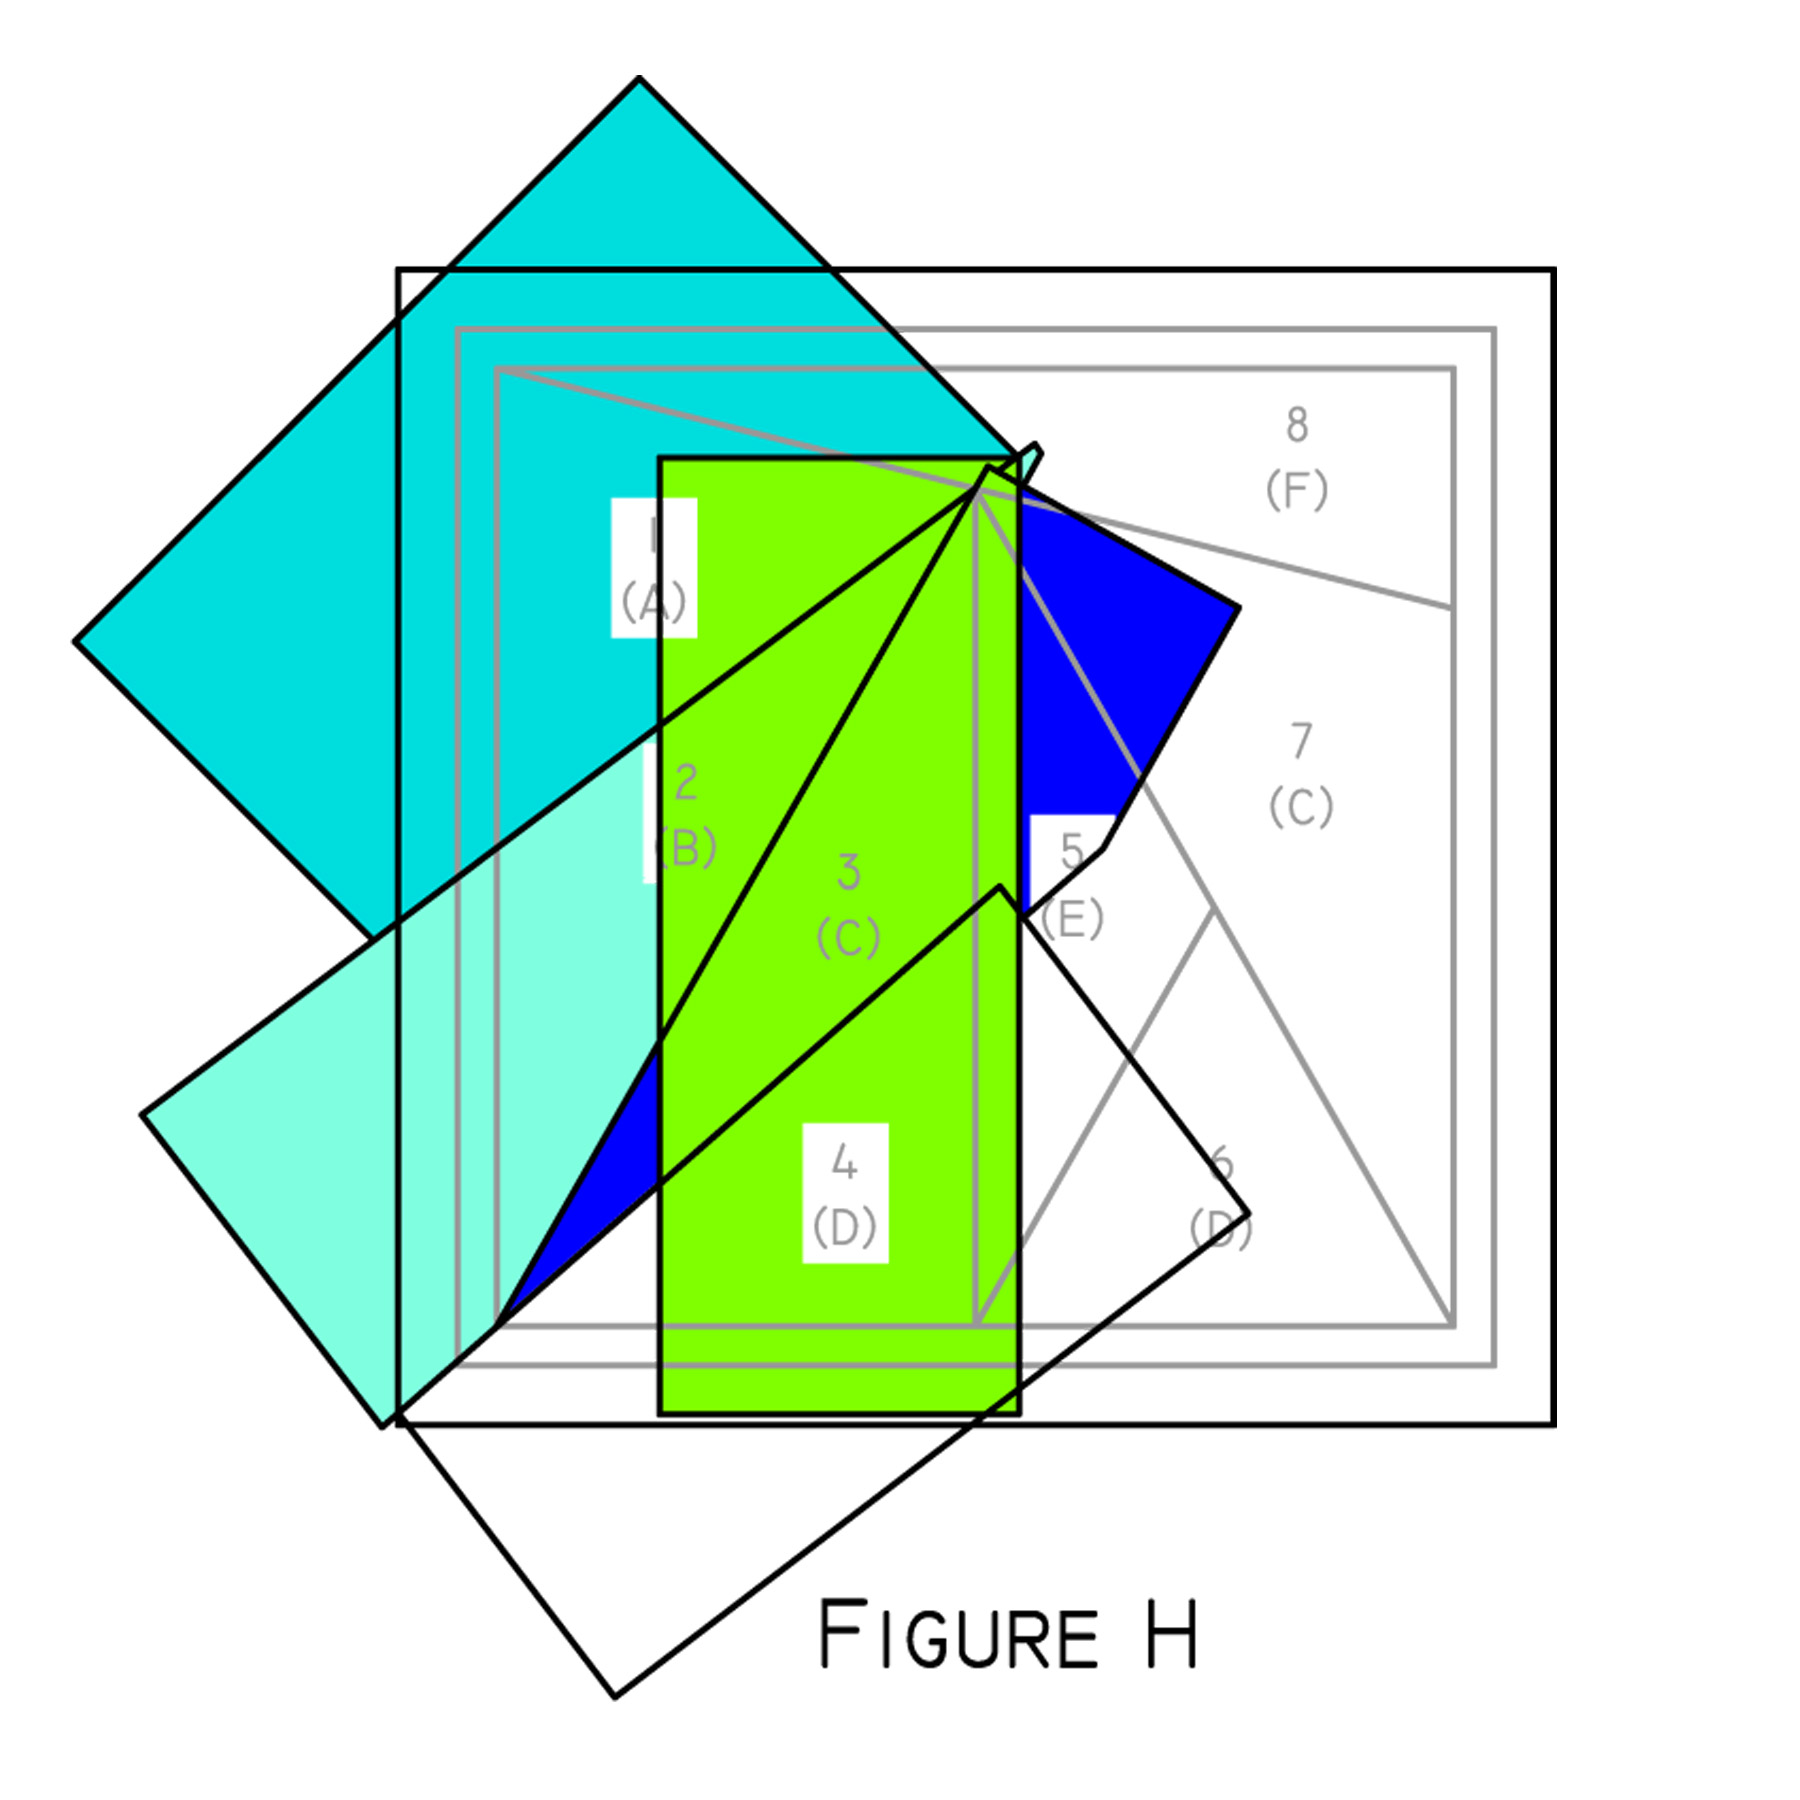
Stitch along the line between sections three/four and five, trim the seam allowance, and press the section five fabric into place. (See Figure I)
Section 6: Position the section six fabric wrong side up with the main body of the fabric over section five. (See Figure J) Use a light source to check the fabric positioning. 
Stitch along the line between sections five and six, trim the seam allowance, and press the section six fabric into place. (See Figure K)
Section 7: Position the section seven fabric wrong side up with the main body of the fabric over sections five and six. (See Figure L) Use a light source to check the fabric positioning. 
Stitch along the line between sections five/six and seven, trim the seam allowance, and press the section seven fabric into place. (See Figure M)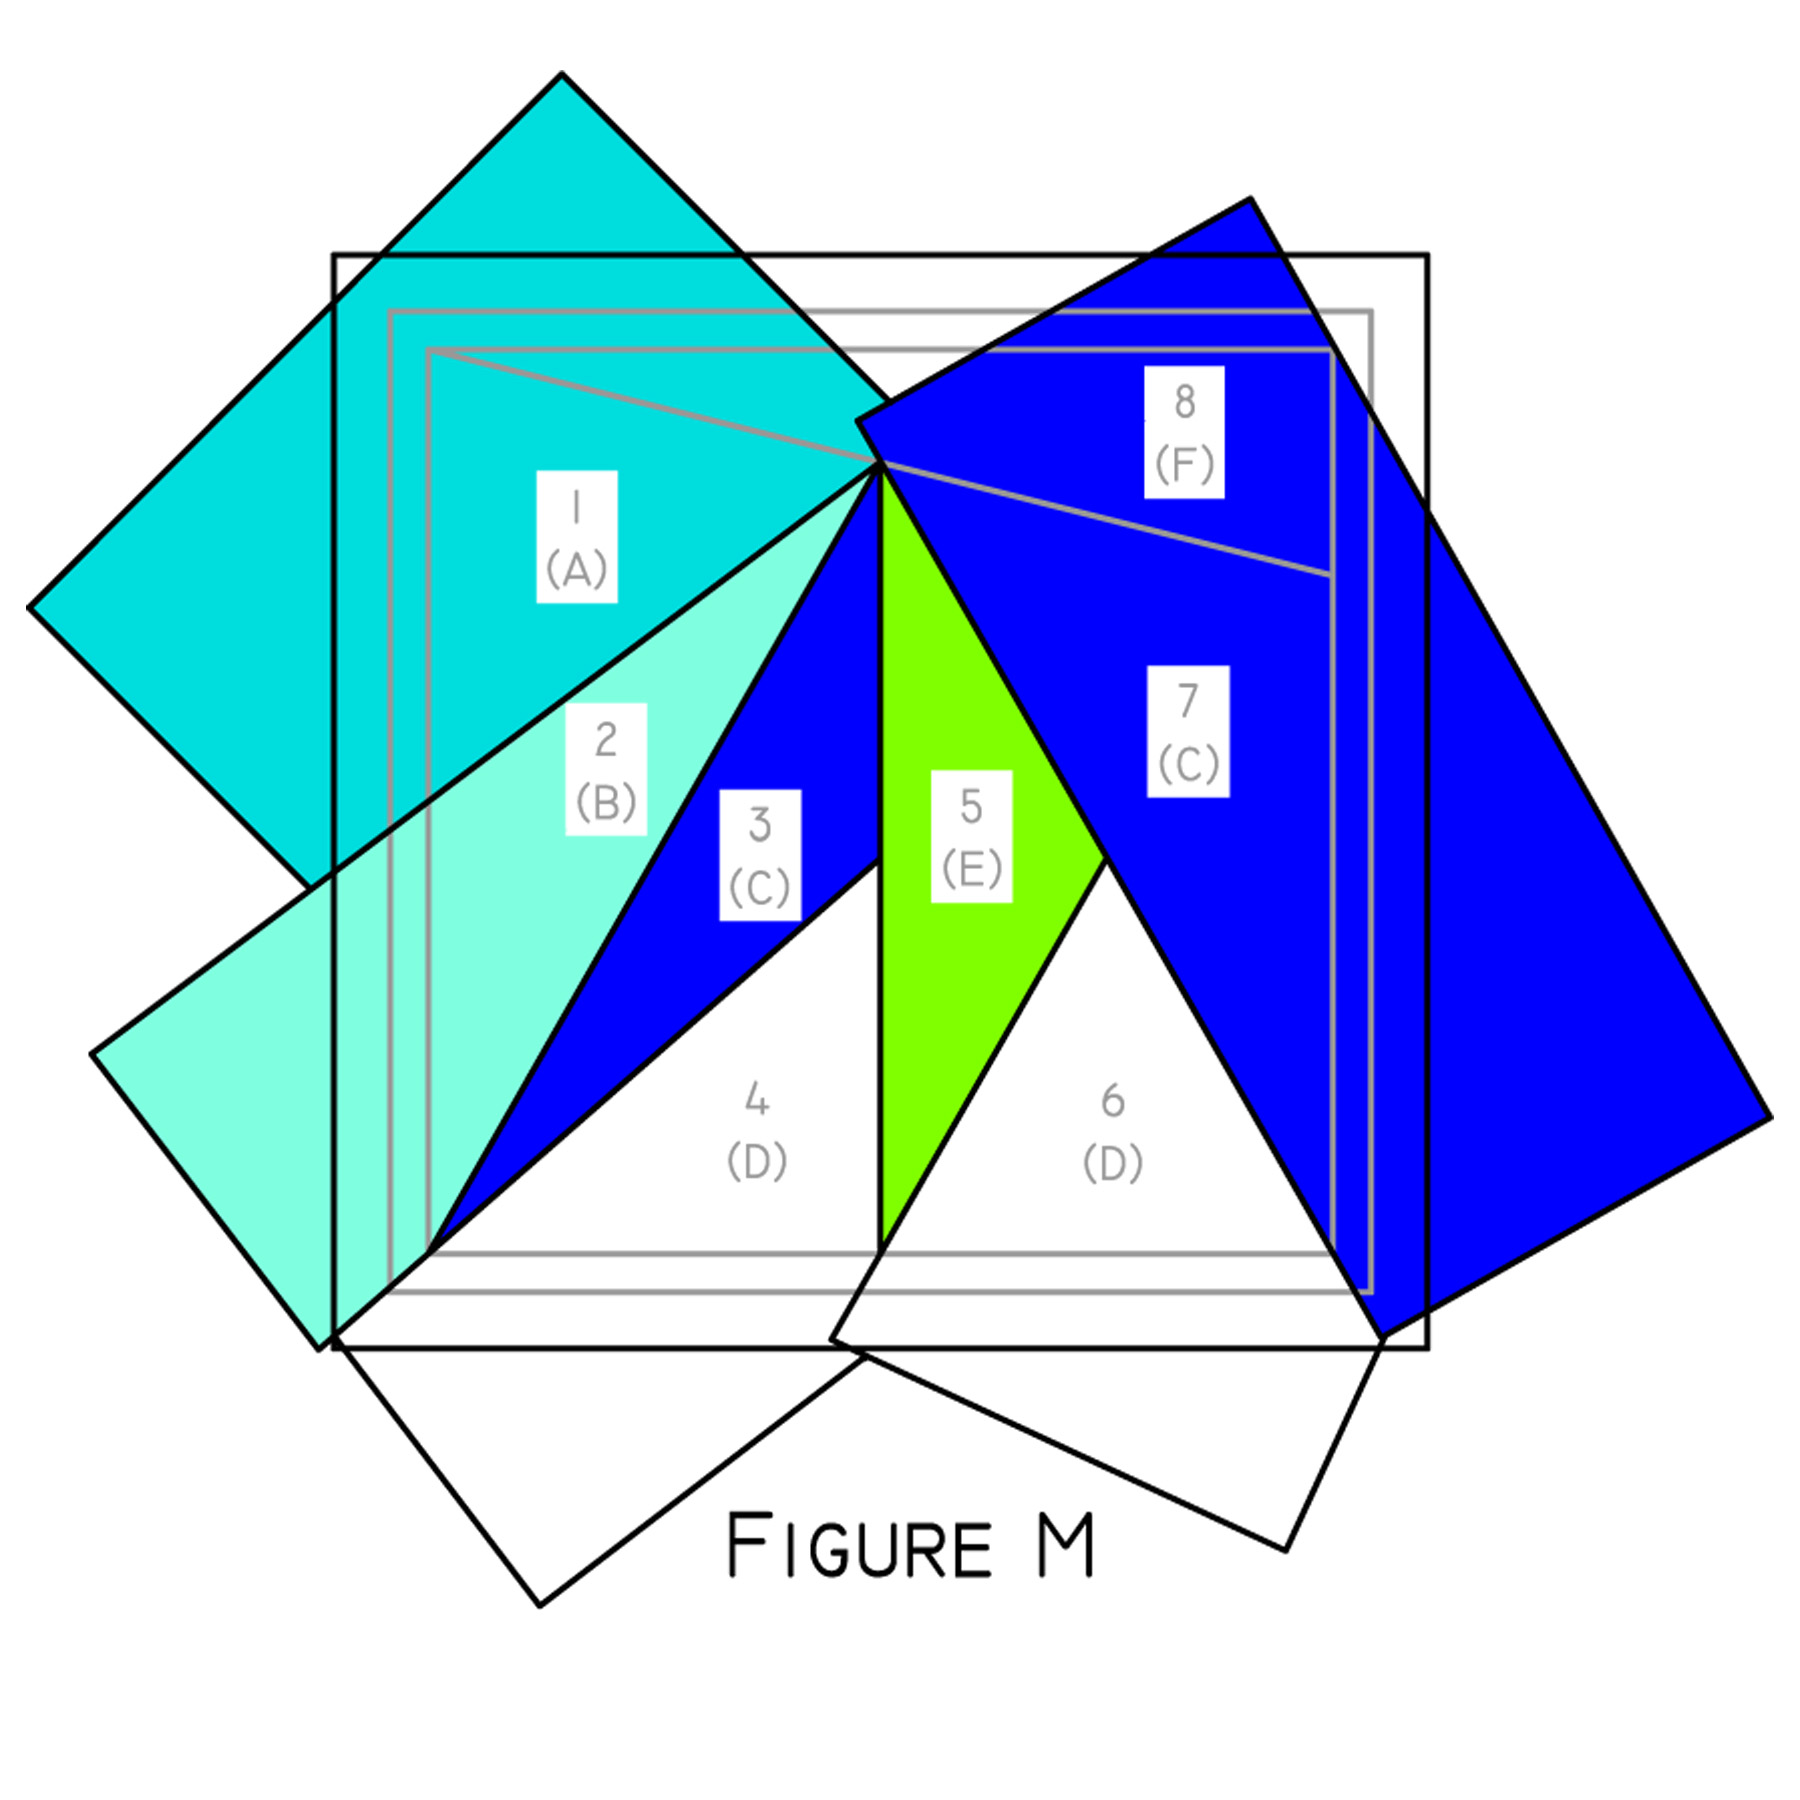
Section 8: Position the section eight fabric wrong side up with the main body of the fabric over sections 1-7. (See Figure N) Use a light source to check the fabric positioning. 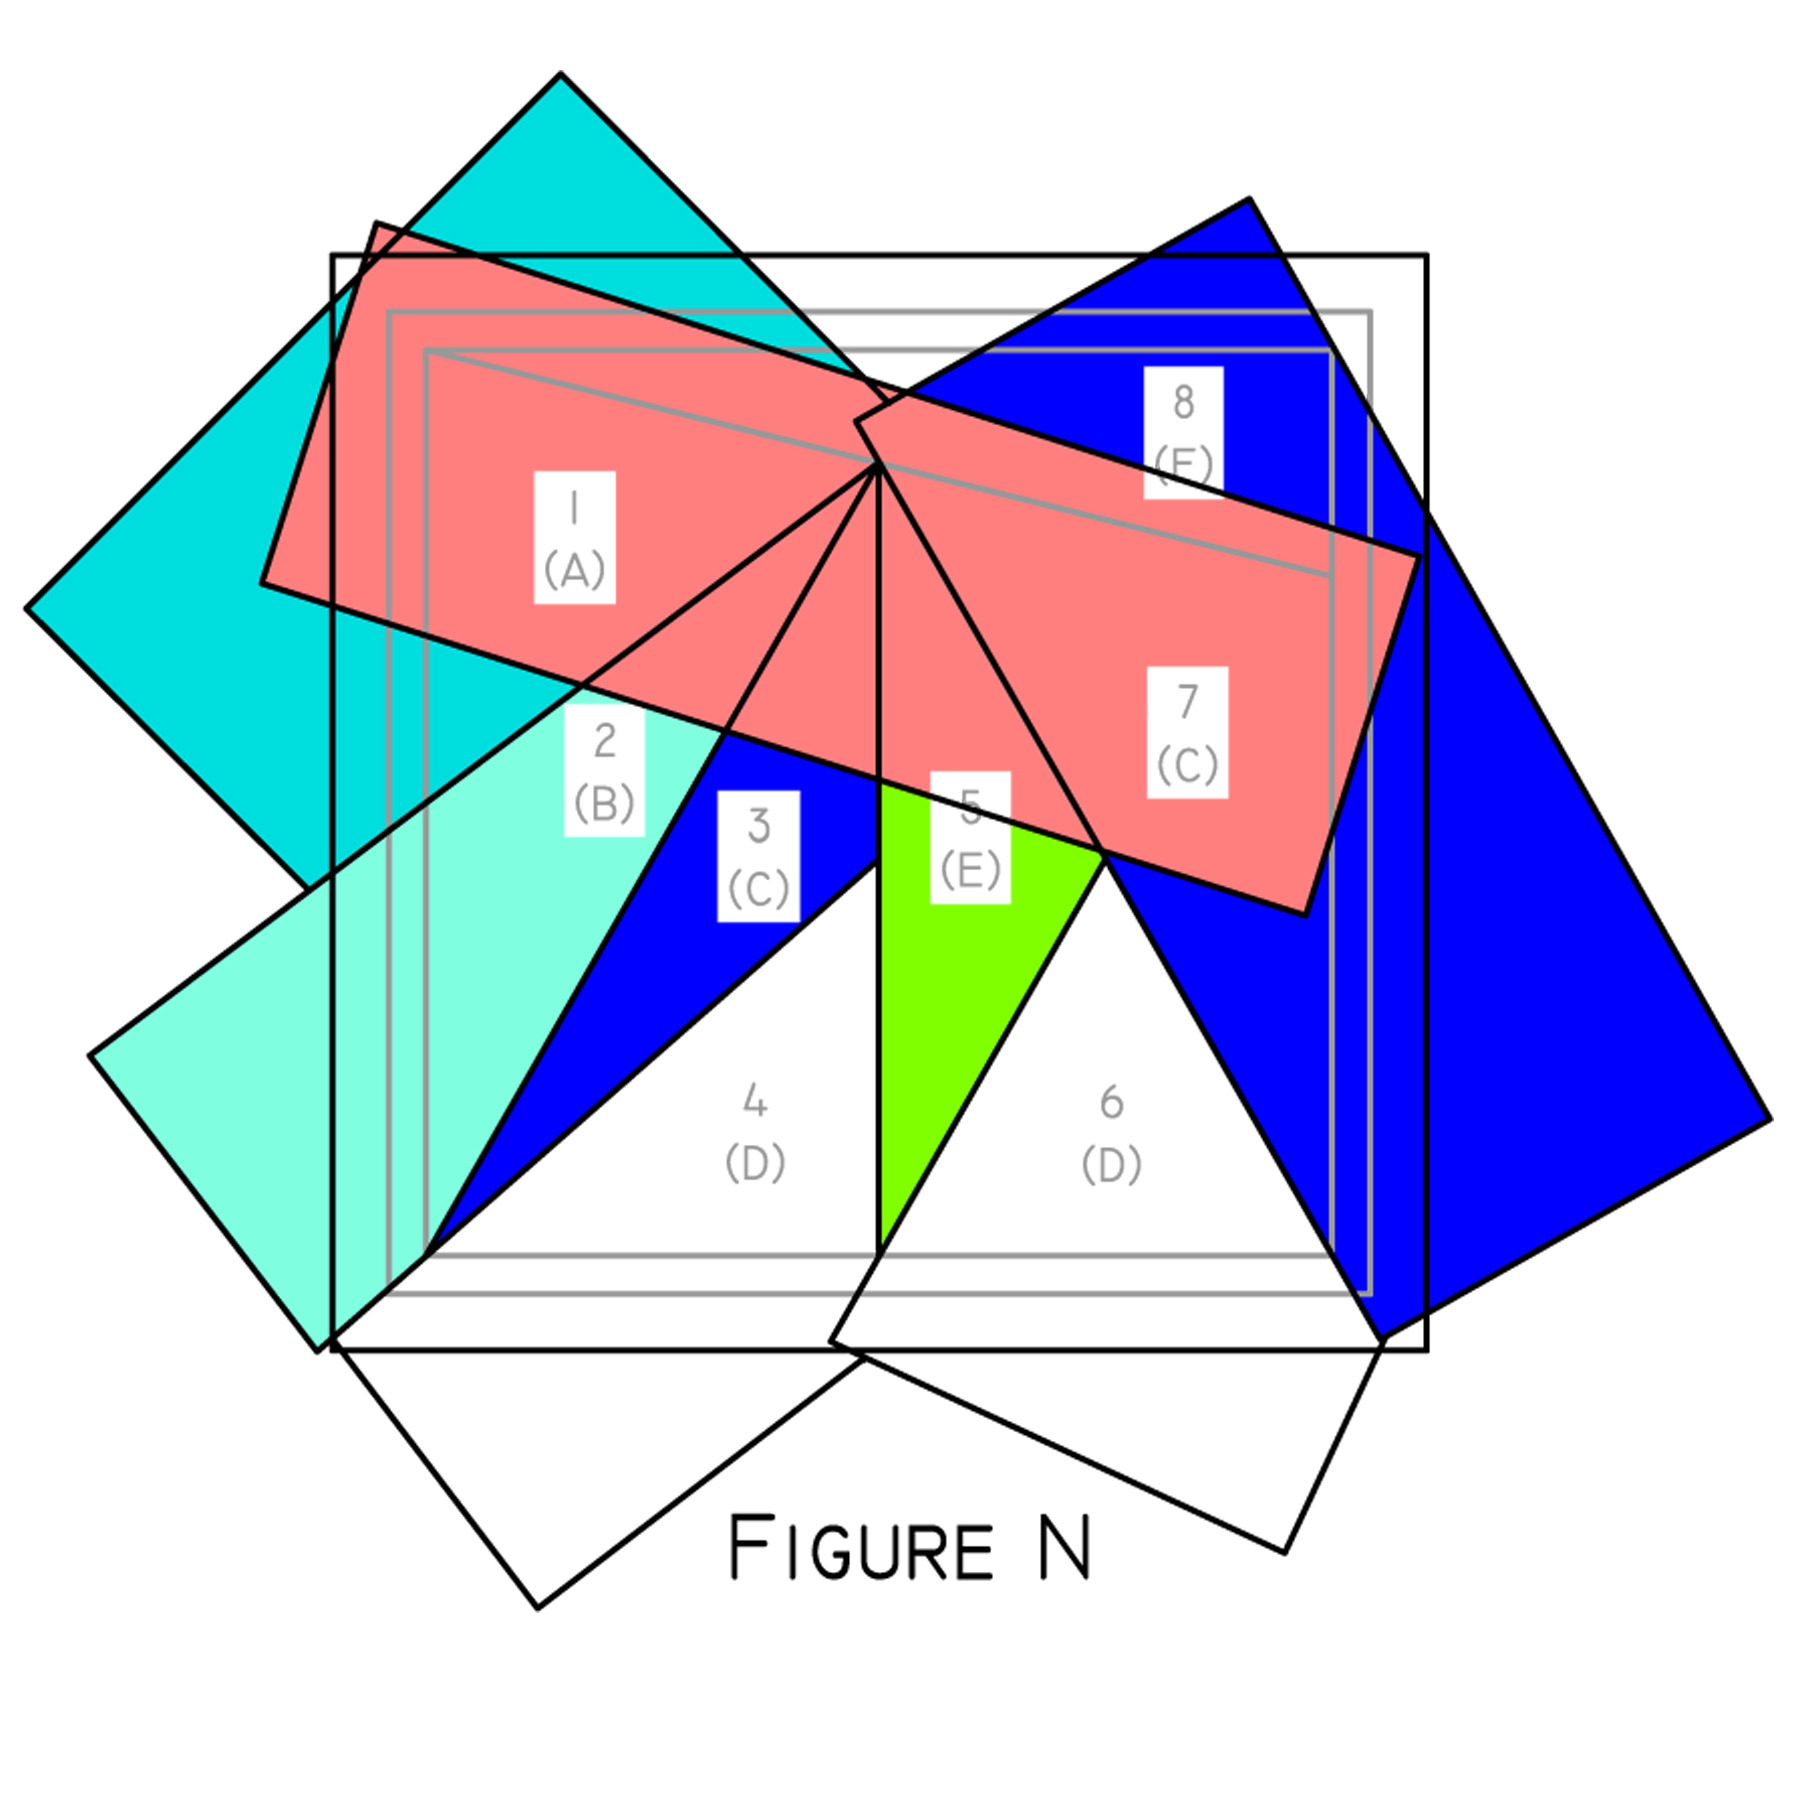
Stitch along the line between section 8 and the previous sections, trim the seam allowance, and press the section eight fabric into place. (See Figure O)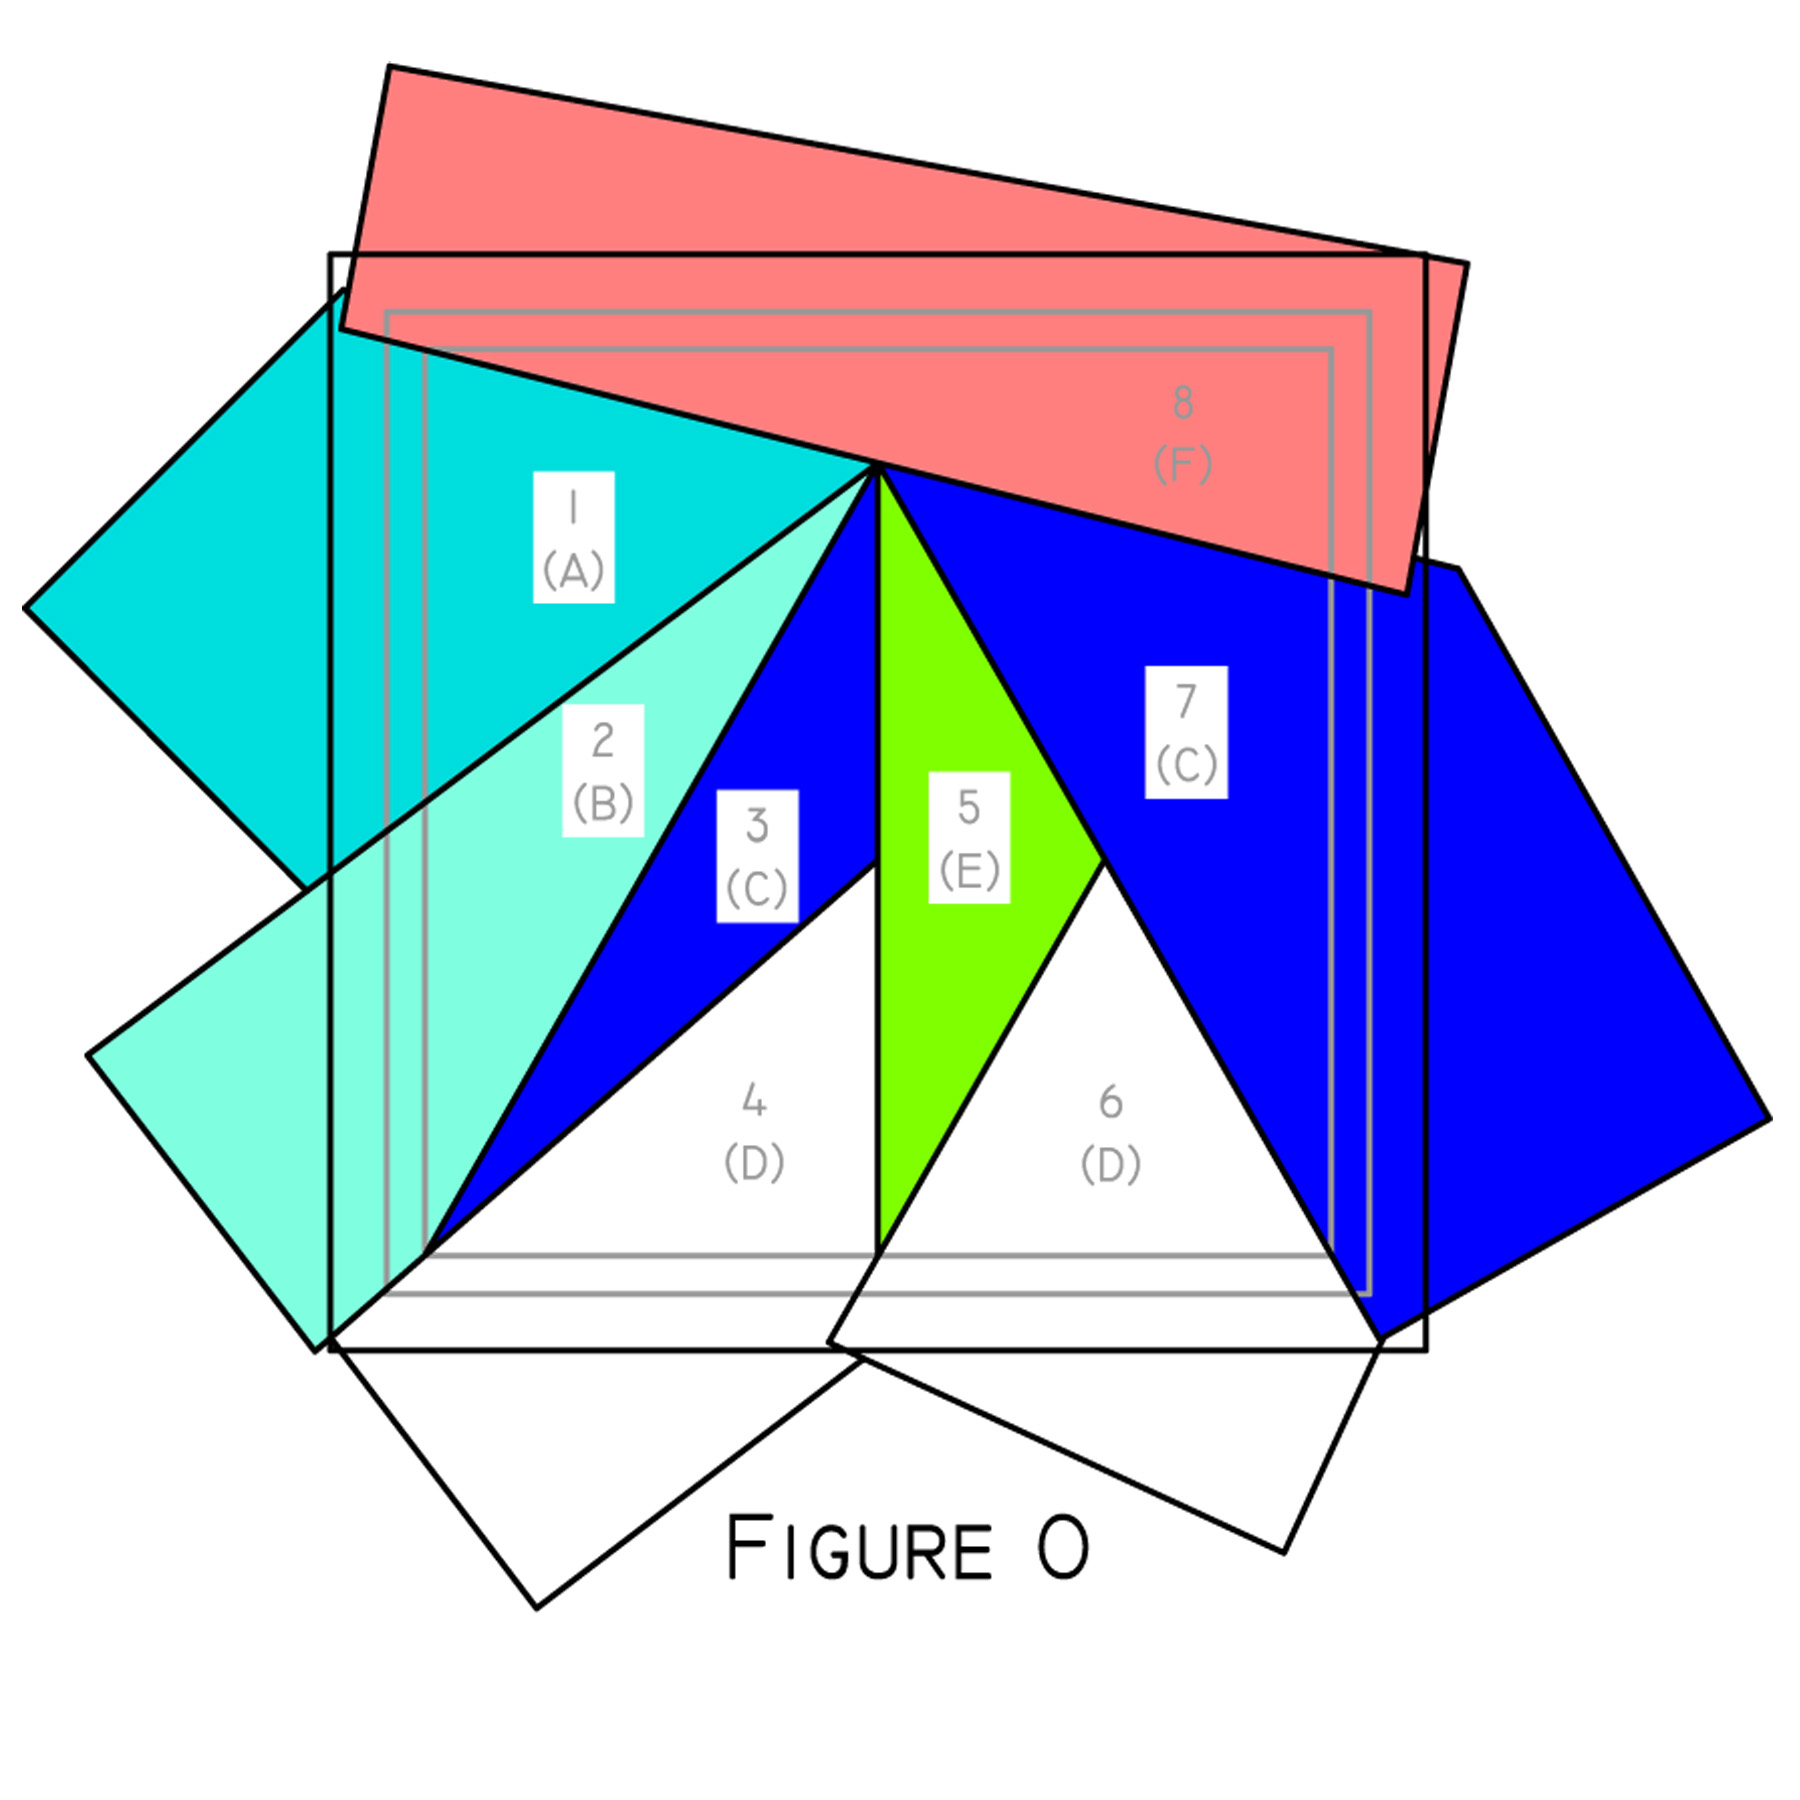

Completely Stitched Block Section that is ready to be trimmed
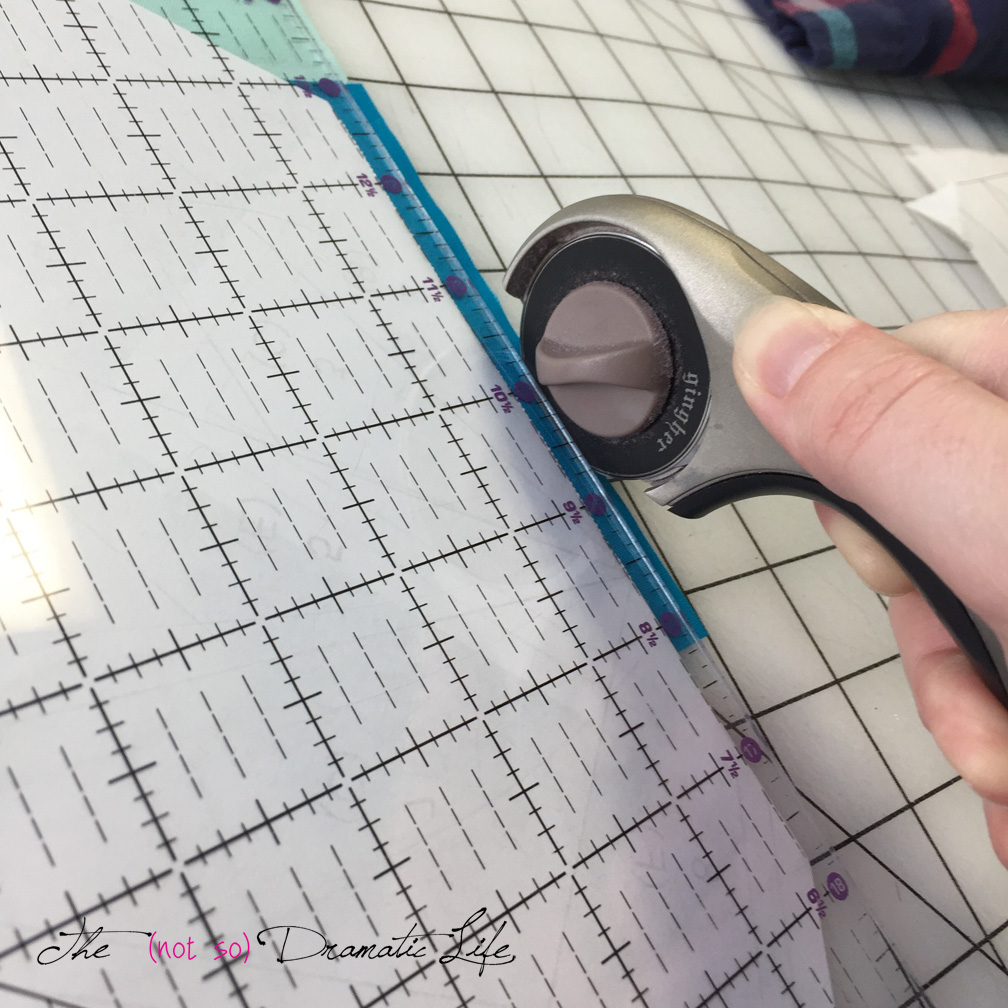
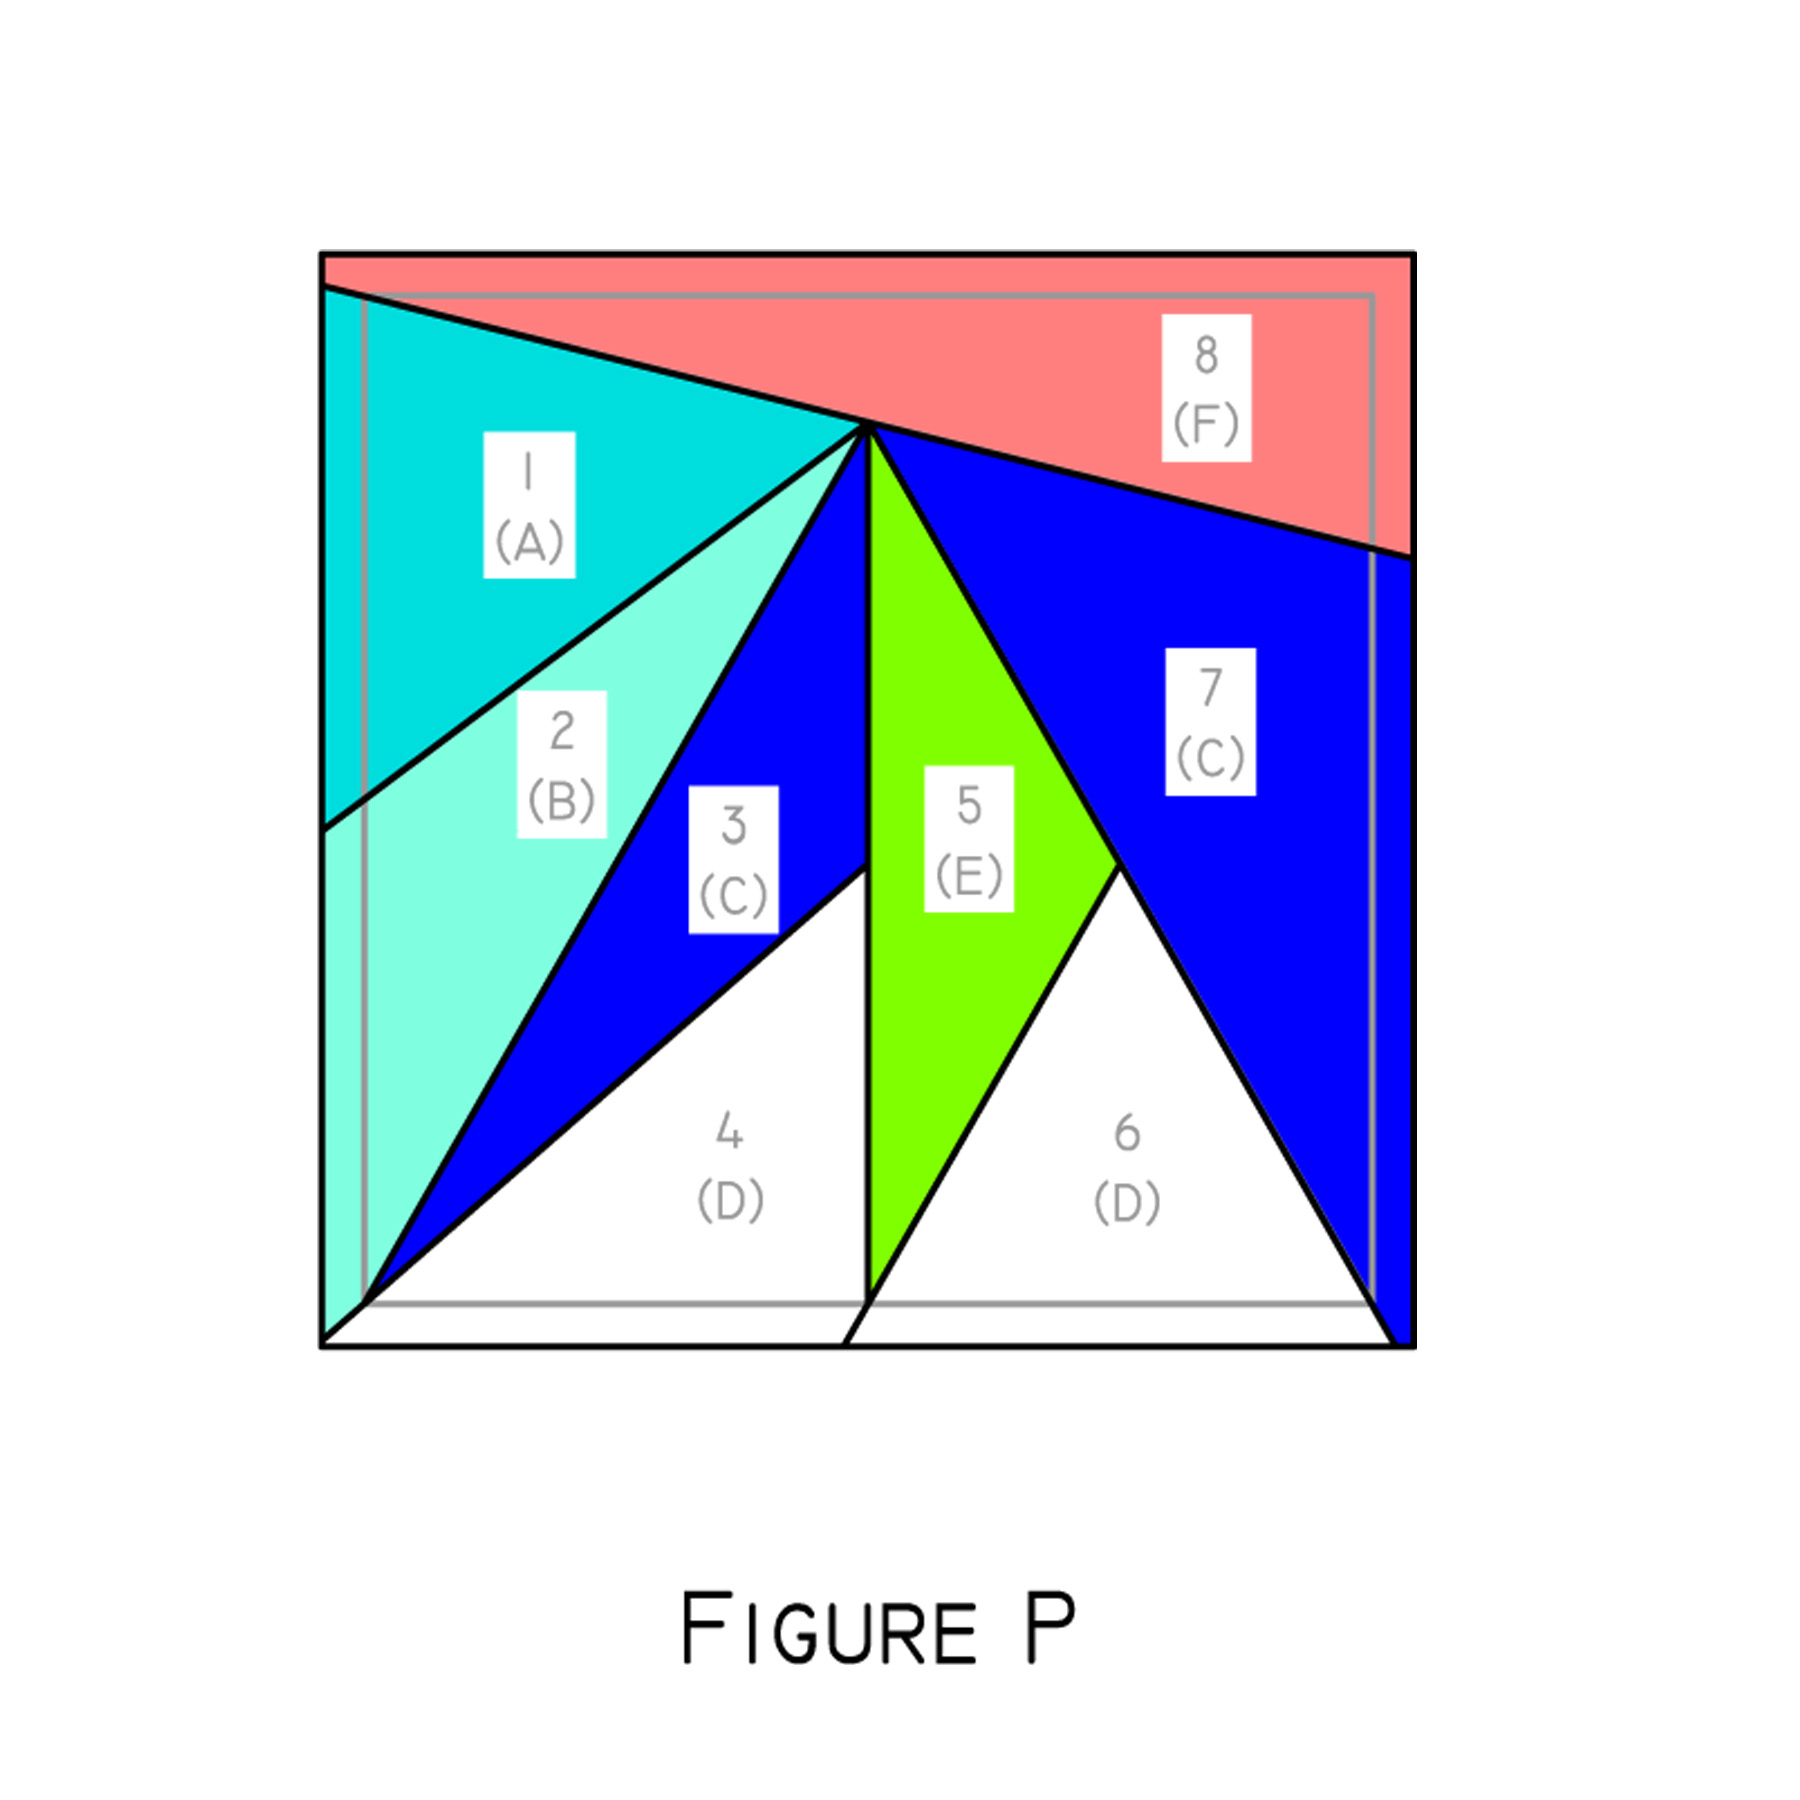
Step 7: Finish the block segment by pressing it well and using a rotary cutter and ruler to trim the excess paper and fabric along the outermost printed line of the block. (See Figure P)
Partially trimmed block segment
Note: Each block segment will measure 6-1/2’’ x 6-1/2’’ at this stage
Step 8: This is where you lather, rinse, and repeat steps 1-7 three more times to make a total of four block segments.
Step 9: Arrange these segments into the block configuration. (See Figure Q)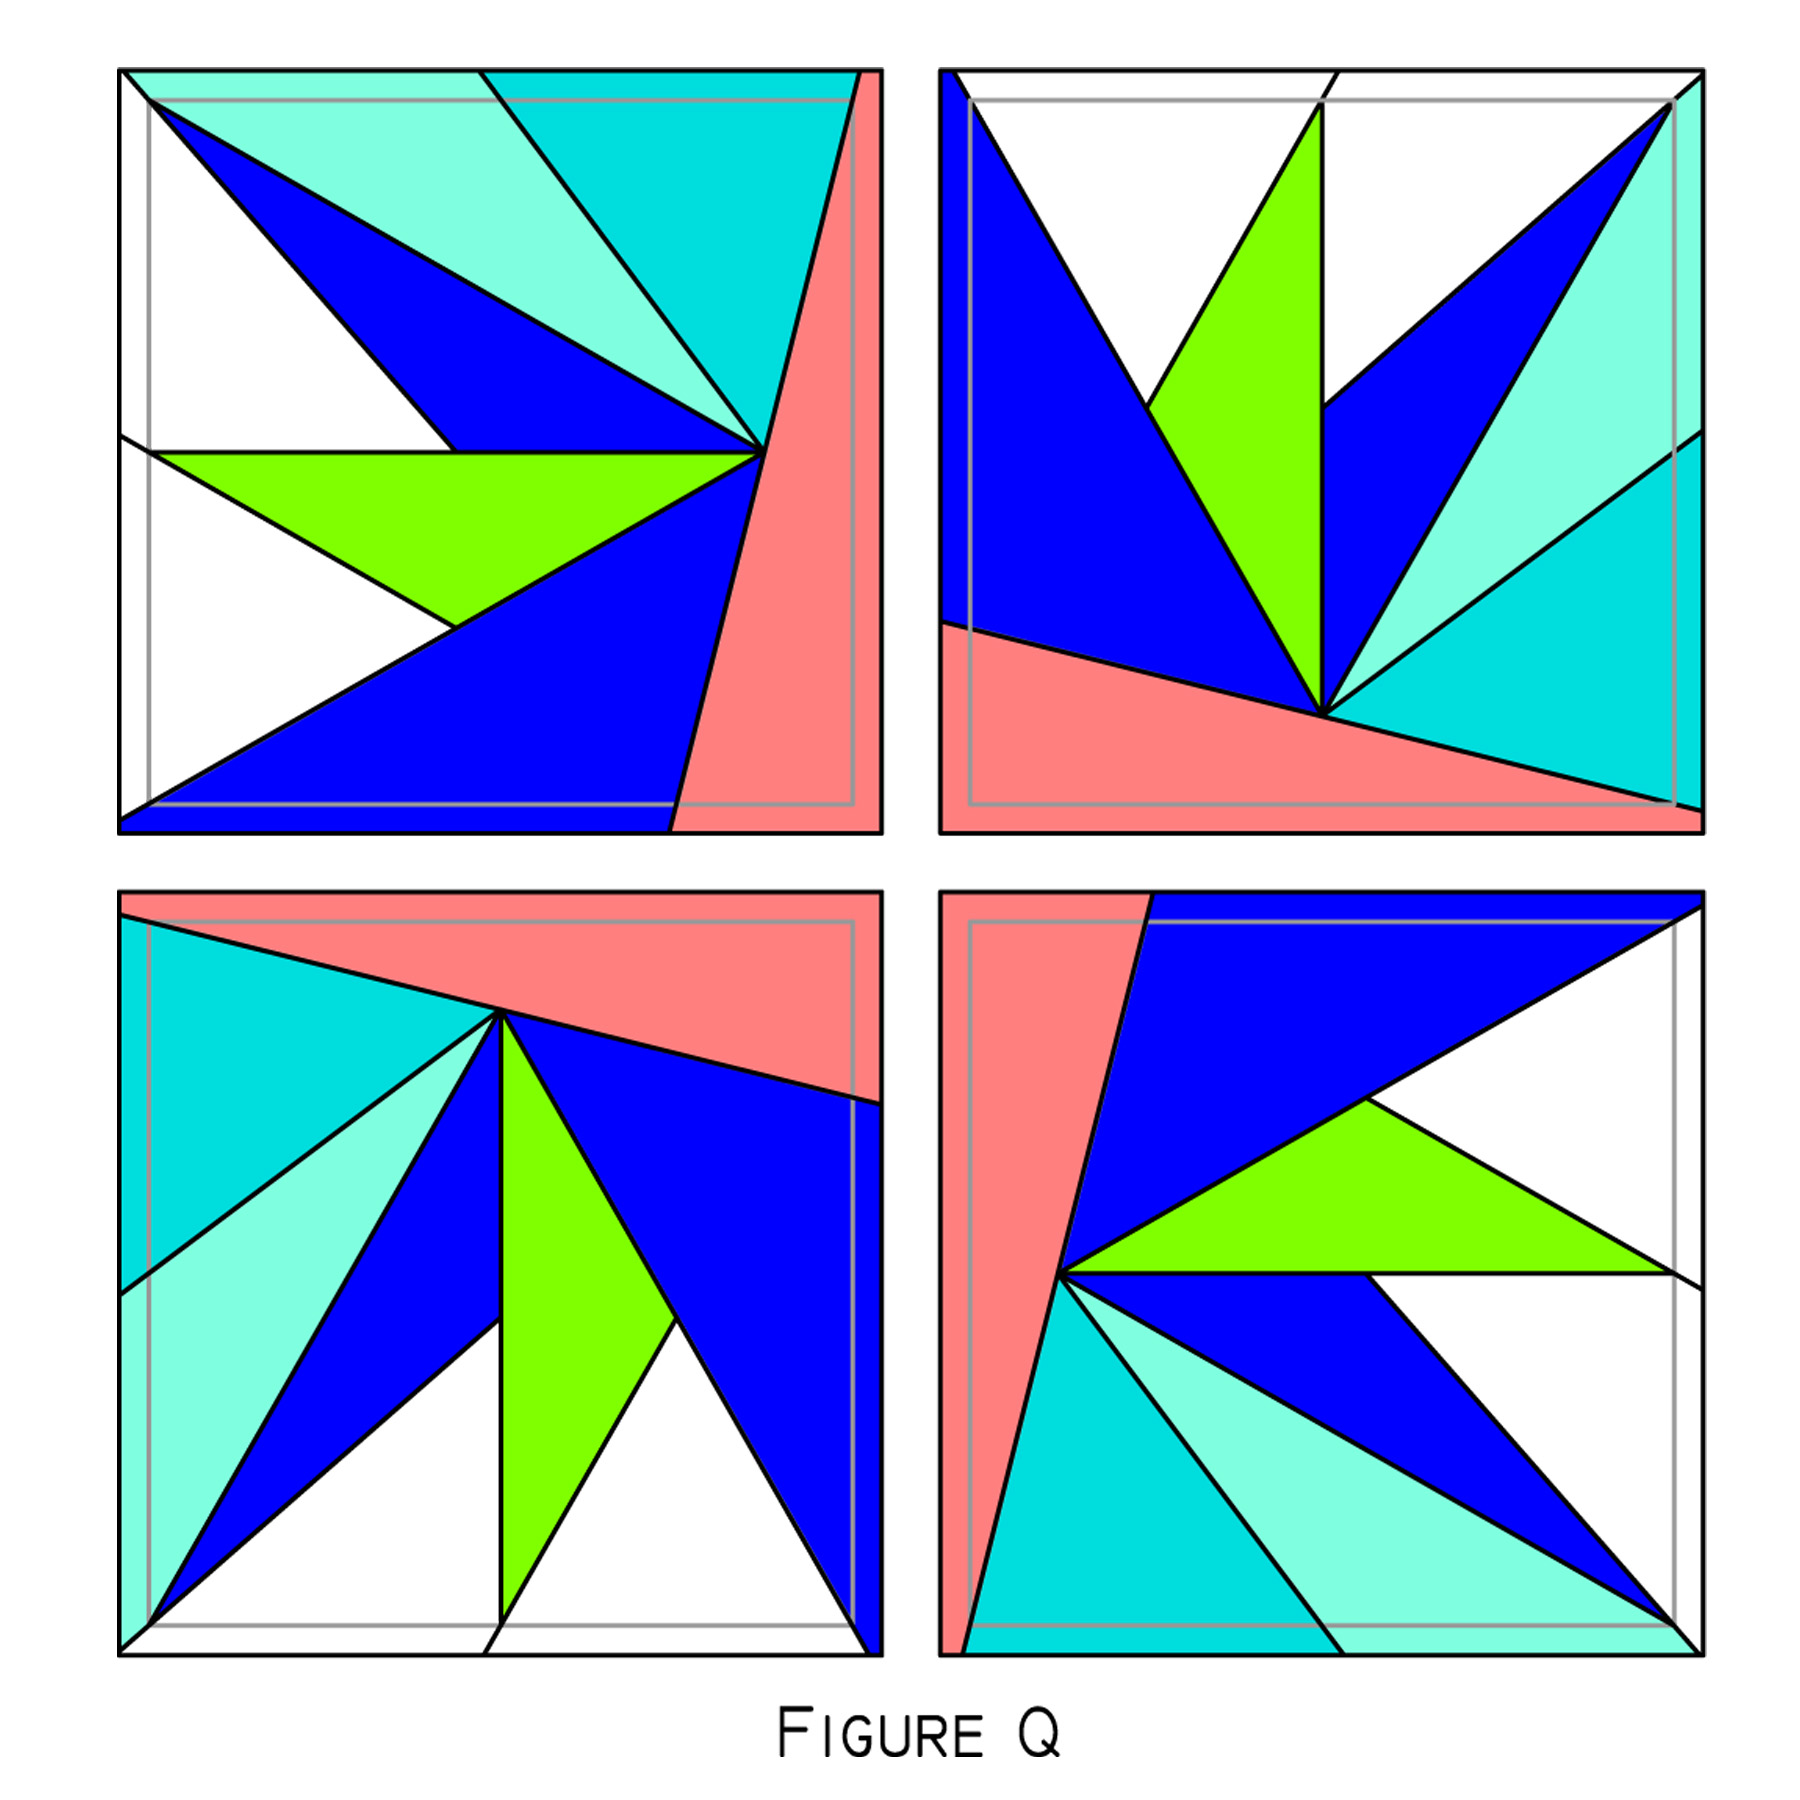
Step 10: Use Wonder Clips or pins to hold two segments together while you sew along the stitching line. (See Figure R) Press the seam allowances open.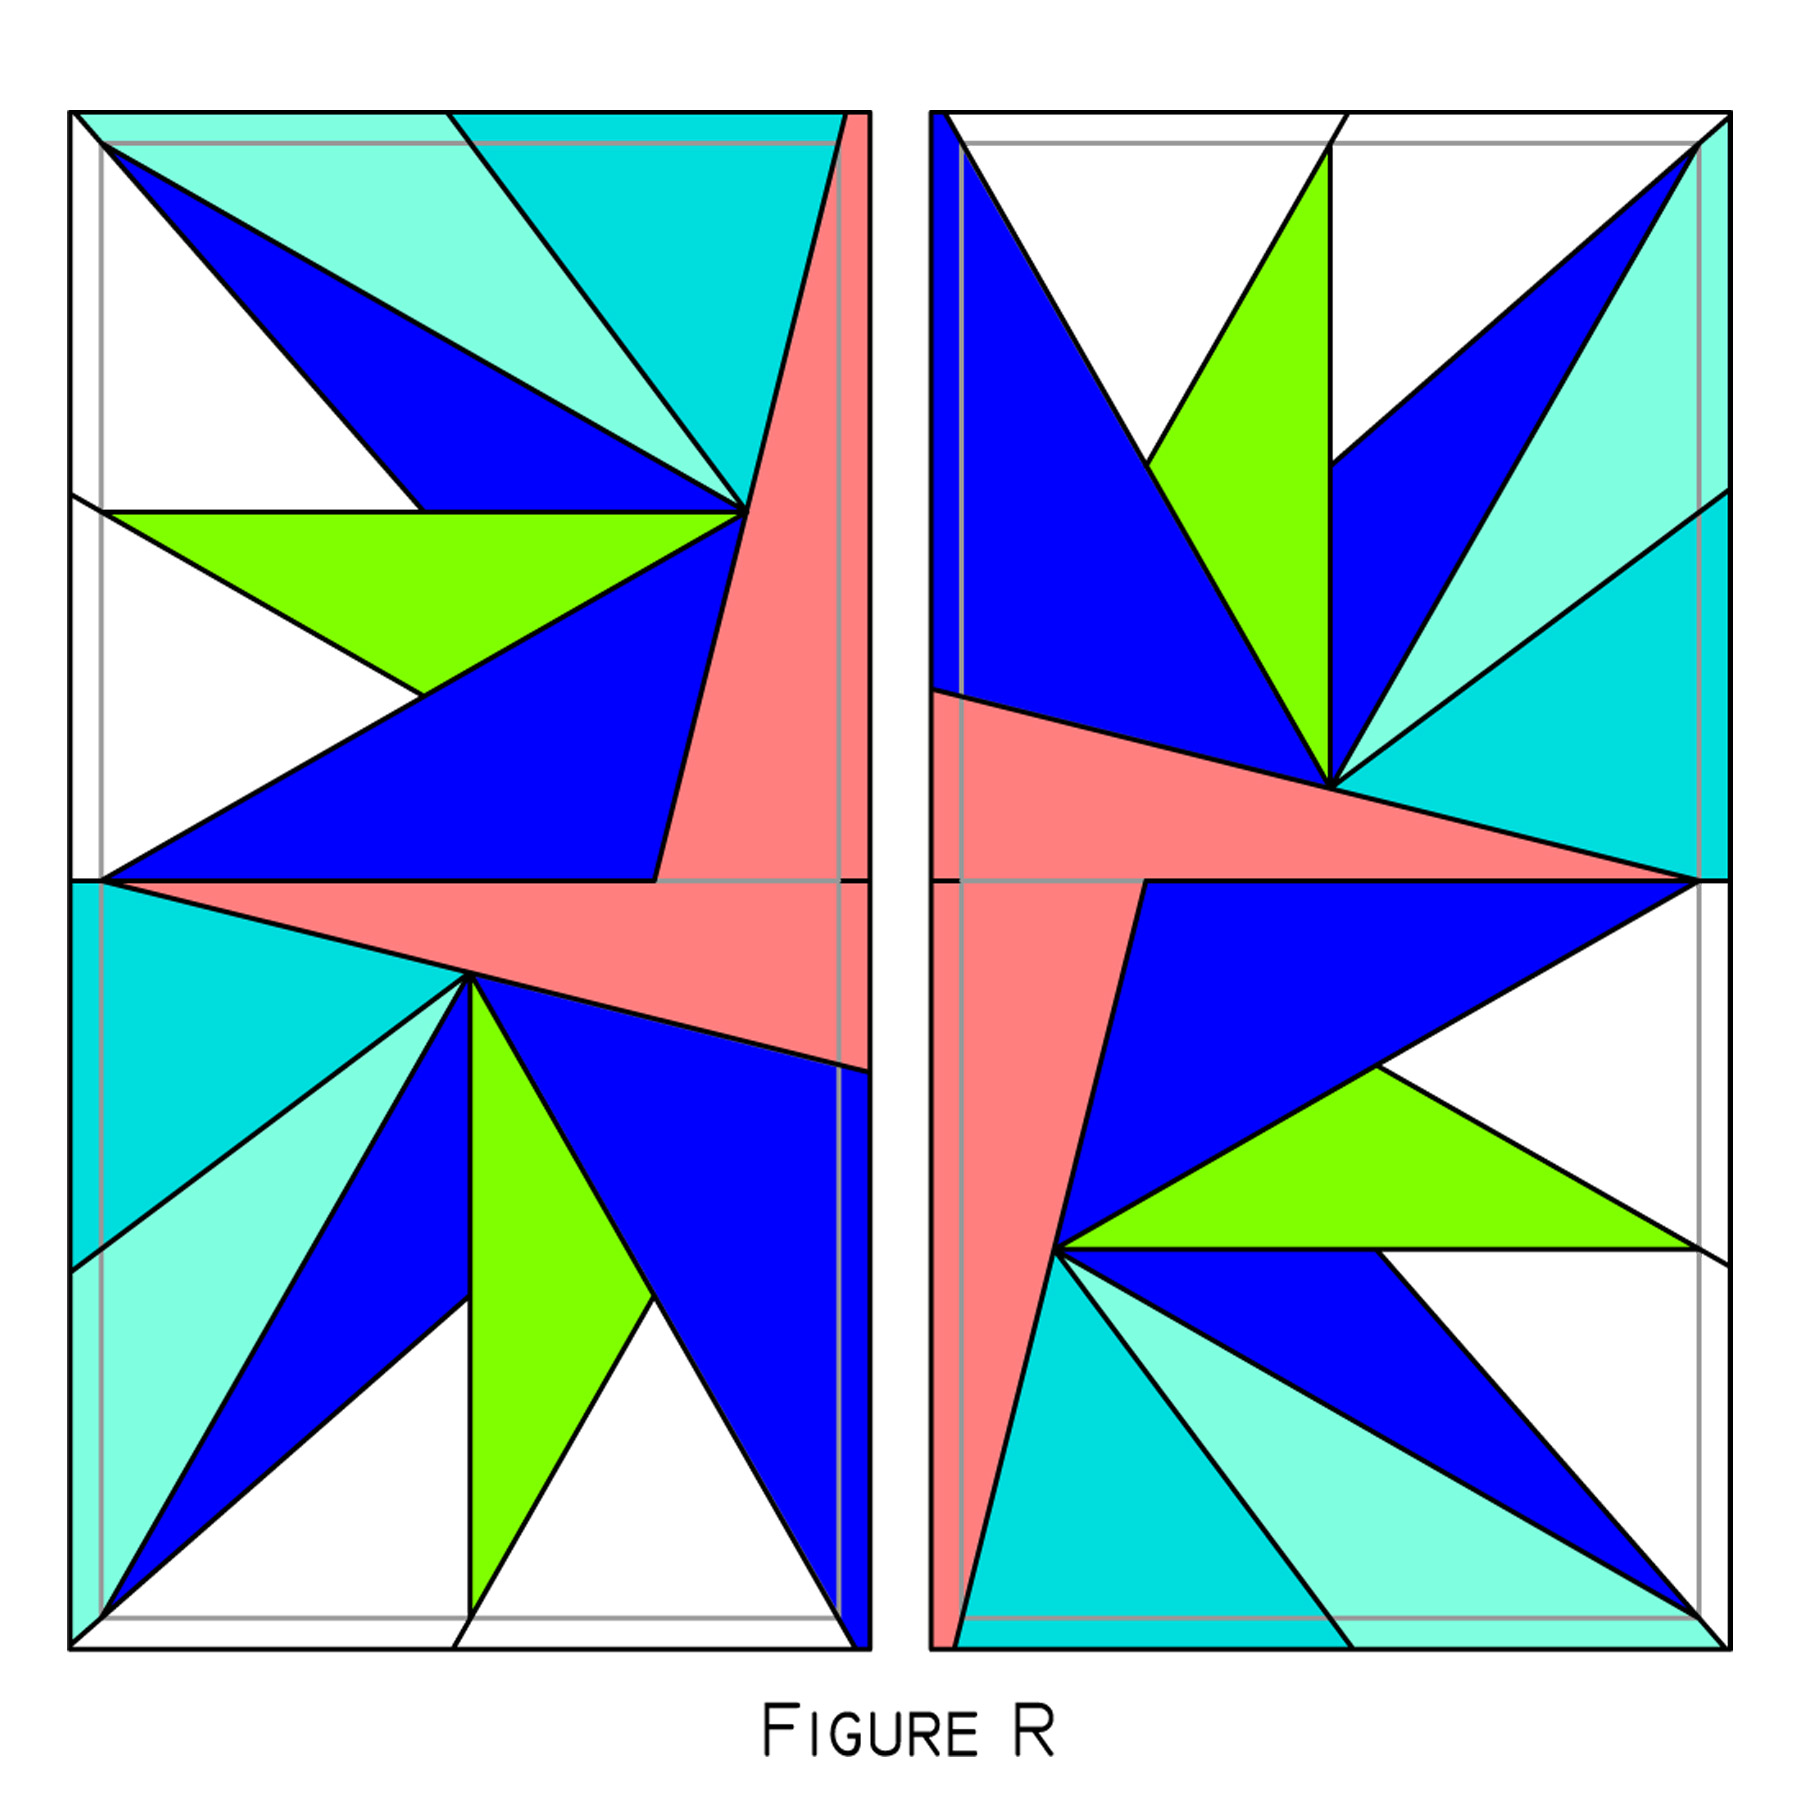
Step 11: Sew the two larger sections together and press the seam allowance open to complete the block. (See Figure S)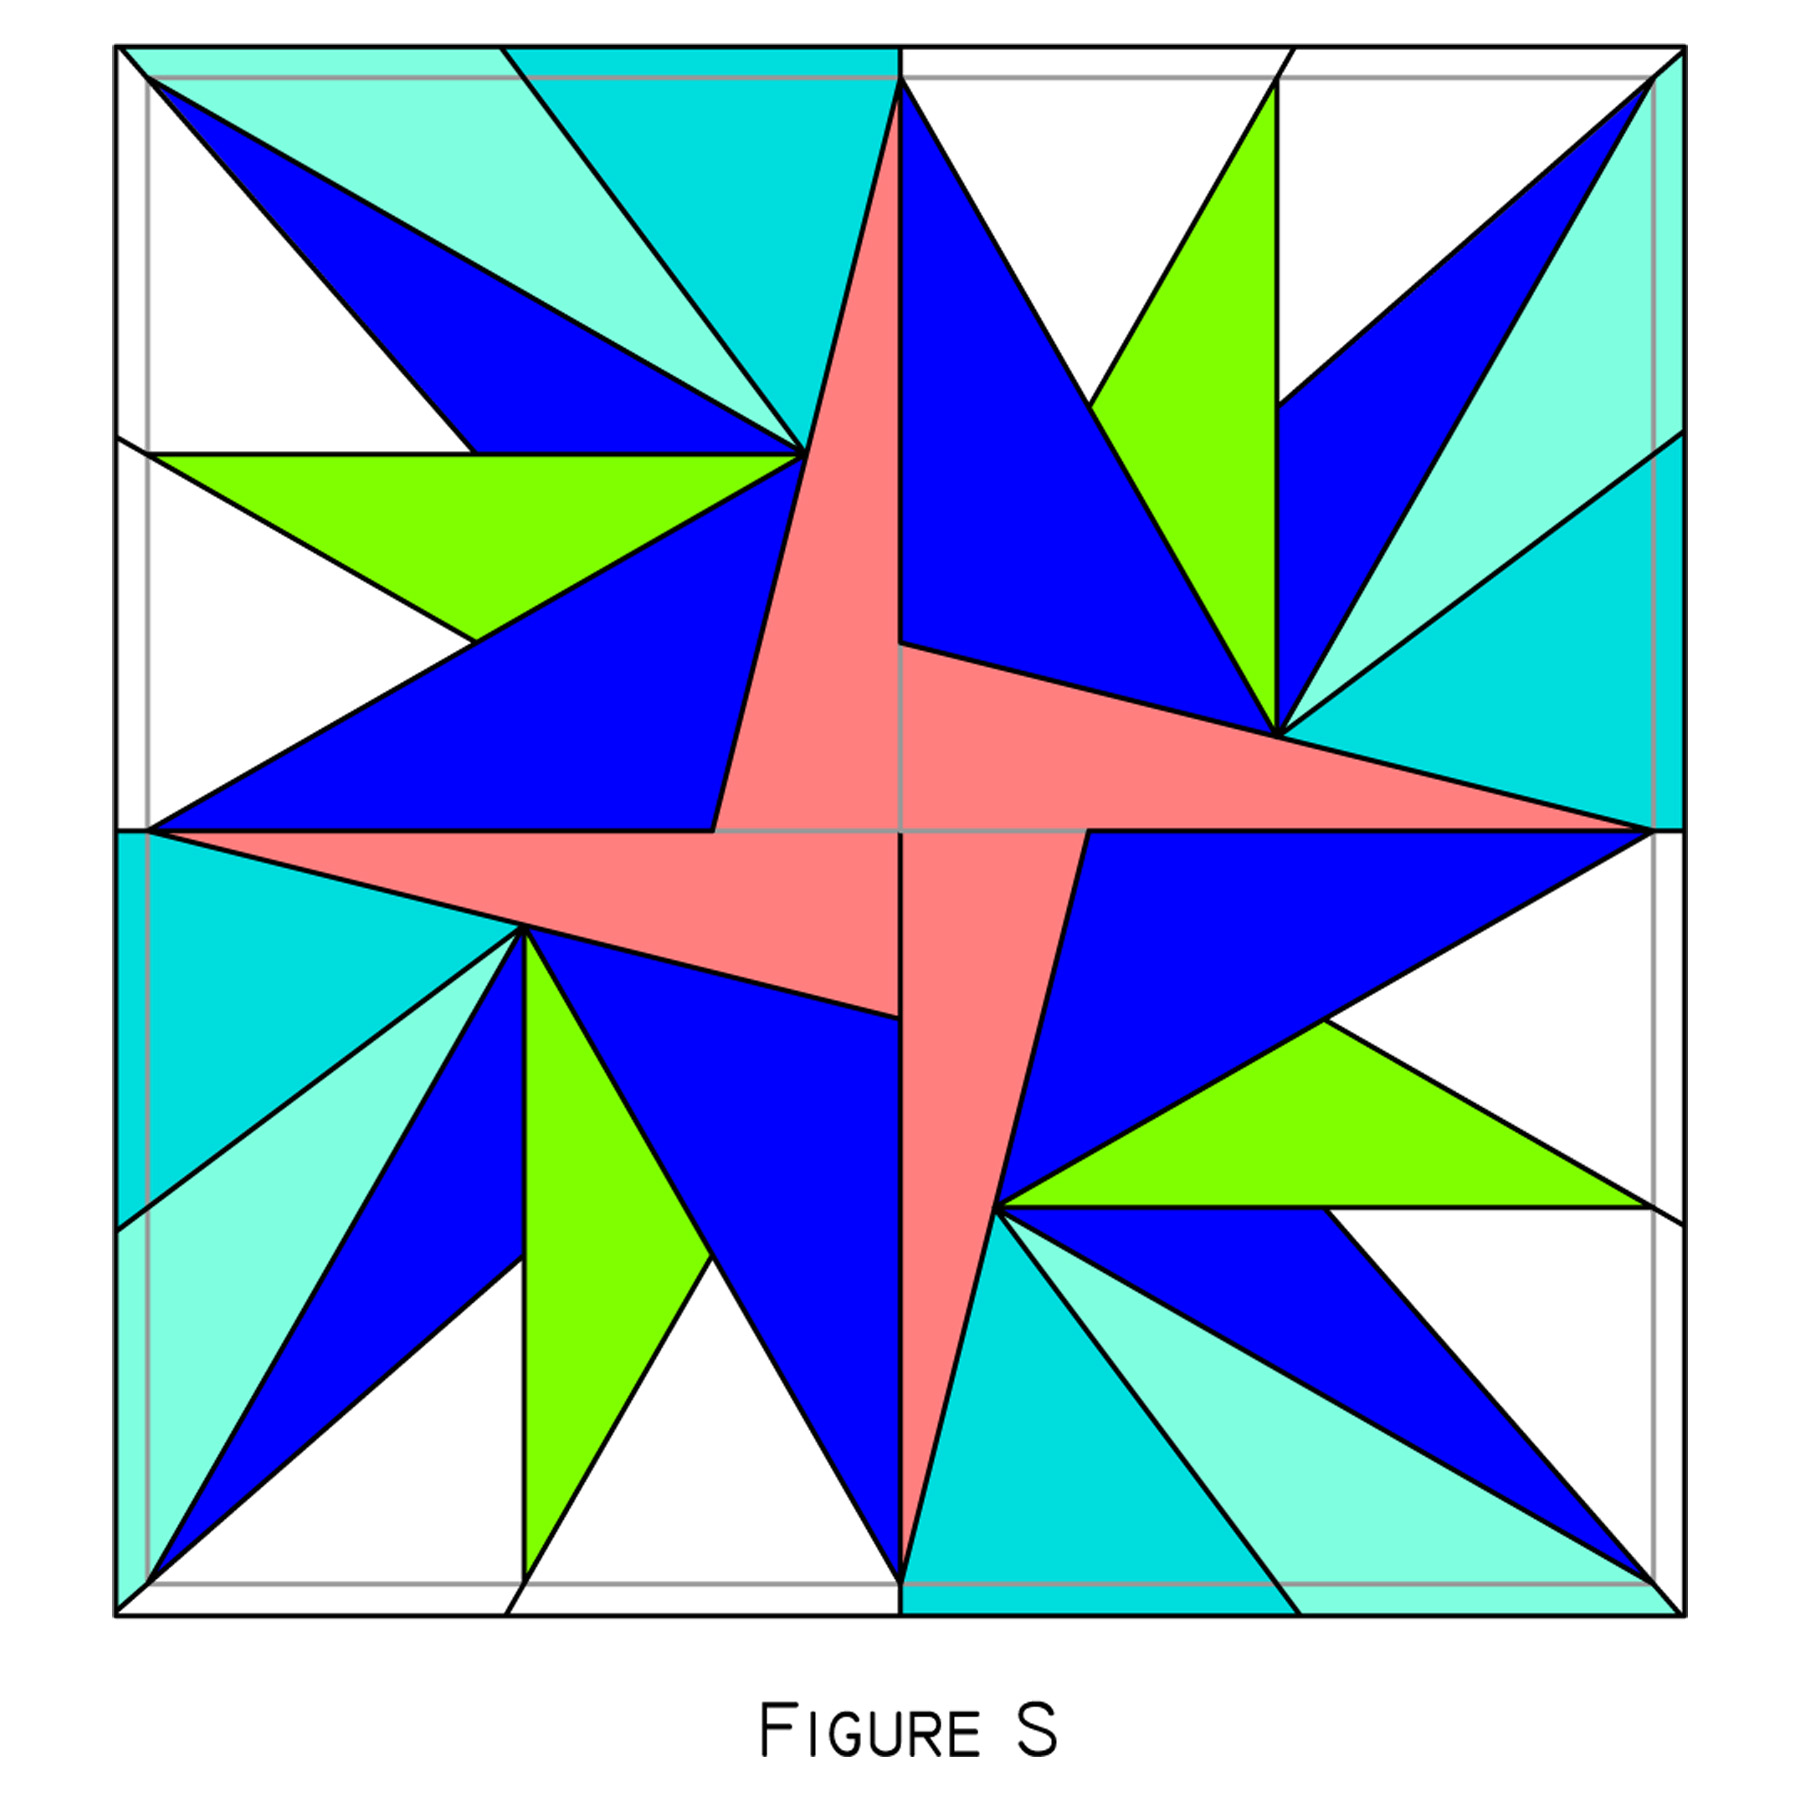
Step 12: If you are creating a quilt consisting entirely of this or other foundation paper pieced blocks you may leave the papers in place until construction is complete. If you are combining this block with traditionally pieced or appliquéd block or if this block will be used on its own, carefully tear out the foundation papers now.
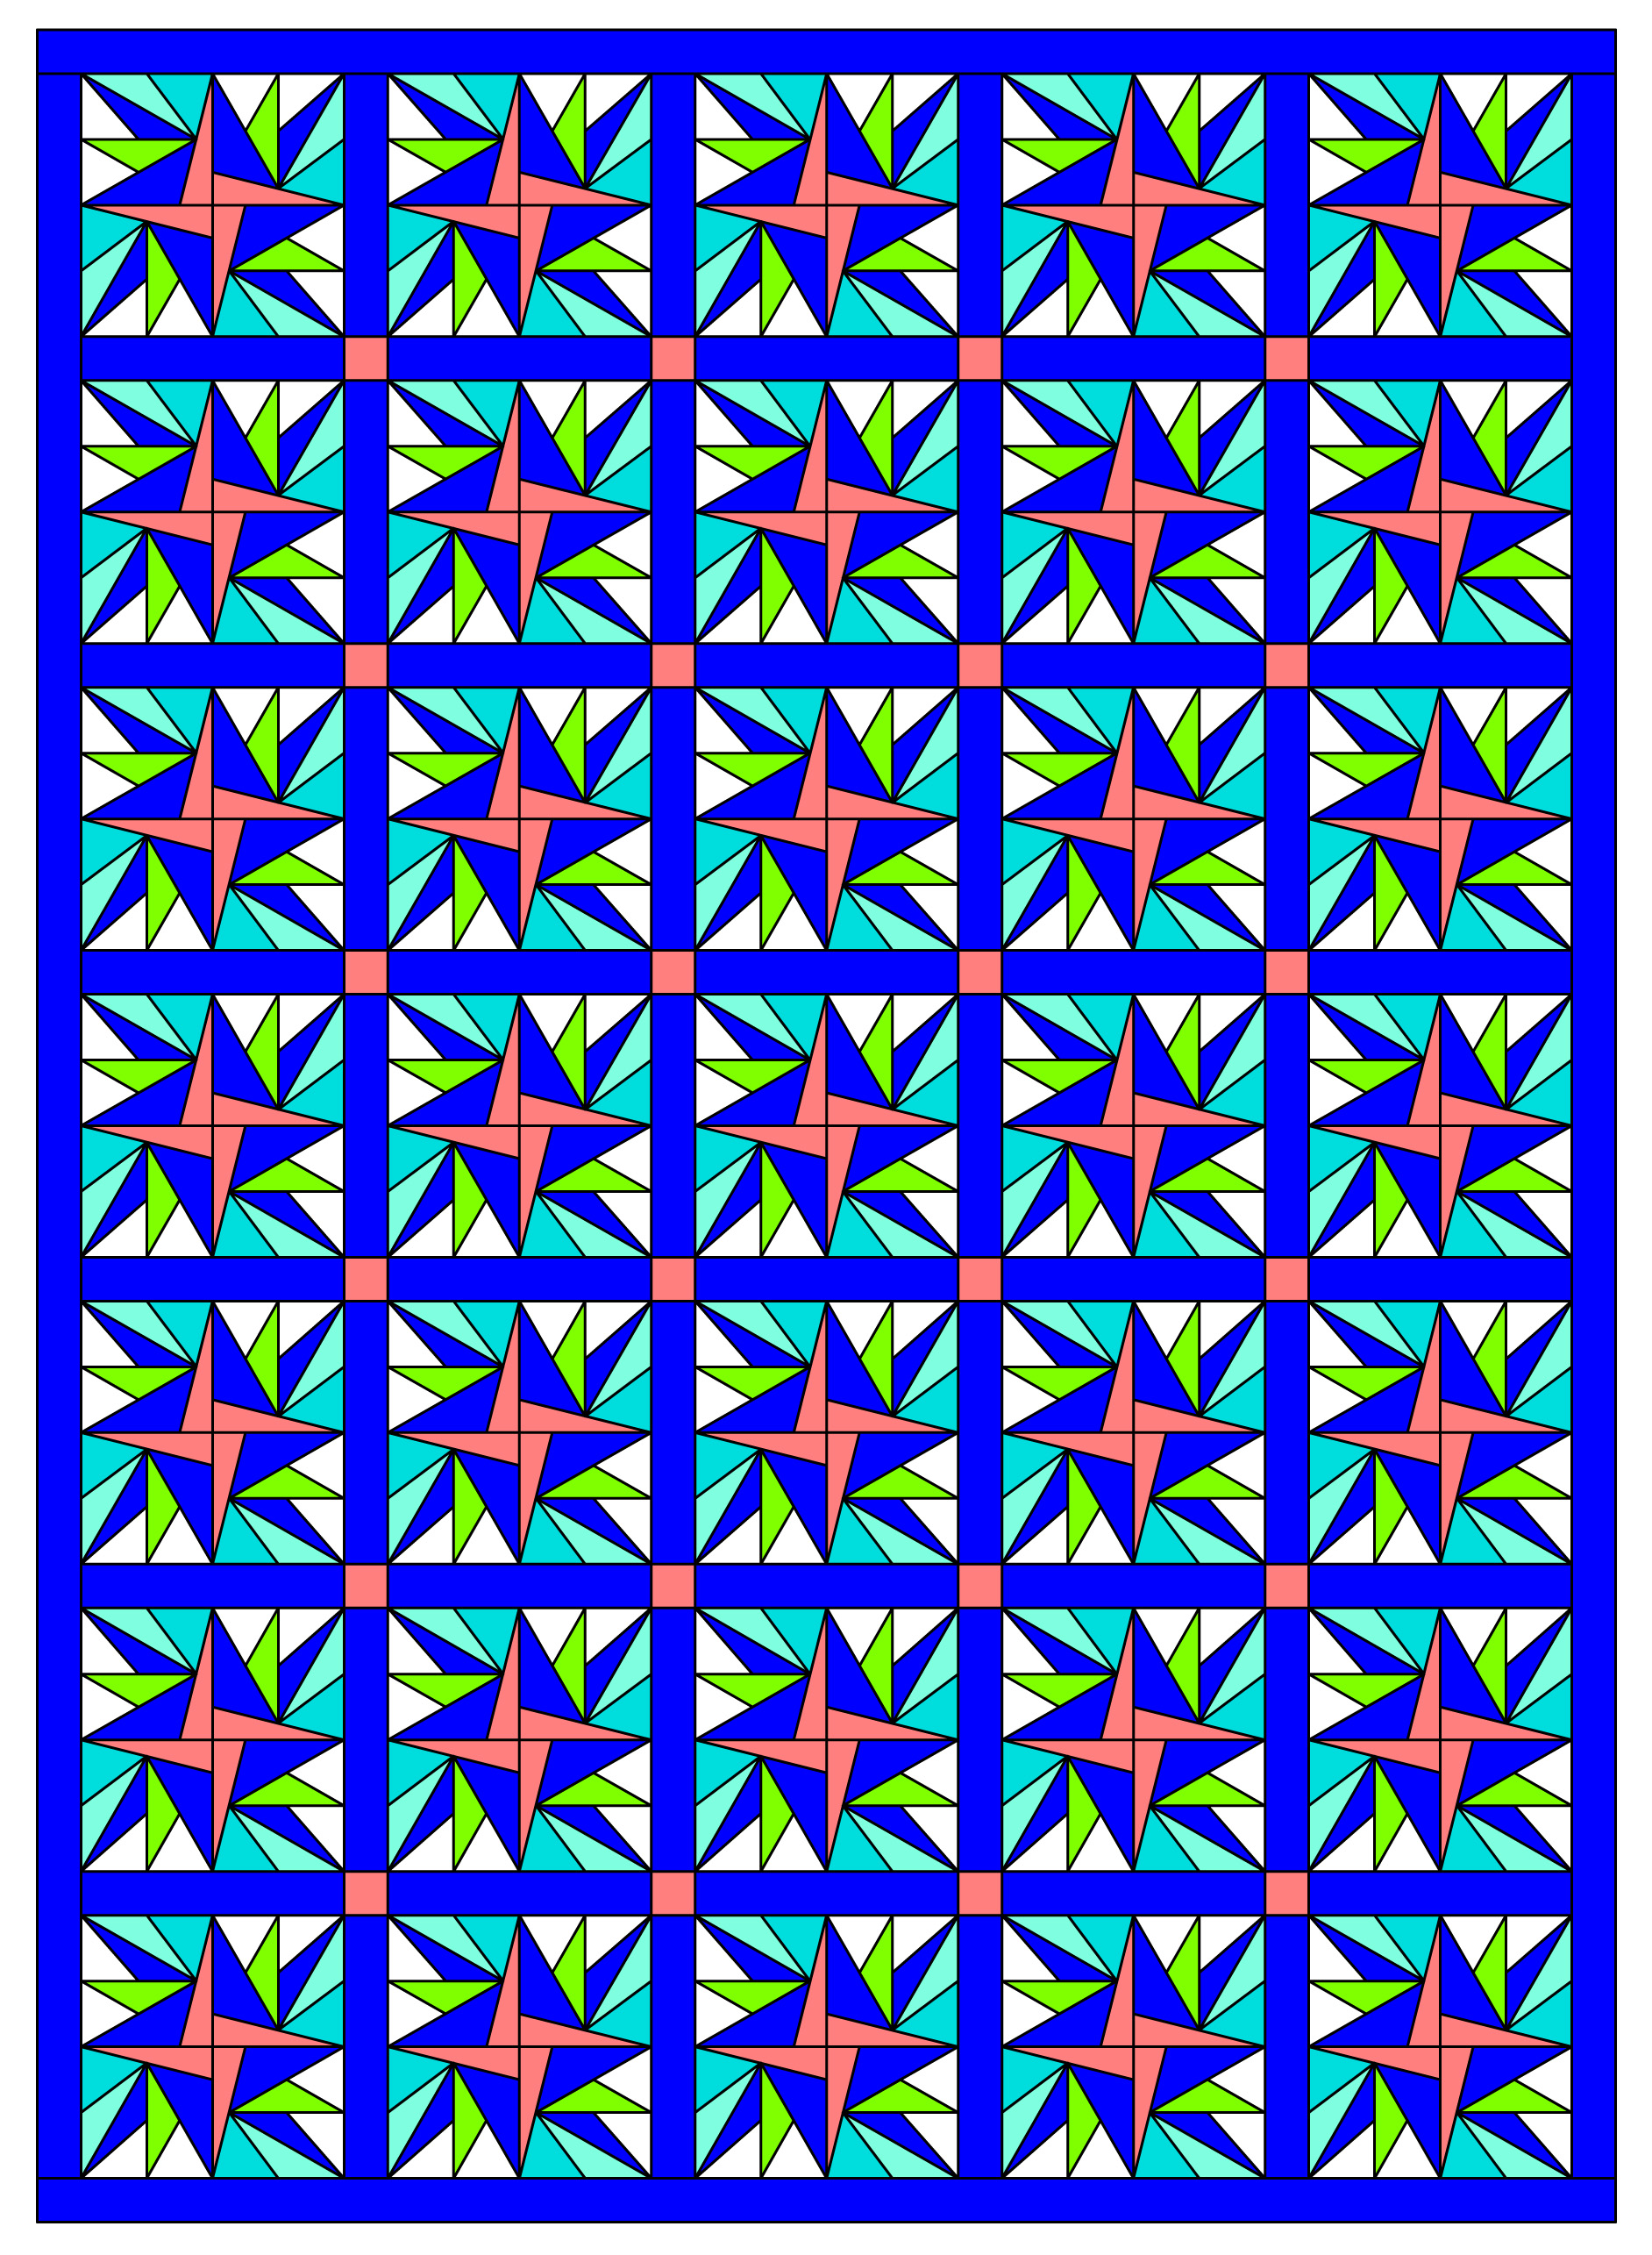
Here are just a few of the possible layouts that you could achieve with this block:

This Layout alternates Summer Starburst blocks with Mirrored Summer Starburst Blocks
I really like the effect of this layout. If you like it too, here is the template for the Mirrored Summer Starburst Block:
Quilt Block Designs-Mirrored Summer Starburst Paper Piecing

Summer Starburst Blocks
Summer Starburst Blocks with sashing
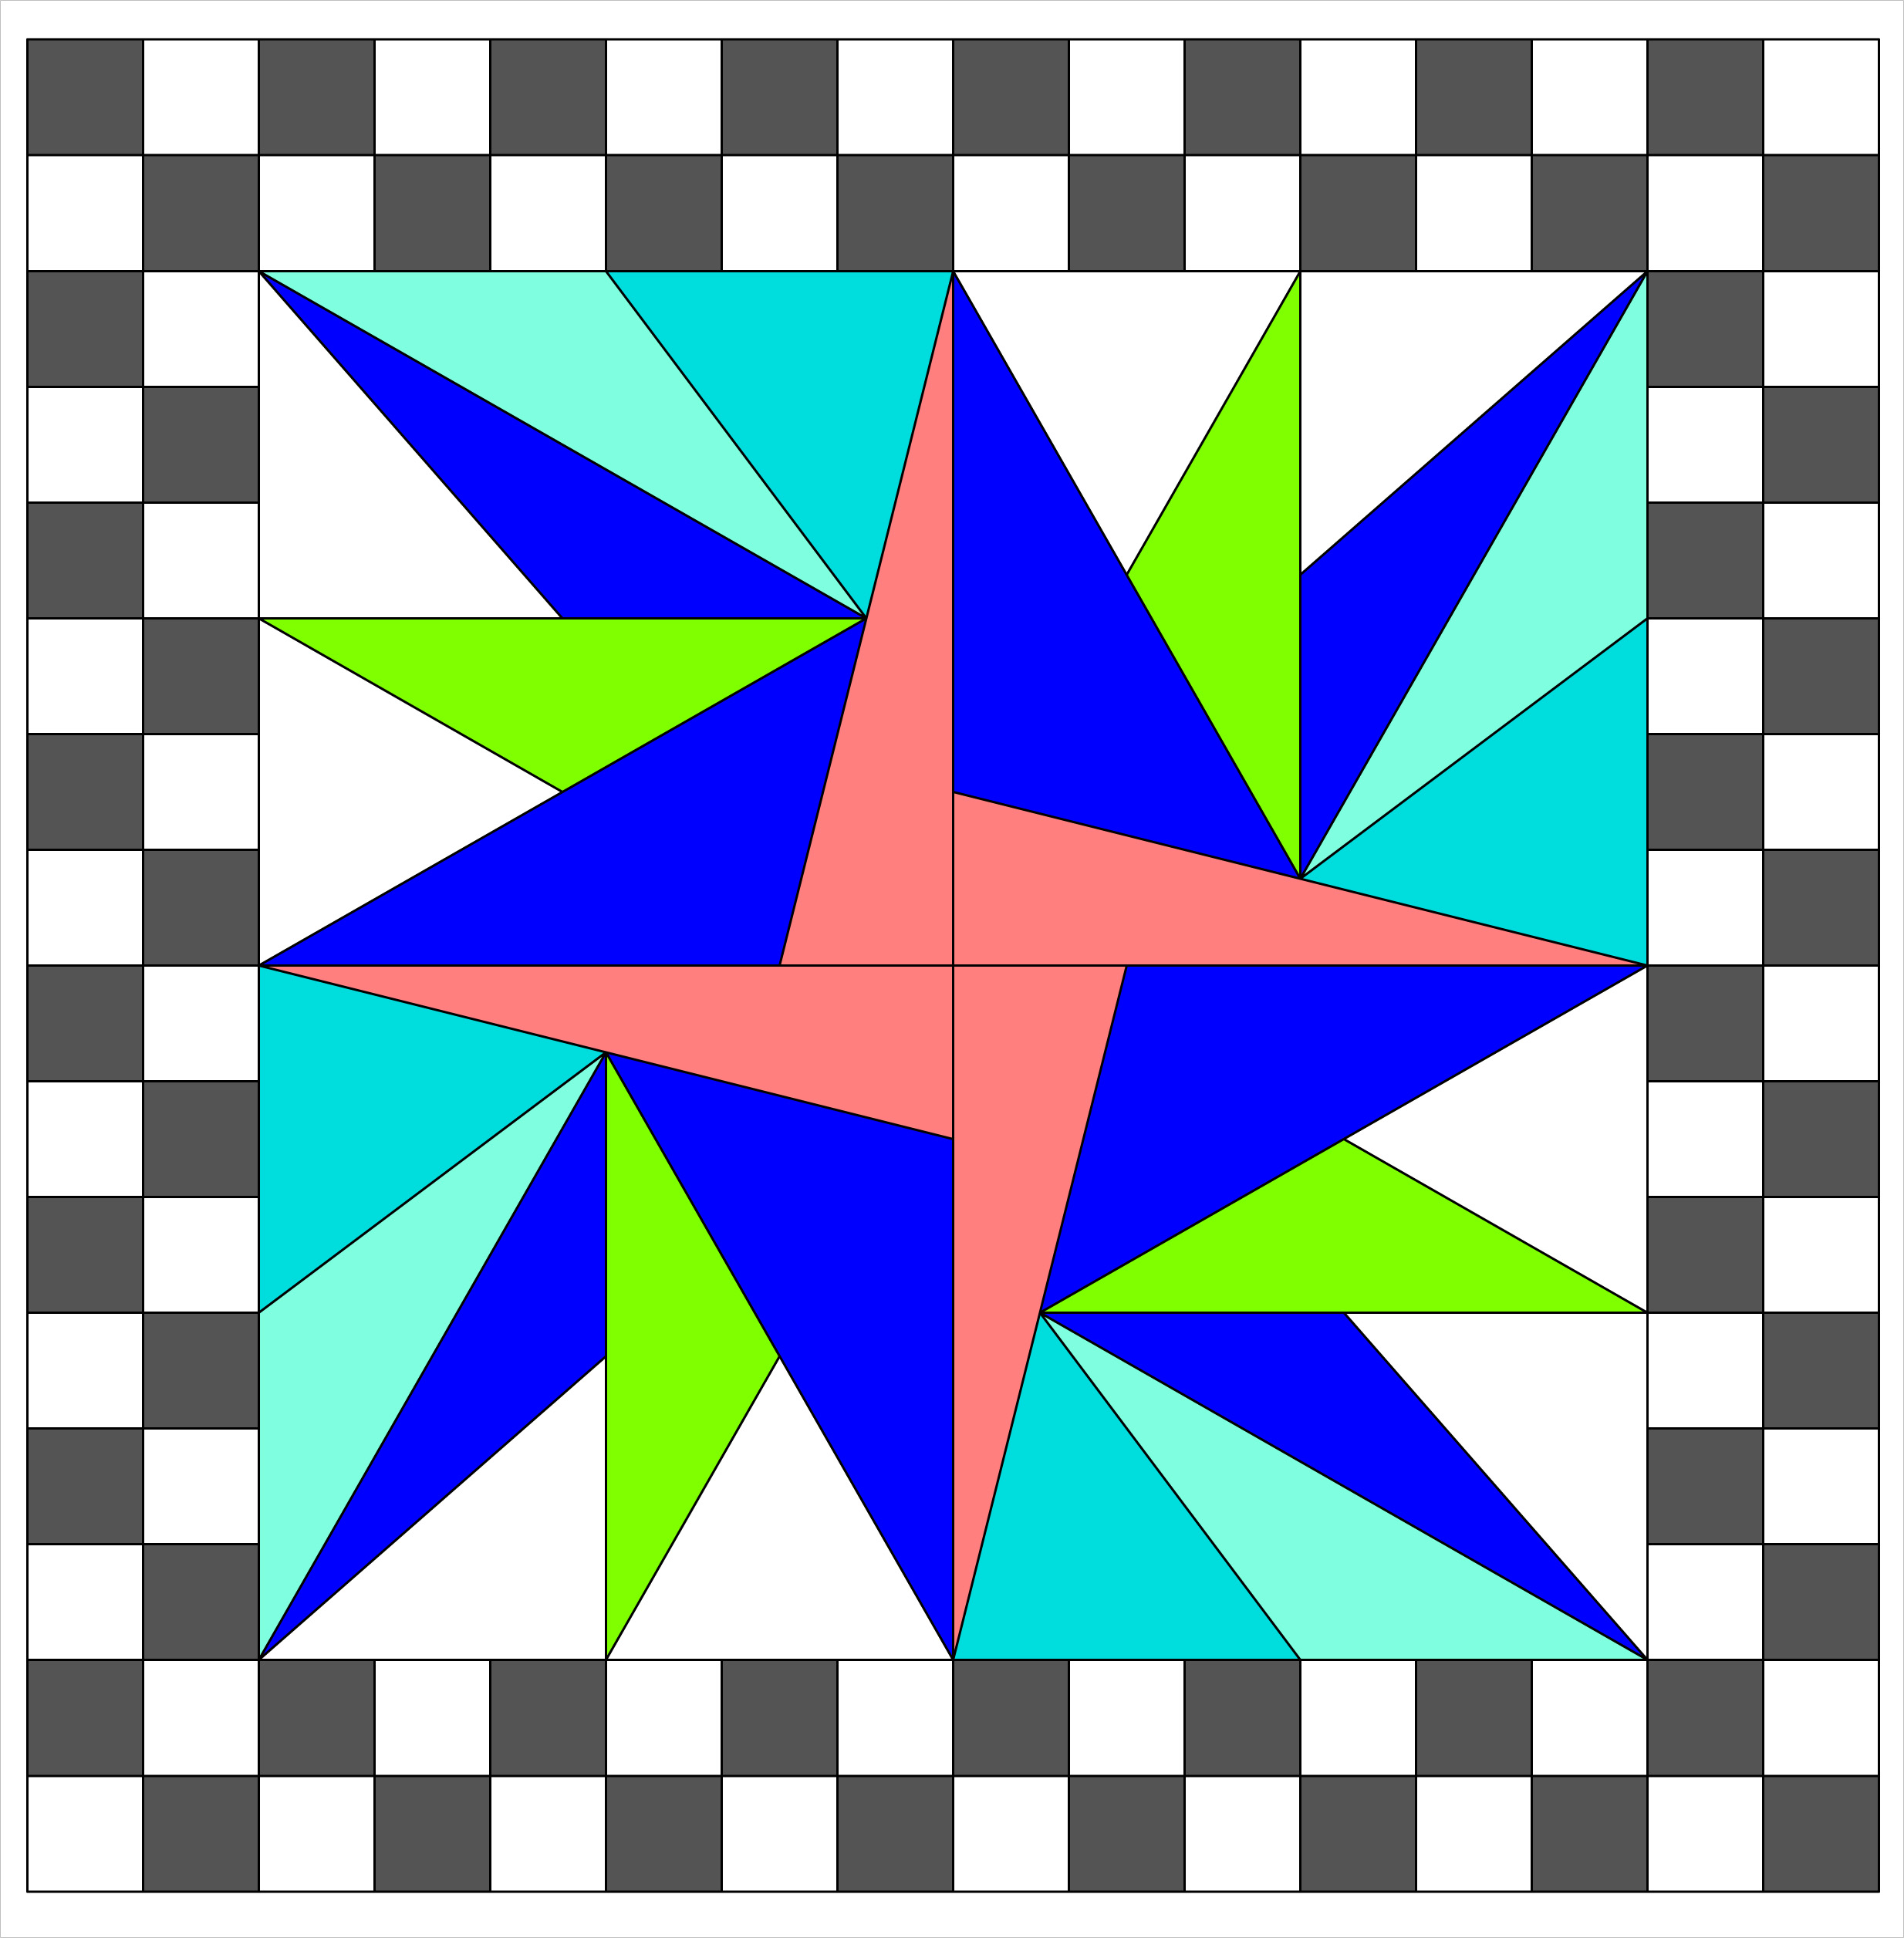
Summer Starburst Mini Quilt or Pillow with Checkerboard Border
Hmm . . . This mini quilt may be in my Mini Quilt Mania future!
Below are links to the rest of today’s original blocks. I hope you take a moment to discover some lovely new designs!
Today’s wonderful host is Yvonne of Quilting Jetgirl. Remember- she’s hosting a fabric giveaway today!
The rest of today’s blocks can be found on the following blogs:
Kelly @Quilting it Out
Martha @Once a Wingnut
Irene @Patchwork and Pastry
Andrea @The Sewing Fools
Bernie @Needle and Foot
Silvia @A Stranger View
Wanda @Wanda’s Life Sampler
Sandra @Musings of a Menopausal Melon
Vicki @Orchid Owl Quilts
Jess @Quilty Habit
Diana @Red Delicious Life
Chelsea @Patch the Giraffe
Margo @Shadow Lane Quilts
Renee @Quilts of a Feather
Tuesday’s Host is Cheryl at Meadow Mist Designs
Wednesday will be brought to you by Stephanie of Late Night Quilter
Terri Ann at Childlike Fascination will host the final group on Thursday

58 Comments
Yvonne @ Quilting Jetgirl
August 31, 2015 at 12:23 amThis is a beautiful block, Cassandra. Your instructions for paper piecing are so clear; I love the graphics you used to show how to position each fabric (and thank you so much for the instructions on how to pre-cut each piece – I appreciate that in a paper pieced pattern!).
Martha
August 31, 2015 at 12:44 amCassandra – Awesome block! It reminds me of a bird of paradise flower. Your illustrations are so professional (how did you do those) and the lighting in your photos is divine. Congratulations on a great block. I’m saving this design for a future project – Martha @ onceawingnut.com
Fabri-Quilt New Block Blog Hop & Giveaway! | Quilting Jetgirl
August 31, 2015 at 12:45 am[…] Jetgirl Kelly @Quilting it Out Martha @Once a Wingnut Irene @Patchwork and Pastry Cassandra @The (not so) Dramatic Life Andrea @The Sewing Fools Bernie @Needle and Foot Silvia @A Stranger View Wanda @Wanda’s Life […]
Margo
August 31, 2015 at 3:19 amWhat a great block and tutorial! Your block is beautiful and your instructions are clear. Love the demonstrations of each piece.
Jenny
August 31, 2015 at 4:35 amI can’t begin to imagine how much time this took but it is one of the clearest explanations of paper piecing I’ve seen. A technique I love! Those wonderful points….
Irene
August 31, 2015 at 6:32 amGreat Block!
Lisa
August 31, 2015 at 7:37 amThis is really beautiful Cassandra. I’lm impressed by the diagrams. You have great computer skills.
Kim S.
August 31, 2015 at 7:58 amBeautiful block, and you wrote a great tutorial for explaining the paper piecing process! Lovely!
Tish
August 31, 2015 at 8:21 amAs someone who loves paper piecing but is often confused on cutting my fabric…I’m going to make a bold statement…this is one of the best tutorials I have seen on paper piecing. Why? Because you actually show me how to cut my material and place it on the template. I also love that you provided graphics to show how the block would look in a quilt. Great job! And what a fun block.
rosa
August 31, 2015 at 8:36 amStunning block and layout!!
Kelly
August 31, 2015 at 9:20 amWow, your instructions are so clear and thorough. Thank you so much for the tutorial! Also, as a small side note, I have the same rotary cutter and I love it.
Cindy
August 31, 2015 at 9:40 amI like how you made this block, clear instructions and cutting directions. Neat block!
Jayne Willis
August 31, 2015 at 9:41 amLove it Cassandra! You did a great job not only on the block, but the graphics are fantastic!
Sherry B. in Sacramento
August 31, 2015 at 10:25 amAwesome job! Your tutorial was so clear and concise. It makes me feel like I am ready to try paper piecing. Thanks for sharing!
barbara woods
August 31, 2015 at 10:55 amBeautiful block
Vicki
August 31, 2015 at 10:59 amThis is a really great block! I’m super impressed with your paper piecing directions and the graphics! What program did you use to create those? I may need to hire you. :O)
Leanne Parsons
August 31, 2015 at 11:09 amThat is such a beautiful block! I love stars (my block features a star too!) and I could see this one made in so many different colour combinations.
Brenda Ackerman
August 31, 2015 at 11:41 amWonderful tutorial and such a spectacular quilt it creates. Thank you for sharing and have a wonderful creative day!
Renee
August 31, 2015 at 11:58 amThis block looks like a lot of fun to make! It looks great in the Watermelon Summer bundle colors too!
Stephanie
August 31, 2015 at 1:45 pmWhat a great block! It has so much energy. I love your suggestions for pattern layout.
Quilting Tangent
August 31, 2015 at 1:53 pmI like your block the most, it reminds me of a spinning pinwheel.
Brenda
August 31, 2015 at 2:20 pmStarbursts are among my favorite blocks and this one is glorious. I would love to see a quilt in “star” colors (i.e., “hot” colors in the yellow to red range and beyond) against a dark ground for a wonderful night view quilt.
helen
August 31, 2015 at 2:23 pmI have tried foundation paper piecing a once or twice and enjoyed it, thought my efforts were a little rough and ready. I’m feeling inspired to give it another go. Well done
Linda Webster
August 31, 2015 at 2:49 pmSummer Starburst is my favourite block! Thank you for such a detailed tutorial for paper piecing the sections. I also love the different layouts for quilts using Summer Starburst.
Carrie Wikander
August 31, 2015 at 2:58 pmWell, this is just awesome – I really, really love it. I cannot believe the amazing ideas everyone is coming up with – so fun! Great job!
Silvia Sutters
August 31, 2015 at 3:08 pmThis is a beautiful block and the instructions are so clear. I love how the Starburst moves and spins. You did an amazing job!
lori landenburger
August 31, 2015 at 4:01 pmWhat a wonderful tutorial!!!
I love a starburst block! I can see this in cottagy colors and Christmas… hmmm! My sis would love this quilt!! I know I do!!
XX!
Lori
Candy
August 31, 2015 at 4:31 pmGreat tutorial! Exacting what I have been looking for to begin my foray into paper piecing! Thank you!
Denise
August 31, 2015 at 6:28 pmI really like the setting of starburst and mirrored starburst – what great geometry! I haven’t tried a quilt’s worth of paper pieced identical blocks, but I really like this one….
Anja @ Anja Quilts
August 31, 2015 at 7:24 pmYou created an awesome block.
Diana @ Red Delicious Life
August 31, 2015 at 7:52 pmCassandra, this is a really great block! And man, I am so impressed with all of your graphics. I was originally going to do a video tutorial but ended up referring to others’ tutorials because I just couldn’t get the photos and graphics to look good. Yours are amazing and I love the alternate layouts, especially the mini.
Wanda Dotson
August 31, 2015 at 8:00 pmDramatic for the not so dramatic. Tutorials are your bailiwick
Hannah Jennings
August 31, 2015 at 9:26 pmThis is by far the BEST paper piecing tutorial I have ever seen, great job!!
Cabana Block TutorialThe Sewing Fools | The Sewing Fools
August 31, 2015 at 10:47 pm[…] Jetgirl Kelly @Quilting it Out Martha @Once a Wingnut Irene @Patchwork and Pastry Cassandra @The (not so) Dramatic Life Bernie @Needle and Foot Silvia @A Stranger View Wanda @Wanda’s Life Sampler Sandra @Musings of a […]
Susan
August 31, 2015 at 10:54 pmThat’s a wonderful looking block. I know a lot of people will try that one!
Lori Morton
August 31, 2015 at 11:00 pmWowie!! Great Block! Thanks for such an understandable Tutorial too! I have never paper-pieced before…think I could actually do this block! 🙂
Jinger
August 31, 2015 at 11:00 pmWonderful block Cassandra and really great instructions!
Andrea
August 31, 2015 at 11:05 pmSuch a crisp clean block. Reminds me of a birds of paradise
Dena
August 31, 2015 at 11:06 pmWoohoo! I love your block! Thanks so much for making your tutorial available on both your website and Craftsy. I hope to be able to make tutorials in the same manner. What program did you use to create a professional tutorial?
Lu
September 1, 2015 at 10:40 amJust beautiful Cassandra. Thank you so much for your inspiration.
Fabri-Quilt New Block Blog Hop: Blue Island Tribal Block Tutorial | The Carpenter's Daughter Who Quilts
September 1, 2015 at 4:11 pm[…] Jetgirl Kelly @Quilting it Out Martha @Once a Wingnut Irene @Patchwork and Pastry Cassandra @The (not so) Dramatic Life Andrea @The Sewing Fools Bernie @Needle and Foot Silvia @A Stranger View Wanda @Wanda’s Life […]
Subject to Change: Fabri-Quilt New Block Blog Hop | Wanda's Life Sampler
September 1, 2015 at 6:27 pm[…] @Quilting JetgirlKelly @Quilting it OutMartha @Once a WingnutIrene @Patchwork and PastryCassandra @The (not so) Dramatic LifeAndrea @The Sewing FoolsBernie @Needle and FootSilvia @A Stranger ViewWanda @Wanda’s Life […]
DebraKay Neiman
September 1, 2015 at 8:30 pmThank you for the informative paper piecing tutorial. I am a beginner. I follow You and Inspired by Fabric by Bloglovin. crystalbluern at onlineok dot com
Terri Ann
September 1, 2015 at 11:38 pmSuch a great starburst block, I bet this would be fun to play with different color combinations with for a really bold quilt. So glad you shared it with us, I can’t wait to try one sometime!
It’s Finally Here!!!! | quilt'n party
September 2, 2015 at 11:46 am[…] Jetgirl Kelly @Quilting it Out Martha @Once a Wingnut Irene @Patchwork and Pastry Cassandra @The (not so) Dramatic Life Andrea @The Sewing Fools Bernie @Needle and Foot Silvia @A Stranger View Wanda @Wanda’s Life […]
Fabri-Quilt New Block Blog Hop and Giveaway - Hoops & Thimbles
September 3, 2015 at 10:56 am[…] @Quilting it Out Martha @Once a Wingnut Irene @Patchwork and Pastry Cassandra @The (not so) Dramatic Life Andrea @The Sewing Fools Bernie @Needle and Foot Silvia @A Stranger View Wanda @Wanda’s Life […]
MoeWest
September 3, 2015 at 3:09 pmThanks for this great block! The pattern is very well written. I could have used one this clear when I first tried paper piecing! It would have saved some unsewing.
The 2015 Fabri-Quilt new block blog hop | One million stitches …
September 3, 2015 at 6:11 pm[…] @Quilting it Out Martha @Once a Wingnut Irene @Patchwork and Pastry Cassandra @The (not so) Dramatic Life Andrea @The Sewing Fools Bernie @Needle and Foot Silvia @A Stranger View Wanda @Wanda’s Life […]
Julie Stocker
September 5, 2015 at 8:21 pmSuper tutorial and beautifully designed block! Paper piecing isn’t my forte, but I would be tempted to give this pattern a whirl.
Julie @ Pink Doxies
Liz
September 6, 2015 at 12:12 pmThis is a beautiful block, and would stand up just as well on it’s own (perhaps as a mini in you’re mini quilt series) as it does joined together in a full-size quilt. You’ve done an amazing job at explaining the paper piecing technique too.
Brianna Robertson
September 15, 2015 at 5:32 pmLove it! It would go nicely with my paper-pieced block, I think 🙂 I may have to do a sampler with a few of them!
Summer Starburst: Mini Quilt #32 | The (not so) Dramatic Life
October 6, 2015 at 11:27 pm[…] had so much fun sharing a new block design last month for the New Blogger’s Block Hop, and I am so glad to finally have the binding on […]
A Planner made just for Quilters! | The (not so) Dramatic Life
October 28, 2015 at 11:03 am[…] many features is a quilt block pattern for every week of the year. I am thrilled that my block, Summer Starburst, is included, and I am so excited to see how this book comes […]
Charity Quilts | Quilting Jetgirl
November 16, 2015 at 3:01 am[…] Cassandra @The (not so) Dramatic Life […]
Lap Charity Quilt | Quilting Jetgirl
December 11, 2015 at 3:03 am[…] Cassandra @The (not so) Dramatic Life […]
Liz Bess
January 17, 2016 at 10:26 amI have been so afraid to try paper piecing, you have made it seem more understandable. Thank you, I think I should be able to attempt and create this block and I have a paper pieced pattern my mom bought for me a few years ago that I have been afraid to attempt.
Rashad Honga
October 23, 2016 at 11:42 pmGreetings from Los angeles!
Paper piecing Star Bee update – October – Cassandra Madge
January 26, 2021 at 5:32 am[…] Summer Starburst, which is designed by another Cassandra at The not so Dramatic Life and you can download it from her site – HERE. I really like this block because the angled piecing gives you lots of options to play around and […]